Dell Studio One 19 1909 Studio One 19 Service Manual - Page 7
Battery
 |
View all Dell Studio One 19 1909 manuals
Add to My Manuals
Save this manual to your list of manuals |
Page 7 highlights
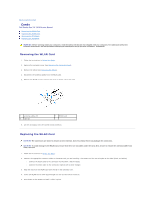
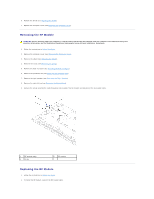
Back to Contents Page Battery Dell Studio One 19/1909 Service Manual Removing the Battery Replacing the Battery WARNING: Before working inside your computer, read the safety information that shipped with your computer. For additional safety best practices information, see the Regulatory Compliance Homepage at www.dell.com/regulatory_compliance. WARNING: A new battery can explode if it is incorrectly installed. Replace the battery only with the same or equivalent type recommended by the manufacturer. Discard used batteries according to the manufacturer's instructions. Removing the Battery 1. Record all the screens in system setup (see System Setup) so that you can restore the correct settings in step 7. 2. Follow the procedures in Before You Begin. 3. Remove the computer cover (see Removing the Computer Cover). 4. Remove the shield (see Removing the Shield). 5. Disconnect the cables to the connectors HDD_POWER and SATA_1 (see System Board Components). 6. Locate the battery socket on the system board (see System Board Components). CAUTION: If you pry the battery out of its socket with a blunt object, be careful not to touch the system board with the object. Ensure that the object is inserted between the battery and the socket before you attempt to pry out the battery. Otherwise, you may damage the system board by prying off the socket or by breaking circuit traces on the system board. 7. Carefully press the battery release lever away from the battery and the battery will pop out. 8. Remove the battery from the system and properly dispose of the battery. 1 coin-cell battery 2 battery socket
-
 1
1 -
 2
2 -
 3
3 -
 4
4 -
 5
5 -
 6
6 -
 7
7 -
 8
8 -
 9
9 -
 10
10 -
 11
11 -
 12
12 -
13
-
14
-
15
-
16
-
17
-
18
-
19
-
20
-
21
-
22
-
23
-
24
-
25
-
26
-
27
-
28
-
29
-
30
-
31
-
32
-
33
-
34
-
35
-
36
-
37
-
38
-
39
-
40
-
41
-
42
-
43
-
44
-
45
-
46
-
47
-
48
-
49
-
50
-
51
-
52
-
53
 |
 |
