Dell Studio One 19 1909 Studio One 19 Service Manual - Page 8
Replacing the Battery
 |
View all Dell Studio One 19 1909 manuals
Add to My Manuals
Save this manual to your list of manuals |
Page 8 highlights
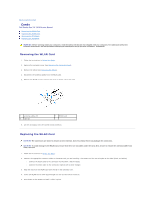
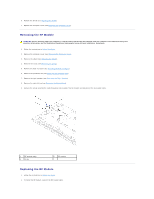
Replacing the Battery 1. Follow the procedures in Before You Begin. 2. Insert the new battery into the socket with the side labeled "+" facing up and then snap the battery into place. 3. Reconnect the cables to the connectors HDD_POWER and SATA_1 (see System Board Components). 4. Replace the shield (see Replacing the Shield). 5. Replace the computer cover (see Replacing the Computer Cover). 6. Connect your computer and devices to electrical outlets, and then turn them on. 7. Enter system setup (see System Setup) and restore the settings you recorded in step 1. Back to Contents Page
-
 1
1 -
2
-
 3
3 -
 4
4 -
 5
5 -
 6
6 -
 7
7 -
 8
8 -
 9
9 -
 10
10 -
 11
11 -
 12
12 -
 13
13 -
14
-
15
-
16
-
17
-
18
-
19
-
20
-
21
-
22
-
23
-
24
-
25
-
26
-
27
-
28
-
29
-
30
-
31
-
32
-
33
-
34
-
35
-
36
-
37
-
38
-
39
-
40
-
41
-
42
-
43
-
44
-
45
-
46
-
47
-
48
-
49
-
50
-
51
-
52
-
53
 |
 |

Replacing the Battery
1.
Follow the procedures in
Before You Begin
.
2.
Insert the new battery into the socket with the side labeled "+" facing up and then snap the battery into place.
3.
Reconnect the cables to the connectors HDD_POWER and SATA_1 (see
System Board Components
).
4.
Replace the shield (see
Replacing the Shield
).
5.
Replace the computer cover (see
Replacing the Computer Cover
).
6.
Connect your computer and devices to electrical outlets, and then turn them on.
7.
Enter system setup (see
System Setup
) and restore the settings you recorded in
step 1
.
Back to Contents Page