Dell V505 All In One Inkjet Printer User's Guide - Page 17
Number, Use the, Orange, Orange blinking, Initiate a copy, scan, or fax.
 |
View all Dell V505 All In One Inkjet Printer manuals
Add to My Manuals
Save this manual to your list of manuals |
Page 17 highlights
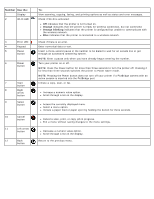
Number Use the: 1 Display 2 Wi-Fi LED 3 Error LED 4 Keypad 5 Pause button 6 Power button 7 Start button 8 Right arrow button 9 Select button 10 Cancel button 11 Left arrow button 12 Back button To: View scanning, copying, faxing, and printing options as well as status and error messages. Check if Wi-Fi is activated: Off indicates that the printer is not turned on. Orange indicates that the printer is ready for wireless connection, but not connected. Orange blinking indicates that the printer is configured but unable to communicate with the wireless network. Blue indicates that the printer is connected to a wireless network. Check if there is an error. Enter numerical data or text. Insert a three-second pause in the number to be dialed to wait for an outside line or get through an automated answering system. NOTE: Enter a pause only when you have already begun entering the number. Turn your printer on or off. NOTE: Press the Power button for more than three seconds to turn the printer off. Pressing it for less than three seconds switches the printer to Power Saver mode. NOTE: Pressing the Power button does not turn off your printer if a PictBridge camera with an active session is inserted into the PictBridge port. Initiate a copy, scan, or fax. Increase a numeric value option. Scroll through a list on the display. Access the currently displayed menu. Select a menu option. Initiate a paper feed or paper eject by holding the button for three seconds. Cancel a scan, print, or copy job in progress. Exit a menu without saving changes to the menu settings. Decrease a numeric value option. Scroll through a list on the display. Return to the previous menu.
-
 1
1 -
2
-
3
-
4
-
5
-
6
-
7
-
8
-
9
-
10
-
11
-
 12
12 -
 13
13 -
 14
14 -
 15
15 -
 16
16 -
 17
17 -
 18
18 -
 19
19 -
 20
20 -
 21
21 -
 22
22 -
23
-
24
-
25
-
26
-
27
-
28
-
29
-
30
-
31
-
32
-
33
-
34
-
35
-
36
-
37
-
38
-
39
-
40
-
41
-
42
-
43
-
44
-
45
-
46
-
47
-
48
-
49
-
50
-
51
-
52
-
53
-
54
-
55
-
56
-
57
-
58
-
59
-
60
-
61
-
62
-
63
-
64
-
65
-
66
-
67
-
68
-
69
-
70
-
71
-
72
-
73
-
74
-
75
-
76
-
77
-
78
-
79
-
80
-
81
-
82
-
83
-
84
-
85
-
86
-
87
-
88
-
89
-
90
-
91
-
92
-
93
-
94
-
95
-
96
-
97
-
98
-
99
-
100
-
101
-
102
-
103
-
104
-
105
-
106
-
107
-
108
-
109
-
110
-
111
-
112
-
113
-
114
-
115
-
116
-
117
-
118
-
119
-
120
-
121
-
122
-
123
-
124
-
125
-
126
-
127
-
128
-
129
-
130
-
131
-
132
-
133
-
134
-
135
-
136
-
137
-
138
-
139
-
140
-
141
-
142
-
143
-
144
-
145
-
146
-
147
-
148
-
149
-
150
-
151
-
152
-
153
-
154
-
155
-
156
-
157
-
158
-
159
-
160
-
161
-
162
-
163
-
164
-
165
-
166
-
167
-
168
-
169
-
170
-
171
-
172
-
173
 |
 |
