Dell V505 All In One Inkjet Printer User's Guide - Page 30
Select Connection Type, Wireless Connection, Con Wireless, Select, Setup, Network Setup
 |
View all Dell V505 All In One Inkjet Printer manuals
Add to My Manuals
Save this manual to your list of manuals |
Page 30 highlights
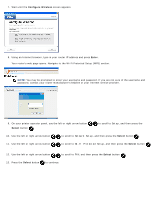
6. From the Select Connection Type screen, select Wireless Connection, and then click Next. 7. Wait until the Configure Wireless screen appears. 8. On your printer operator panel, use the left or right arrow button Select button . to scroll to Setup, and then press the 9. Use the left or right arrow button to scroll to Network Setup, and then press the Select button . 10. Use the left or right arrow button . 11. Use the left or right arrow button to scroll to Wi-Fi Protected Setup, and then press the Select button to scroll to Push Button, and then press the Select button . 12. Press the Select button to continue. 13. Go to your router, and then press the push button on your router within two minutes. Wait for the configuration to complete. NOTE: Some routers may require less time or more time to configure. Refer to your router's manual to see the time required to push the router button before setup connection expires. If setup is successful Wi-Fi Protected Setup Successful appears on the printer operator panel. Check if the printer's Wi-Fi LED turns blue. For more information, see Wi-Fi LED. Continue with step 15. If setup is unsuccessful or times out Wait for a few minutes, and then perform step 8 to step 13 again.
-
 1
1 -
2
-
3
-
4
-
5
-
6
-
7
-
8
-
9
-
10
-
11
-
12
-
13
-
14
-
15
-
16
-
17
-
18
-
19
-
20
-
21
-
22
-
23
-
24
-
 25
25 -
 26
26 -
 27
27 -
 28
28 -
 29
29 -
 30
30 -
 31
31 -
 32
32 -
 33
33 -
 34
34 -
 35
35 -
36
-
37
-
38
-
39
-
40
-
41
-
42
-
43
-
44
-
45
-
46
-
47
-
48
-
49
-
50
-
51
-
52
-
53
-
54
-
55
-
56
-
57
-
58
-
59
-
60
-
61
-
62
-
63
-
64
-
65
-
66
-
67
-
68
-
69
-
70
-
71
-
72
-
73
-
74
-
75
-
76
-
77
-
78
-
79
-
80
-
81
-
82
-
83
-
84
-
85
-
86
-
87
-
88
-
89
-
90
-
91
-
92
-
93
-
94
-
95
-
96
-
97
-
98
-
99
-
100
-
101
-
102
-
103
-
104
-
105
-
106
-
107
-
108
-
109
-
110
-
111
-
112
-
113
-
114
-
115
-
116
-
117
-
118
-
119
-
120
-
121
-
122
-
123
-
124
-
125
-
126
-
127
-
128
-
129
-
130
-
131
-
132
-
133
-
134
-
135
-
136
-
137
-
138
-
139
-
140
-
141
-
142
-
143
-
144
-
145
-
146
-
147
-
148
-
149
-
150
-
151
-
152
-
153
-
154
-
155
-
156
-
157
-
158
-
159
-
160
-
161
-
162
-
163
-
164
-
165
-
166
-
167
-
168
-
169
-
170
-
171
-
172
-
173
 |
 |
