Dell V505 All In One Inkjet Printer User's Guide - Page 39
Black and White, On Hook Dial
 |
View all Dell V505 All In One Inkjet Printer manuals
Add to My Manuals
Save this manual to your list of manuals |
Page 39 highlights
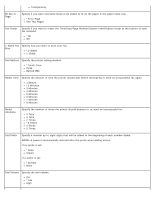
1. From the main menu, use the left and right Arrow buttons to scroll to FAX. 2. Press the Select button . 3. The display asks for a phone number. Press the Select button . 4. Press the right Arrow button . until the heading you want appears on the display, and then press the Select button 5. Use the left and right Arrow buttons to scroll through the available menu items. 6. When the setting you want appears on the display, press the Select button submenu. In order for faxing to function properly: to save the setting or enter the The printer's FAX connector ( -lower connector) must be connected to an active telephone line. See Setting Up the Printer With External Devices for setup details. NOTE: You cannot fax with a DSL (digital subscriber line) or ISDN (integrated signature digital network) unless you purchase a digital line filter. Contact your Internet Service Provider for more details. If you are sending a fax from within an application, the printer must be connected to a computer with a USB cable. From this menu item: Fax Color You can: Specify your fax to be color or black and white. *Black and White Color Phone Book On Hook Dial Delay Fax Quality Specify the action which you want to perform in your Phone Book. View Add Remove Modify Print For more information about your Phone Book, see Using Speed Dial. Press the Select button if you want the printer to go off hook. Send a delayed fax or view faxes waiting to be sent. Delay Until View Pending Specify the quality (resolution) of the fax being sent. *Standard Fine Superfine Ultrafine Dark Use the left and right Arrow buttons to specify the darkness setting. Default darkness setting is
-
 1
1 -
2
-
3
-
4
-
5
-
6
-
7
-
8
-
9
-
10
-
11
-
12
-
13
-
14
-
15
-
16
-
17
-
18
-
19
-
20
-
21
-
22
-
23
-
24
-
25
-
26
-
27
-
28
-
29
-
30
-
31
-
32
-
33
-
 34
34 -
 35
35 -
 36
36 -
 37
37 -
 38
38 -
 39
39 -
 40
40 -
 41
41 -
 42
42 -
 43
43 -
 44
44 -
45
-
46
-
47
-
48
-
49
-
50
-
51
-
52
-
53
-
54
-
55
-
56
-
57
-
58
-
59
-
60
-
61
-
62
-
63
-
64
-
65
-
66
-
67
-
68
-
69
-
70
-
71
-
72
-
73
-
74
-
75
-
76
-
77
-
78
-
79
-
80
-
81
-
82
-
83
-
84
-
85
-
86
-
87
-
88
-
89
-
90
-
91
-
92
-
93
-
94
-
95
-
96
-
97
-
98
-
99
-
100
-
101
-
102
-
103
-
104
-
105
-
106
-
107
-
108
-
109
-
110
-
111
-
112
-
113
-
114
-
115
-
116
-
117
-
118
-
119
-
120
-
121
-
122
-
123
-
124
-
125
-
126
-
127
-
128
-
129
-
130
-
131
-
132
-
133
-
134
-
135
-
136
-
137
-
138
-
139
-
140
-
141
-
142
-
143
-
144
-
145
-
146
-
147
-
148
-
149
-
150
-
151
-
152
-
153
-
154
-
155
-
156
-
157
-
158
-
159
-
160
-
161
-
162
-
163
-
164
-
165
-
166
-
167
-
168
-
169
-
170
-
171
-
172
-
173
 |
 |
