Dewalt DW723 Instruction Manual - Page 3
Miter Saw Stand with Folding Legs, DW723, Tools Required, General Safety Instructions for Miter, Saw
 |
View all Dewalt DW723 manuals
Add to My Manuals
Save this manual to your list of manuals |
Page 3 highlights
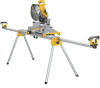
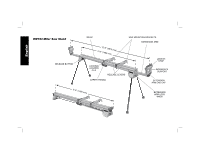
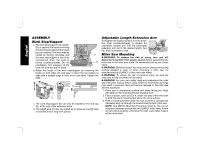
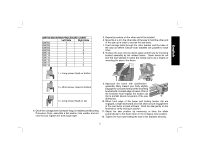
English Definitions: Safety Guidelines The definitions below describe the level of severity for each signal word. Please read the manual and pay attention to these symbols. DANGER: Indicates an imminently hazardous situation which, if not avoided, will result in death or serious injury. WARNING: Indicates a potentially hazardous situation which, if not avoided, could result in death or serious injury. CAUTION: Indicates a potentially hazardous situation which, if not avoided, may result in minor or moderate injury. CAUTION: Used without the safety alert symbol indicates a potentially hazardous situation which, if not avoided, may result in property damage. IF YOU HAVE ANY QUESTIONS OR COMMENTS ABOUT THIS OR ANY DEWALT TOOL, CALL US TOLL FREE AT: 1-800-4-DEWALT (1-800-433-9258) Miter Saw Stand with Folding Legs DW723 This stand is designed for use with most miter saws. If you have any problem with alignment or mounting, call 1-800-4-DEWALT (1-800-433-9258). WARNING: For your own safety, read the miter saw instruction manual before using any accessory. Failure to heed these warnings may result in personal injury and serious damage to the miter saw and the accessory. When servicing this tool, use only identical replacement parts. Tools Required 1. Socket or wrench set 2. Drill with 3/8" (9.5 mm) drill bit (Not required for DEWALT Miter Saws) 3. Phillips #2 screwdriver General Safety Instructions for Miter Saw Accessories WARNING: To reduce the risk of personal injury: • ALWAYS use eye protection. All users and bystanders must wear eye protection that conforms to ANSI Z87.1. • DO NOT exceed the weight this stand can hold. The main center beam of the miter saw stand is designed to support 500 lbs. (227 kg.) safely in a work environment. It is unsafe to climb, sit or stand on the stand. • Follow the mounting instructions carefully. Fasten the tool to the saw mounting brackets securely as instructed. • DO NOT modify or use stand for operations for which it is unintended. • DO NOT use the stand on uneven surfaces. The stand is designed to be used on a flat, stable surface. PREPARATION Lay the miter saw stand on the floor with the folded legs on top. Push the locking pin and A pull each leg up until the locking pin (A) clicks into its detent. Lift the stand by the center beam and place it in an upright position. The stand should be stable and should not rock. Check the legs to be sure that the locking pins have engaged and the legs are firmly held in place. 1
-
 1
1 -
 2
2 -
 3
3 -
 4
4 -
 5
5 -
 6
6 -
 7
7 -
 8
8 -
 9
9 -
10
-
11
-
12
-
13
-
14
-
15
-
16
-
17
-
18
-
19
-
20
-
21
-
22
-
23
-
24
 |
 |