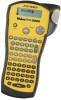
Dymo 15517 User Guide
Dymo 15517 Manual
 |
View all Dymo 15517 manuals
Add to My Manuals
Save this manual to your list of manuals |
Dymo 15517 manual content summary:
- Dymo 15517 | User Guide - Page 1
User Guide www.dymo.com/industrial - Dymo 15517 | User Guide - Page 2
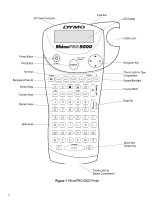
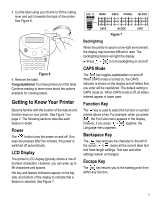
Power Button Print Button Hot Keys Backspace/Clear All Symbol Keys Function Keys Numeric Keys Alpha Keys Tape Exit LCD Display Cutter Lever Navigation Key Thumb Latch for Tape Compartment Escape/Backlight Function/Shift Enter/OK Space Bar/ Symbol Key Thumb Latch for Battery Compartment Figure - Dymo 15517 | User Guide - Page 3
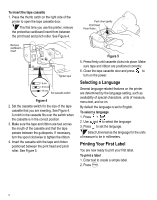
card and return it to the appropriate customer service address within seven days. Visit www.dymo.com/ industrial for details. Getting Started Follow the instructions in this section to get started by printing your first label. Power Supply The printer can operate on AC or battery power. To - Dymo 15517 | User Guide - Page 4
thumb catch on the right side of the printer to open the tape cassette door. The first time you use the printer, remove the protective cardboard insert from between millimeters. Printing Your First Label You are now ready to print your first label. To print a label 1. Enter text to create a simple - Dymo 15517 | User Guide - Page 5
and pull it towards the back of the printer. See Figure 6. Figure 6 4. Remove the label. Congratulations! You have printed your first label. Continue reading to learn more about the options available for creating labels. Getting to Know Your Printer Become familiar with the location of the feature - Dymo 15517 | User Guide - Page 6
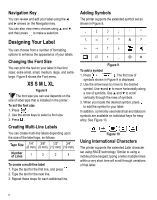
: Tape Size 1/4" (6 mm) 3/8" (9 mm) 1/2" 3/4" (12 mm) (19 mm) Number of Lines 1 2 2 4 To create a multi-line label 1. Type the text for the first line, and press . 2. Type the text for the next line. 3. Repeat these steps for each additional line. Adding Symbols The printer supports the - Dymo 15517 | User Guide - Page 7
the width of the cable and repeated so that you can read the label from any angle. You can select from a number of different wire gauges AWG CABLE 6.0" Figure 12 To print vertical wire wraps 1. Enter the text for the label. 2. Press . WRAP 3. Use the arrow keys to move to the desired wire gauge - Dymo 15517 | User Guide - Page 8
of text that will print on the label determines the minimum length of a label, regardless of the fixed length you set manually. For example, setting a fixed length of 0.50" for a label with 20 characters would have no effect on the label length. To set the label length 1. Press . FIXED 2. Press to - Dymo 15517 | User Guide - Page 9
. 2. Press VERT and then Print . Printing Barcode Labels +VERT . The printer can generate two types of barcodes: CODE-39 and CODE-128. You can only print a barcode on 3/4" (19 mm) label tape. The barcode will print horizontally along the label with the text in small print underneath the barcode. You - Dymo 15517 | User Guide - Page 10
designed to give you long and trouble-free service, while requiring very little maintenance. Clean your printer from time to time to keep it working properly. Clean the cutter blade each time you replace the tape cassette. To clean the cutter blade 1. Remove the tape cassette. 2. Press and hold down - Dymo 15517 | User Guide - Page 11
Troubleshooting Review the following possible solutions if you encounter a problem while using your printer. Problem/Error Message Solution No display • Ensure the printer is turned on. • Replace discharged batteries. Poor Print Quality • Replace discharged batteries. • Ensure tape cassette - Dymo 15517 | User Guide - Page 12
, commercial and light industrial environments. Esselte is an ISO 14000 registered company. Plastic components of this printer have been marked to enable final disposal in a manner that is sensitive to the environment. DYMO Corporation 44 Commerce Road Stamford, CT 06902-4561 (203) 355-9000 © 2003
-
 1
1 -
 2
2 -
 3
3 -
 4
4 -
 5
5 -
 6
6 -
 7
7 -
8
-
9
-
10
-
11
-
12
 |
 |
www.dymo.com/industrial
User Guide