Dymo 15517 User Guide - Page 4
Selecting a Language, Printing Your First Label - label printer
 |
View all Dymo 15517 manuals
Add to My Manuals
Save this manual to your list of manuals |
Page 4 highlights
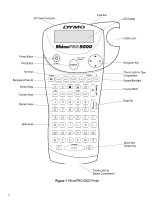
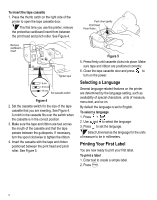
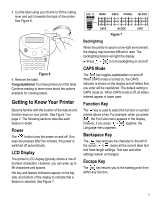
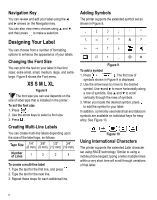
To insert the tape cassette 1. Press the thumb catch on the right side of the printer to open the tape cassette door. The first time you use the printer, remove the protective cardboard insert from between the print head and pinch roller. See Figure 4. Push down gently Print Head Pinch Roller Remove cardboard insert Tighten tape = 6 mm = 9/12 mm = 19 mm Set cassette switch Figure 4 2. Set the cassette switch for the size of the tape cassette that you are inserting. See Figure 4. A notch in the cassette fits over the switch when the cassette is in the correct position. 3. Make sure the tape and ribbon are taut across the mouth of the cassette and that the tape passes between the guideposts. If necessary, turn the spool clockwise to tighten the ribbon. 4. Insert the cassette with the tape and ribbon positioned between the print head and pinch roller. See Figure 5. Figure 5 5. Press firmly until cassette clicks into place. Make sure tape and ribbon are positioned correctly. 6. Close the tape cassette door and press to turn on the power. Selecting a Language Several language-related features on the printer are determined by the language setting, such as availability of special characters, units of measure, menu text, and so on. By default the language is set to English. To select a language 1. Press + SIZE . 2. Use and to select the language. 3. Press to set the language. Select Universal as the language for the units of measure to be in millimeters. Printing Your First Label You are now ready to print your first label. To print a label 1. Enter text to create a simple label. 2. Press Print . 4
-
 1
1 -
 2
2 -
 3
3 -
 4
4 -
 5
5 -
 6
6 -
 7
7 -
 8
8 -
 9
9 -
 10
10 -
11
-
12
 |
 |
