Dymo 15517 User Guide - Page 6
Designing Your Label, XSM L XL - review
 |
View all Dymo 15517 manuals
Add to My Manuals
Save this manual to your list of manuals |
Page 6 highlights
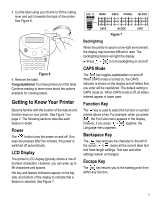
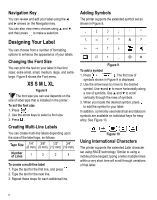
Navigation Key You can review and edit your label using the and arrows on the Navigation key. You can also view menu choices using and , and then press to make a selection. Designing Your Label You can choose from a number of formatting options to enhance the appearance of your labels. Changing the Font Size You can print the text on your label in five font sizes: extra-small, small, medium, large, and extralarge. Figure 8 shows the Font menu. XS S M L XL Figure 8 The font size you can use depends on the size of label tape that is installed in the printer. To set the font size 1. Press SIZE . 2. Use the arrow keys to select a font size. 3. Press . Creating Multi-Line Labels You can create multi-line labels depending upon the size of the label tape, as follows: Tape Size 1/4" (6 mm) 3/8" (9 mm) 1/2" 3/4" (12 mm) (19 mm) Number of Lines 1 2 2 4 To create a multi-line label 1. Type the text for the first line, and press . 2. Type the text for the next line. 3. Repeat these steps for each additional line. Adding Symbols The printer supports the extended symbol set as shown in Figure 9. , ( ) ; ' " \= ² ° &? ∅ ∗ _@± Figure 9 To add a symbol 1. Press + . The first row of symbols shown in Figure 9 is displayed. 2. Use the arrow keys to move to the desired symbol. Use and to move horizontally along a row of symbols. Use and to scroll vertically through the rows of symbols. 3. When you locate the desired symbol, press to add the symbol to your label. In addition, commonly used electrical and datacom symbols are available on individual keys for easy entry. See Figure 10. Figure 10 Using International Characters The printer supports the extended Latin character set using RACE technology. Similar to using a mobile phone keypad, typing a letter multiple times within a very short time will scroll through variations of that letter. 6
-
 1
1 -
 2
2 -
 3
3 -
 4
4 -
 5
5 -
 6
6 -
 7
7 -
 8
8 -
 9
9 -
 10
10 -
 11
11 -
 12
12
 |
 |
