Dymo 15517 User Guide - Page 5
Getting to Know Your Printer
 |
View all Dymo 15517 manuals
Add to My Manuals
Save this manual to your list of manuals |
Page 5 highlights
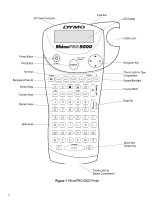
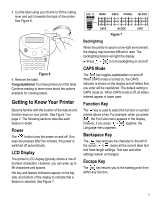
3. Cut the label using your thumb to lift the cutting lever and pull it towards the back of the printer. See Figure 6. Figure 6 4. Remove the label. Congratulations! You have printed your first label. Continue reading to learn more about the options available for creating labels. Getting to Know Your Printer Become familiar with the location of the feature and function keys on your printer. See Figure 1 on page 2. The following sections describe each feature in detail. Power The button turns the power on and off. If no keys are pressed after five minutes, the power is switched off automatically. LCD Display The printer's LCD display typically shows a row of fourteen characters. However, you can enter up to 99 characters and spaces. Hot key and feature indicators appear on the top, side, and bottom of the display to indicate that a feature is selected. See Figure 7. SIZE: XL BATTERY WRAP FIXED PPANEL TBLOCK LINE CAPS BCODE Figure 7 VERT Backlighting When the printer is used in a low-light environment, the display may become difficult to read. The backlighting feature will light the display. ➤ Press + ESC to turn backlighting on and off. CAPS Mode The CAPS key toggles capitalization on and off. When CAPS mode is turned on, the CAPS indicator is shown on the display and all letters that you enter will be capitalized. The default setting is CAPS mode on. When CAPS mode is off, all letters entered appear in lower case. Function Key The key is used to select the function or symbol printed above a key. For example, when you press SIZE , the Font size menu appears in the display; however, if you press + SIZE together, the Language menu appears. Backspace Key The key removes the character to the left of the cursor. + clears all the current label text and fixed-length settings. Text size and other settings remain unchanged. Escape Key The ESC key returns you to the starting point from within any function. 5
-
 1
1 -
 2
2 -
 3
3 -
 4
4 -
 5
5 -
 6
6 -
 7
7 -
 8
8 -
 9
9 -
 10
10 -
 11
11 -
12
 |
 |
