Dymo 15605 Instruction Manual
Dymo 15605 Manual
 |
View all Dymo 15605 manuals
Add to My Manuals
Save this manual to your list of manuals |
Dymo 15605 manual content summary:
- Dymo 15605 | Instruction Manual - Page 1
Instruction Manual POWER Multiple Copies CLEAR LANG PRINT SIZE UNITS STYLE FEED SAVE CAPS ESC BOX/UL RECALL DATA SEC PANEL O N [ ] / = : -1 + 2 - 3 . 4 % 5 | E N T E 6 7 8 -9 -0 R ABC DE F GHI J KL M NO P QR ST Y UV SYMBOLS S PAC E WX Z www.dymo.com/industrial q - Dymo 15605 | Instruction Manual - Page 2
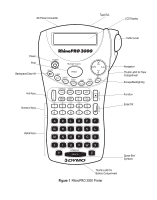
AC Power Connector Tape Exit LCD Display Cutter Lever T E 6 7 8 -9 -0 R ABC DE F GHI J KL M NO P QR ST Y UV SYMBOLS S PAC E WX Z Navigation Thumb Latch for Tape Compartment Escape/Backlighting Function Enter/OK Space Bar/ Symbols Thumb Latch for Battery Compartment Figure 1 RhinoPRO - Dymo 15605 | Instruction Manual - Page 3
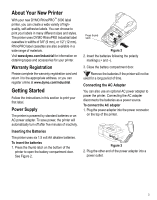
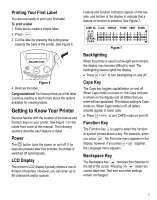
on obtaining tapes and accessories for your printer. Warranty Registration Please complete the warranty registration card and return it to the appropriate address, or you can register online at www.dymo.com/industrial. Getting Started Follow the instructions in this section to print your first label - Dymo 15605 | Instruction Manual - Page 4
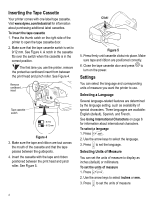
Tape Cassette Your printer comes with one label tape cassette. Visit www.dymo.com/industrial for information about purchasing additional label cassettes. To insert the tape cassette 1. Press the thumb catch on the right side of the printer to open the tape cassette door. 2. Make sure that the tape - Dymo 15605 | Instruction Manual - Page 5
reading to learn more about the options available for creating labels. Getting to Know Your Printer Become familiar with the location of the feature and function keys on your printer. See Figure 1 on the inside front cover of this manual. The following sections describe each feature in detail. Power - Dymo 15605 | Instruction Manual - Page 6
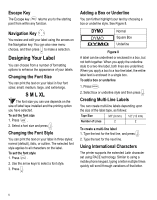
upon the size of the label tape, as follows: Tape Size 3/8" (9 mm) 1/2" (12 mm) Number of Lines 2 2 To create a multi-line label 1. Type the text for the first line, and press . 2. Type the text for the next line. Using International Characters The printer supports the extended Latin character - Dymo 15605 | Instruction Manual - Page 7
appear depend on the language you have selected to use. Adding Symbols The printer supports the extended symbol set as shown in Figure 9. A! ¡ ? ¿ . B, ' #%& C; " symbol to your label. Saving your Label You can save up to 25 labels in memory. To save a label 1. Type your label text. 2. - Dymo 15605 | Instruction Manual - Page 8
the label you want. 3. Press + and then press ESC to clear the memory location. Using the Hot Key Functions Your printer includes of the label tape between the label text (U) is approximately 1.1" (28.27 mm). The text on flag labels is automatically printed on both ends of the label leaving - Dymo 15605 | Instruction Manual - Page 9
below the A N first line, separated by a space. E L To print vertically 1 1. Press VERT . 2. Enter the text for your label and press . Using the Pre-defined Text Keys Your printer includes four Hot Keys that allow you to access pre-defined text. These Hot Keys include Location, Audio/Video - Dymo 15605 | Instruction Manual - Page 10
Right Surround Speaker RS-232 SAT Speaker Subwoofer Surround S-Video Tape Touch Screen TV VCR VESA Video Game Volume Control Zone Voice flag and wrap mode. The following example shows how to quickly print a flag label for a speaker wire in your home-entertainment system. 1. Press FLAG to turn - Dymo 15605 | Instruction Manual - Page 11
11.5 mm). To add additional blank space to the beginning or end of your label, you can feed the tape in 0.25" (6 mm) increments. To feed the label tape ♦ Press + . BOX/UL Adjusting Print Quality (Advanced) Depending on the label material you choose, you may need to lighten or darken the print on the - Dymo 15605 | Instruction Manual - Page 12
trouble-free service, while requiring very little maintenance. Clean your printer from time to time to keep it working properly. Clean the cutter blade each time you replace the label cassette. To clean the cutter blade 1. Remove the label the tape compartment lid. You can also use the optional - Dymo 15605 | Instruction Manual - Page 13
stalled due to label jam. • Remove jammed tape and replace label cassette. • Clean cutter blade. If you still need assistance, contact DYMO Customer Support for your country. A list of contact numbers for each country is included on the inside back cover of this manual. Documentation Feedback We - Dymo 15605 | Instruction Manual - Page 14
EMC) - Part 6: Generic Standards - Section 3: Emission standard for residential, commercial and light industrial environments. Esselte is an ISO 14001 registered company. Plastic components of this printer have been marked to enable final disposal in a manner that is sensitive to the environment. 14 - Dymo 15605 | Instruction Manual - Page 15
list of telephone numbers to reach DYMO Sales and Support departments. You can also reach DYMO at www.dymo.com. Country Australia Austria Belgium Canada 212/ 286 26 30 PBX (+44) 020/ 7341 55 29 (203) 588-2500 Fax Support 1800/ 817 558 02/627-400-160 +31/ 20/ 581 93 80 +02/619 12 730 +31/ 20/ 581 - Dymo 15605 | Instruction Manual - Page 16
in any form or by any means or translated into another language without the prior written consent of DYMO Corporation. RhinoPRO and Hot Key are trademarks of DYMO Corporation. DYMO is a registered trademark of Esselte Corporation. All other trademarks are the property of their respective holders.
-
 1
1 -
 2
2 -
 3
3 -
 4
4 -
 5
5 -
 6
6 -
 7
7 -
8
-
9
-
10
-
11
-
12
-
13
-
14
-
15
-
16
 |
 |
www.dymo.com/industrial
q
Instruction Manual
A
B
C
PRINT
S PAC E
D
E
F
G
H
I
J
K
L
M
N
O
P
Q
R
S
T
U
V
W
X
Z
Y
Multiple Copies
SYMBOLS
CLEAR
POWER
LANG
UNITS
FEED
NORMAL
WRAP
SAVE
CAPS
F
U
N
C
T
I
O
N
E
N
T
E
R
[
]
/
=
%
.
-
+
:
|
SIZE
STYLE
BOX/UL
RECALL
FLAG
HWRAP
VERT
PANEL
FIXED
SEC
AUDIO
VIDEO
1
—
9
—
0
—
2
6
7
8
3
4
5
VOICE
DATA
SERIAL
ESC
L
O
C
A
T
I
O
N