Dymo 15605 Instruction Manual - Page 11
Printing Options
 |
View all Dymo 15605 manuals
Add to My Manuals
Save this manual to your list of manuals |
Page 11 highlights
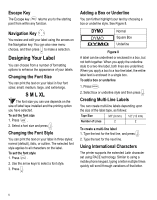
Printing Options You can choose to print multiple copies of the same label, print serialized labels, or print a combination of both. Printing Multiple Copies You can print up to 50 copies of the same label at one time. When printing multiple copies, a dotted cut-line is printed between each label. To print multiple copies 1. Press + . 2. Press the ; arrow to increase the number of copies to print. The default is 2 copies. 3. Press the : arrow to decrease the number of copies (maximum is 50). 4. Press to begin printing. You may notice a brief pause in printing between each label for more complex formats. When printing is finished, the number of copies to print returns to 2. Serializing Your Labels You can print serialized labels numerically or alphabetically. Numbers can be incremented from 1-99 and letters from A-Z. You can serialize any number or letter by placing the cursor (|) behind the position to be incremented, such as the number 2 in 12|3 or the letter B in AB|C. For example, with the cursor behind the 2 in 12|3 and the increment #=3, the resulting labels would print as 123, 133, and 143. 123 133 143 Figure 12 When the letter Z or the number 9 is reached during serialization, a letter or number is added to increase the increment. For example, Z increments to AA and 9 increments to 10. When a space is present in a string to be serialized, only the numbers or letters after the space are serialized. To serialize your labels 1. Enter the text for your label. 2. Use the arrow keys to move the cursor behind the letter or number to serialize. 3. Press . SERIAL 4. Select the increment and press . Printing begins automatically. Advancing the Label Tape The default leader space for all labels is approximately 7/16" (11.5 mm). To add additional blank space to the beginning or end of your label, you can feed the tape in 0.25" (6 mm) increments. To feed the label tape ♦ Press + . BOX/UL Adjusting Print Quality (Advanced) Depending on the label material you choose, you may need to lighten or darken the print on the label. Adjusting the print head temperature allows you to control the print quality (±20). To set the print head temperature 1. Press + VERT . 2. Use the arrow keys to select the print head temperature and press . 3. Repeat as necessary until you are satisfied with the print quality. 11
-
 1
1 -
2
-
3
-
4
-
5
-
 6
6 -
 7
7 -
 8
8 -
 9
9 -
 10
10 -
 11
11 -
 12
12 -
 13
13 -
 14
14 -
 15
15 -
 16
16
 |
 |
