Epson 5700i Product Information Guide - Page 3
Using the Optional 500-Sheet Lower Cassette Unit, Installing the Unit, Loading Paper - driver
 |
UPC - 010343818620
View all Epson 5700i manuals
Add to My Manuals
Save this manual to your list of manuals |
Page 3 highlights
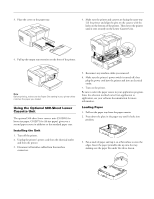
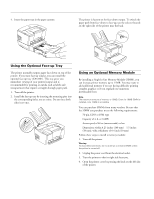
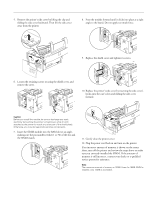
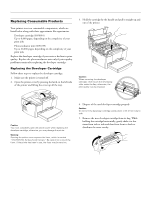
3. Place the cover on the paper tray. EPSON EPL-5700i 4. Make sure the printer and cassette are facing the same way. Lift the printer and align the pins on the cassette with the holes on the bottom of the printer. Then lower the printer until it rests securely on the Lower Cassette Unit. 4. Pull up the output tray extension on the front of the printer. Note: Before printing, make sure the Paper Size setting in your printer driver matches the paper you loaded. Using the Optional 500-Sheet Lower Cassette Unit The optional 500-sheet lower cassette unit (C812881 for letter size paper, C812871 for A4 size paper) gives you a second paper source in addition to the standard paper tray. Installing the Unit 1. Turn off the printer. 2. Unplug the printer's power cord from the electrical outlet and from the printer. 3. Disconnect all interface cables from the interface connectors. 5. Reconnect any interface cables you removed. 6. Make sure the printer's power switch is turned off, then plug the power cord into the printer and into an electrical outlet. 7. Turn on the printer. Be sure to select the paper source in your application program. Since the selection method varies from application to application, see your software documentation for more information. Loading Paper 1. Pull out the paper tray from the paper cassette. 2. Press down the plate in the paper tray until it locks into position. 3. Fan a stack of paper and tap it on a flat surface to even the edges. Insert the paper printable side up into the tray, making sure the paper fits under the tab as shown. 9/99 EPSON EPL-5700i - 3
-
 1
1 -
 2
2 -
 3
3 -
 4
4 -
 5
5 -
 6
6 -
 7
7 -
 8
8 -
 9
9 -
10
-
11
-
12
 |
 |
