Epson 5700i Product Information Guide - Page 7
Replacing the Photoconductor Unit, clean the paper roller as described in Cleaning the Inside - epl driver
 |
UPC - 010343818620
View all Epson 5700i manuals
Add to My Manuals
Save this manual to your list of manuals |
Page 7 highlights
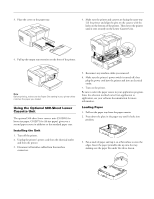
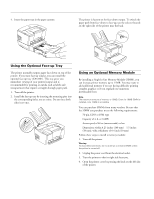
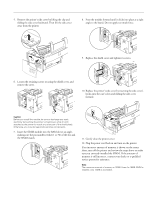
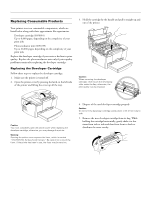
6. Remove the protective tape seal from the cover of the developer cartridge. EPSON EPL-5700i 8. Gently press down on the printer cover until it clicks shut. Caution: Never touch the developing roller under the flap. Otherwise, the print quality may be impaired. 7. Hold the cartridge by its handle and lower it into the printer, making sure that the pins on each side of the cartridge fit into the grooves inside the printer. Slide the cartridge gently into the opening until it locks into place. 9. After turning on the printer, access the printer settings dialog box in the printer driver, and click the Toner Level Clear button. The Toner level clear dialog box is displayed. 10. Click OK to reset the toner level counter. Whenever you replace the developer cartridge, you should clean the paper roller as described in "Cleaning the Inside of the Printer" on page 11. Replacing the Photoconductor Unit 1. Make sure the printer is turned off. 2. Open the printer cover by pressing the latch on the left side of the printer and lifting the cover up all the way. Caution: You must completely open the printer cover to replace the photoconductor unit; otherwise, you may damage the printer. 3. Remove the developer cartridge (see the previous section for instructions). Caution: Do not turn the developer cartridge upside down or tilt it from side to side. Warning: Opening the printer cover exposes the fuser, which is marked "CAUTION Hot Surface Avoid Contact." Be careful not to touch the fuser. If the printer has been in use, the fuser may be very hot. 9/99 EPSON EPL-5700i - 7
-
 1
1 -
 2
2 -
 3
3 -
 4
4 -
 5
5 -
 6
6 -
 7
7 -
 8
8 -
 9
9 -
 10
10 -
 11
11 -
 12
12
 |
 |
