Epson 5700i Product Information Guide - Page 5
EPSON EPL-5700i, Gently close the printer cover. - review
 |
UPC - 010343818620
View all Epson 5700i manuals
Add to My Manuals
Save this manual to your list of manuals |
Page 5 highlights
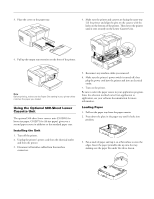
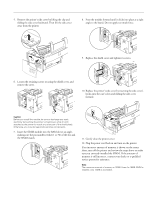
5. Remove the printer's side cover by lifting the clip and sliding the side cover backward. Then lift the side cover away from the printer. 1 EPSON EPL-5700i 8. Press the module forward until it clicks into place at a right angle to the board. Do not apply too much force. 2 3 9. Replace the shield cover and tighten its screws. 6. Loosen the retaining screws securing the shield cover, and remove the cover. 2 1 10. Replace the printer's side cover by inserting the side cover's hooks into the case's slots and sliding the side cover forward. 1 2 Caution: Before you install the module, be sure to discharge any static electricity by touching the printer's shield cover while it's still attached to the printer (or touch any other part of the shield plate). Otherwise, you may damage static-sensitive components. 7. Insert the SIMM module into the RAM slot at an angle, making sure the pin numbers (either 1 or 72) of the slot and the SIMM match. 2 1 11. Gently close the printer cover. 12. Plug the power cord back in and turn on the printer. If an incorrect amount of memory is shown on the status sheet, turn off the printer and review the steps above to make sure you correctly installed the SIMM. If the amount of memory is still incorrect, contact your dealer or a qualified service person for assistance. Note: The maximum amount of memory is 13MB. Even if a 16MB SIMM is installed, only 13MB is accessible. 9/99 EPSON EPL-5700i - 5
-
 1
1 -
 2
2 -
 3
3 -
 4
4 -
 5
5 -
 6
6 -
 7
7 -
 8
8 -
 9
9 -
 10
10 -
 11
11 -
12
 |
 |
