Epson 7850p Product Information Guide - Page 11
Using the Control Panel, Controlling Multiple Projectors, Setting the Projector ID - powerlite user manual
 |
UPC - 010343845992
View all Epson 7850p manuals
Add to My Manuals
Save this manual to your list of manuals |
Page 11 highlights
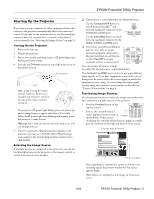
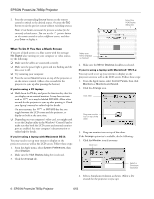
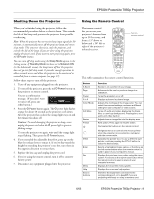
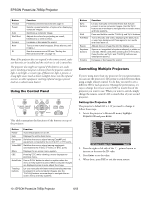
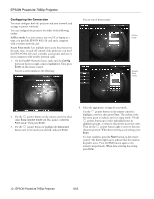
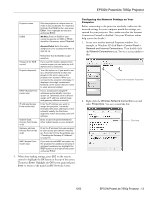
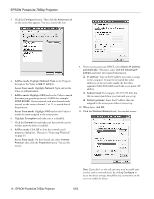
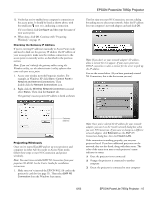
EPSON PowerLite 7850p Projector Button Preview Preset Auto Wall Shot Volume Num ID Function Previews connected sources (see page 5). Selects a preset selection of options for displaying computer images. Optimizes a computer image. Adjusts the colors for projecting on a wall, blackboard, or other surface. Increases or decreases the sound. Turns on the numeric keypad. (Press this key until it lights.) Sets the remote control ID (see "Setting the Remote Control ID" on page 11). Note: If the projector does not respond to the remote control, make sure batteries are installed and the switch on its side is turned on. The projector also might not respond if the batteries are weak, you're standing at too great a distance from the projector, ambient light is too bright, a certain type of fluorescent light is present, a strong light source (such as direct sunlight) shines into the infrared receiver, or other equipment emitting infrared energy is present (such as a radiant room heater). Using the Control Panel This table summarizes the functions of the buttons on top of the projector. Button Function Power Turns the projector on or off. Help Displays the online help menu. Computer/ Switches the source signal among EasyMP and DVI equipment connected to the Computer or DVI ports. Video/BNC Switches the source signal among equipment connected to the Video, S-Video, or BNC ports. Menu Displays the on-screen menu system. ESC Pressing ESC while viewing a menu displays the previous menu. Auto/Enter Use as Enter button to select an option when the menu or help system is active. When computer images are displayed, press to auto-adjust the image. Tracking buttons Let you manually eliminate vertical banding that may be present in some computer images. Use the Tracking buttons as arrow keys to navigate the on- screen menu and help systems. Button Sync buttons Shift A/V Mute Resize Keystone buttons Volume Function Let you manually correct blurriness that may be present in some computer images. Use the Sync buttons as arrow keys to navigate the on-screen menu and help systems. Press and hold to use the Tracking and Sync buttons. Turns off audio and video, displaying the black, blue, or user logo background. Press again to turn audio and video back on. Adjusts how an image fits into the display area. Square an image that is keystone-shaped, or wider on one side. (When used while pressing the Shift button, these function as Sync and Tracking buttons; see descriptions above.) Increases or decreases the sound. Controlling Multiple Projectors If you're using more than one projector for your presentation, you can use the projector's ID system to switch between them using a single remote control. To do this, you need to set a different ID for each projector. During the presentation, it's easy to change the remote control's ID to match that of the projector you want to use. When you want to switch, simply change the remote control's ID to match that of your second projector. Setting the Projector ID The projector's default ID is 1. If you need to change it, follow these steps: 1. Access the projector's Advanced2 menu, highlight Projector ID and press Enter. Video Audio Effect Setting User's Logo Advanced1 Advanced2 About Reset All Brightness Control : High Low Projector ID : 1 Set Network Set COM Port : RS-232C USB Auto setup : ON OFF BNC Sync Termination : ON OFF Reset Execute [ ESC ]: Return [ / ]: Select [ ]: Set [Menu]: Exit 2. Press the right or left side of the pointer button to increase or decrease the ID value. 3. Press Enter to set the value. 4. When done, press ESC to exit the menu system. 10 - EPSON PowerLite 7850p Projector 6/03
-
 1
1 -
2
-
3
-
4
-
5
-
 6
6 -
 7
7 -
 8
8 -
 9
9 -
 10
10 -
 11
11 -
 12
12 -
 13
13 -
 14
14 -
 15
15 -
 16
16 -
17
-
18
-
19
-
20
-
21
-
22
-
23
-
24
-
25
 |
 |
