Epson 7850p Product Information Guide - Page 16
Projecting Wirelessly - powerlite wireless software
 |
UPC - 010343845992
View all Epson 7850p manuals
Add to My Manuals
Save this manual to your list of manuals |
Page 16 highlights
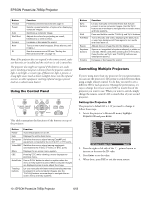
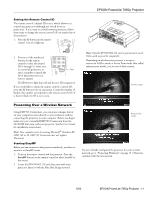
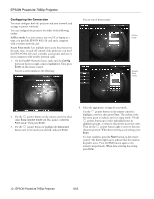
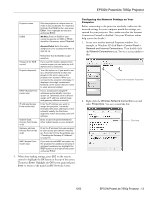
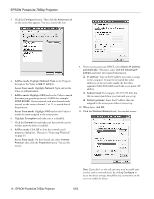
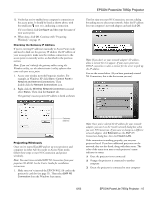
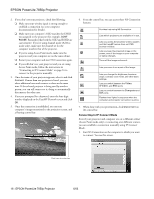
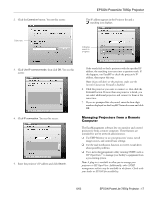
12. Verify that you've enabled your computer's connection to the access point. It should be listed as shown above, with the small icon next to it, indicating a connection. If it's not listed, click Configure and then type the name of your access point. 13. When done, click OK. Continue with "Projecting Wirelessly" on page 15. Checking the Gateway IP Address If you're entering IP addresses manually in Access Point mode and need to find out the gateway IP address (the IP address of your access point), make sure the wireless connection to the access point is currently active, as described in the previous section. Note: If you can't identify the gateway address using this Windows utility, use the administrator's utility software that came with your access point. 1. Access your wireless network Properties window. For example, in Windows XP click Start > Control Panel > Network and Internet Connections. Then double-click the Network Connections icon. 2. Right-click the Wireless Network Connection icon and select Status. Then click the Support tab. The gateway's (access point's) IP address is listed as shown: EPSON PowerLite 7850p Projector The first time you start NS Connection, you see a dialog box asking you to select your network. Select the IP address for your computer's network adapter card and click OK. Note: If you don't see your network adapter's IP address, allow a minute for it to appear. If your access point uses DHCP, sometimes it takes a minute for the server to pick up the IP address. You see the screen below. (If you have previously started NS Connection, this is the first screen you see.) Gateway address Projecting Wirelessly Once you've started EasyMP and set up your projector and computer in either Ad Hoc mode or Access Point mode, follow these steps to start NS Connection and project wirelessly. Note: You must have installed EMP NS Connection from your projector CD-ROM. See the User's Guide for installation instructions. 1. Make sure you've inserted the EPSON 802.11b card in the projector's card slot (see page 11). Then select EMP NS Connection from the Windows Start menu. Note: Once you've selected the IP address for your network adapter, you won't see the Switch network dialog box when you start NS Connection. If you want to change to a different network adapter, click Extension on the EMP NS Connection dialog box, then click Switch LAN. If the connection is working properly, you see your projector listed. If you have additional projectors on the network, they are also listed, along with their status. The color of the status icon next to each projector's name indicates its status: ❏ Gray: the projector is not connected ❏ Orange: the projector is connected to another computer ❏ Green: the projector is connected to your computer 6/03 EPSON PowerLite 7850p Projector - 15
-
 1
1 -
2
-
3
-
4
-
5
-
6
-
7
-
8
-
9
-
10
-
 11
11 -
 12
12 -
 13
13 -
 14
14 -
 15
15 -
 16
16 -
 17
17 -
 18
18 -
 19
19 -
 20
20 -
 21
21 -
22
-
23
-
24
-
25
 |
 |