Epson AcuLaser CX11NF Start Here Card - Page 4
Load Paper/Verify Settings, Install Software, CX11N as a Local Printer, Windows ®, Turn over - network setup
 |
View all Epson AcuLaser CX11NF manuals
Add to My Manuals
Save this manual to your list of manuals |
Page 4 highlights
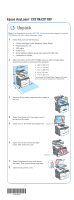
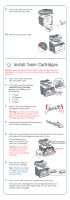
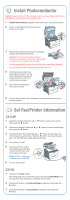
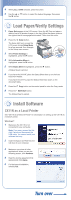
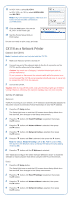
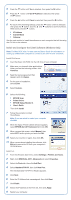
4 With Lang = XXXX selected, press the button. 5 Use the or button to select the desired language, then press the button. 5 Load Paper/Verify Settings 1 Paper Out appears in the LCD screen. Open the MP Tray and place a stack of up to 80 sheets of paper in the tray. Adjust the paper guide on the right so that it is snug against the stack. Then close the cover. 2 Press the Setup button. The Setup light turns on and the LCD screen shows Setup Mode for a few seconds, then changes to the Setup menu screen. 3 While Printer Settings is highlighted, press the button. 4 While Information Menu is highlighted, press the button. 5 While Status Sheet is highlighted, press the button. A Status Sheet is printed. 6 If you have the CX11NF, place the Status Sheet face up on the Auto Document Feeder. If you have the CX11N, place the Status Sheet face down on the document table. 7 Press the Copy button on the control panel to enter the Copy mode. 8 Press the B&W Start button. The Status Sheet is copied. 6 Install Software CX11N as a Local Printer See "CX11N as a Network Printer" for information on setting up the CX11N as a network printer. Windows® 1 Make sure the CX11N is not connected to your computer. Note: If you see a screen like this, click Cancel and disconnect the USB cable. You cannot install your software that way. 2 Insert the Epson CD-ROM into the CD drive of your computer. 3 Make sure you close all other applications. When you see the following screen, click Continue. 4 Read the license agreement that appears and click Agree. 5 For the type of installation, select Local. Turn over
-
 1
1 -
 2
2 -
 3
3 -
 4
4 -
 5
5 -
 6
6 -
 7
7 -
 8
8
 |
 |
