Epson C107001 User Manual - Page 104
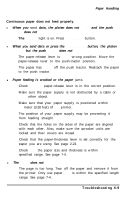
not fall in, is printed at the top
 |
UPC - 010343157507
View all Epson C107001 manuals
Add to My Manuals
Save this manual to your list of manuals |
Page 104 highlights
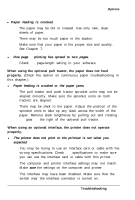
Printing l Regular gaps occur in the printout. One-inch skip-over-perforation may be set. Set DIP switch 1-8 off. l Skip-over-perforation is set, but the perforation does not fall in the center of the skip. Make sure the page-length DIP-switch setting matches the page length of your paper. See page 3-7. If your application program is setting the top and bottom margins, set DIP switch 1-8 off. l Vertical printed lines do not align. Turn DIP switch 1-5 on for unidirectional printing. l Printing starts too low on the page, or the bottom part of one page is printed at the top of the next page. Be sure to choose the correct printer when you choose a printer from your application program's menu. See page 1-14. Use your application software to specify the type of paper you are using (single sheet or continuous). Use your application software to reduce or eliminate the top margin and to reduce the page length or lines per page setting. l When clearing the buffer, you also lose the top-of-form. Always advance the paper to the top of the next page with the LF/FF button before clearing the buffer. Note: You can check the operation of your printer using the self test. (See Running the self test in Chapter 1.) If the self test works properly, the printer is operating properly, and the problem probably lies in the computer, the software, or the cable. If the self test does not work, contact your dealer. Troubleshooting 6-7
-
 1
1 -
2
-
3
-
4
-
5
-
6
-
7
-
8
-
9
-
10
-
11
-
12
-
13
-
14
-
15
-
16
-
17
-
18
-
19
-
20
-
21
-
22
-
23
-
24
-
25
-
26
-
27
-
28
-
29
-
30
-
31
-
32
-
33
-
34
-
35
-
36
-
37
-
38
-
39
-
40
-
41
-
42
-
43
-
44
-
45
-
46
-
47
-
48
-
49
-
50
-
51
-
52
-
53
-
54
-
55
-
56
-
57
-
58
-
59
-
60
-
61
-
62
-
63
-
64
-
65
-
66
-
67
-
68
-
69
-
70
-
71
-
72
-
73
-
74
-
75
-
76
-
77
-
78
-
79
-
80
-
81
-
82
-
83
-
84
-
85
-
86
-
87
-
88
-
89
-
90
-
91
-
92
-
93
-
94
-
95
-
96
-
97
-
98
-
 99
99 -
 100
100 -
 101
101 -
 102
102 -
 103
103 -
 104
104 -
 105
105 -
 106
106 -
 107
107 -
 108
108 -
 109
109 -
110
-
111
-
112
-
113
-
114
-
115
-
116
-
117
-
118
-
119
-
120
-
121
-
122
-
123
-
124
-
125
-
126
-
127
-
128
-
129
-
130
-
131
-
132
-
133
-
134
-
135
-
136
-
137
-
138
-
139
-
140
-
141
-
142
-
143
-
144
-
145
-
146
-
147
-
148
-
149
-
150
-
151
-
152
-
153
 |
 |