Epson C107001 User Manual - Page 23
Testing the Printer, Plugging in the Printer, Running the Self Test - dip switch settings
 |
UPC - 010343157507
View all Epson C107001 manuals
Add to My Manuals
Save this manual to your list of manuals |
Page 23 highlights
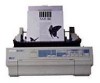
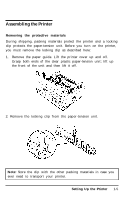
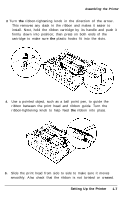
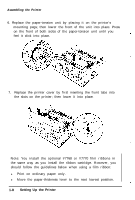
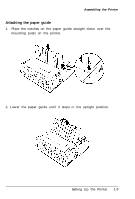
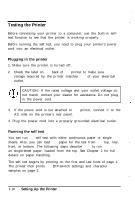
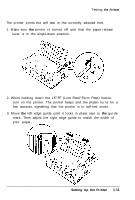
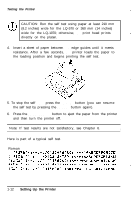
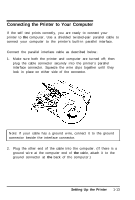
Testing the Printer Before connecting your printer to a computer, use the built-in selftest function to see that the printer is working properly. Before running the self test, you need to plug your printer's power cord into an electrical outlet. Plugging in the printer 1. Make sure the printer is turned off. 2. Check the label on the back of the printer to make sure the voltage required by the printer matches that of your electrical outlet. CAUTION: If the rated voltage and your outlet voltage do not match, contact your dealer for assistance. Do not plug in the power cord. 3. If the power cord is not attached to the printer, connect it to the AC inlet on the printer's rear panel. 4. Plug the power cord into a properly grounded electrical outlet. Running the self test You can run the self test with either continuous paper or single sheets. Also, you can load the paper for the test from the top, rear, front, or bottom. The following steps describe how to run the test on single-sheet paper, loaded from the top. See Chapter 2 for full details on paper handling. The self test begins by printing on the first and last lines of page 1. The printer then prints the DIP-switch settings and character samples on page 2. 1-10 Setting Up the Printer
-
 1
1 -
2
-
3
-
4
-
5
-
6
-
7
-
8
-
9
-
10
-
11
-
12
-
13
-
14
-
15
-
16
-
17
-
 18
18 -
 19
19 -
 20
20 -
 21
21 -
 22
22 -
 23
23 -
 24
24 -
 25
25 -
 26
26 -
 27
27 -
 28
28 -
29
-
30
-
31
-
32
-
33
-
34
-
35
-
36
-
37
-
38
-
39
-
40
-
41
-
42
-
43
-
44
-
45
-
46
-
47
-
48
-
49
-
50
-
51
-
52
-
53
-
54
-
55
-
56
-
57
-
58
-
59
-
60
-
61
-
62
-
63
-
64
-
65
-
66
-
67
-
68
-
69
-
70
-
71
-
72
-
73
-
74
-
75
-
76
-
77
-
78
-
79
-
80
-
81
-
82
-
83
-
84
-
85
-
86
-
87
-
88
-
89
-
90
-
91
-
92
-
93
-
94
-
95
-
96
-
97
-
98
-
99
-
100
-
101
-
102
-
103
-
104
-
105
-
106
-
107
-
108
-
109
-
110
-
111
-
112
-
113
-
114
-
115
-
116
-
117
-
118
-
119
-
120
-
121
-
122
-
123
-
124
-
125
-
126
-
127
-
128
-
129
-
130
-
131
-
132
-
133
-
134
-
135
-
136
-
137
-
138
-
139
-
140
-
141
-
142
-
143
-
144
-
145
-
146
-
147
-
148
-
149
-
150
-
151
-
152
-
153
 |
 |