Epson Stylus 1500 User Setup Information - PC - Page 35
Changing the default printer or printer port, Control Panel, Printers, Set As Default Printer
 |
View all Epson Stylus 1500 manuals
Add to My Manuals
Save this manual to your list of manuals |
Page 35 highlights
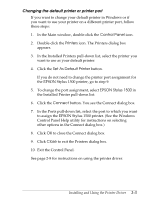
Changing the default printer or printer port If you want to change your default printer in Windows or if you want to use your printer on a different printer port, follow these steps: 1. In the Main window, double-click the Control Panel icon. 2. Double-click the Printers icon. The Printers dialog box appears. 3. In the Installed Printers pull-down list, select the printer you want to use as your default printer. 4. Click the Set As Default Printer button. If you do not need to change the printer port assignment for the EPSON Stylus 1500 printer, go to step 9. 5. To change the port assignment, select EPSON Stylus 1500 in the Installed Printer pull-down list. 6. Click the Connect button. You see the Connect dialog box. 7. In the Ports pull-down list, select the port to which you want to assign the EPSON Stylus 1500 printer. (See the Windows Control Panel Help utility for instructions on selecting other options in the Connect dialog box.) 8. Click OK to close the Connect dialog box. 9. Click Close to exit the Printers dialog box. 10. Exit the Control Panel. See page 2-8 for instructions on using the printer driver. Installing and Using the Printer Driver 2-3
-
 1
1 -
2
-
3
-
4
-
5
-
6
-
7
-
8
-
9
-
10
-
11
-
12
-
13
-
14
-
15
-
16
-
17
-
18
-
19
-
20
-
21
-
22
-
23
-
24
-
25
-
26
-
27
-
28
-
29
-
 30
30 -
 31
31 -
 32
32 -
 33
33 -
 34
34 -
 35
35 -
 36
36 -
 37
37 -
 38
38 -
 39
39 -
 40
40 -
41
-
42
-
43
-
44
-
45
-
46
-
47
-
48
-
49
-
50
-
51
-
52
-
53
-
54
-
55
-
56
-
57
-
58
-
59
-
60
-
61
-
62
-
63
-
64
-
65
 |
 |
