Epson Stylus NX510 Quick Guide - Page 11
Copying a Photo - not printing black
 |
View all Epson Stylus NX510 manuals
Add to My Manuals
Save this manual to your list of manuals |
Page 11 highlights
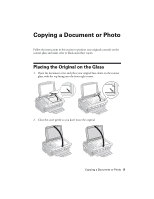
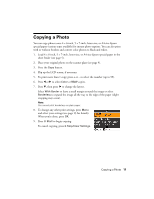
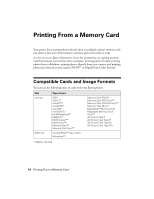
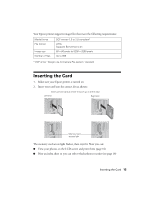
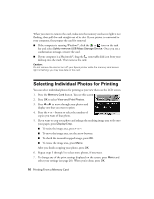
Copying a Photo You can copy photos onto 4 × 6-inch, 5 × 7-inch, letter-size, or A4-size Epson special paper (various types available) for instant photo reprints. You can also print with or without borders and convert color photos to black and white. 1. Load 4 × 6-inch, 5 × 7-inch, letter-size, or A4-size Epson special paper in the sheet feeder (see page 5). 2. Place your original photo on the scanner glass (see page 9). 3. Press the Copy button. 4. Flip up the LCD screen, if necessary. 5. To print more than 1 copy, press + or - to select the number (up to 99). 6. Press l or r to select Color or B&W copies. 7. Press d, then press r to change the layout. Select With Border to leave a small margin around the image or select Borderless to expand the image all the way to the edge of the paper (slight cropping may occur). Note: You cannot print borderless on plain paper. 8. To change any other print settings, press Menu and select your settings (see page 13 for details). When you're done, press OK. 9. Press x Start to begin copying. To cancel copying, press y Stop/Clear Settings. Copying a Photo 11
-
 1
1 -
2
-
3
-
4
-
5
-
 6
6 -
 7
7 -
 8
8 -
 9
9 -
 10
10 -
 11
11 -
 12
12 -
 13
13 -
 14
14 -
 15
15 -
 16
16 -
17
-
18
-
19
-
20
-
21
-
22
-
23
-
24
-
25
-
26
-
27
-
28
-
29
-
30
-
31
-
32
-
33
-
34
-
35
-
36
-
37
-
38
-
39
-
40
-
41
-
42
-
43
-
44
-
45
-
46
-
47
-
48
-
49
-
50
-
51
-
52
 |
 |
