Epson XP-200 User Guide - Page 120
Checking the Nozzles Using a Computer Utility, Print head is clean, Parent topic, Related concepts - clean print heads
 |
View all Epson XP-200 manuals
Add to My Manuals
Save this manual to your list of manuals |
Page 120 highlights
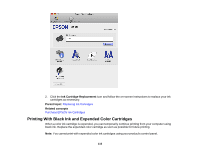
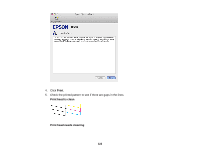
1. Press the power button to turn the product off. 2. Load a few sheets of plain paper in the product. 3. Hold down the stop button and press the power button to turn the product on. 4. When the product turns on, release both buttons. The product begins printing a nozzle check pattern. 5. Check the printed pattern to see if there are gaps in the lines. Print head is clean Print head needs cleaning 6. If there are no gaps, the print head is clean and you can continue printing. If there are gaps or the pattern is faint, clean the print head. Parent topic: Print Head Nozzle Check Related concepts Print Head Cleaning Checking the Nozzles Using a Computer Utility You can check the print head nozzles using a utility on your Windows or Mac computer. 1. Load a few sheets of plain paper in the product. 2. Do one of the following: • Windows: Right-click the product icon in the Windows taskbar. 120
-
 1
1 -
2
-
3
-
4
-
5
-
6
-
7
-
8
-
9
-
10
-
11
-
12
-
13
-
14
-
15
-
16
-
17
-
18
-
19
-
20
-
21
-
22
-
23
-
24
-
25
-
26
-
27
-
28
-
29
-
30
-
31
-
32
-
33
-
34
-
35
-
36
-
37
-
38
-
39
-
40
-
41
-
42
-
43
-
44
-
45
-
46
-
47
-
48
-
49
-
50
-
51
-
52
-
53
-
54
-
55
-
56
-
57
-
58
-
59
-
60
-
61
-
62
-
63
-
64
-
65
-
66
-
67
-
68
-
69
-
70
-
71
-
72
-
73
-
74
-
75
-
76
-
77
-
78
-
79
-
80
-
81
-
82
-
83
-
84
-
85
-
86
-
87
-
88
-
89
-
90
-
91
-
92
-
93
-
94
-
95
-
96
-
97
-
98
-
99
-
100
-
101
-
102
-
103
-
104
-
105
-
106
-
107
-
108
-
109
-
110
-
111
-
112
-
113
-
114
-
 115
115 -
 116
116 -
 117
117 -
 118
118 -
 119
119 -
 120
120 -
 121
121 -
 122
122 -
 123
123 -
 124
124 -
 125
125 -
126
-
127
-
128
-
129
-
130
-
131
-
132
-
133
-
134
-
135
-
136
-
137
-
138
-
139
-
140
-
141
-
142
-
143
-
144
-
145
-
146
-
147
-
148
-
149
-
150
-
151
-
152
-
153
-
154
-
155
-
156
-
157
-
158
-
159
-
160
-
161
-
162
-
163
-
164
-
165
-
166
-
167
-
168
-
169
-
170
-
171
-
172
-
173
-
174
-
175
-
176
-
177
-
178
-
179
-
180
 |
 |
