Fisher and Paykel RF170WLKUX6 Installation Guide - Water Filter Replacement - Page 9
Installing the new filter, After installation, the water filter MUST be flushed., Refer to 'Flushing
 |
View all Fisher and Paykel RF170WLKUX6 manuals
Add to My Manuals
Save this manual to your list of manuals |
Page 9 highlights
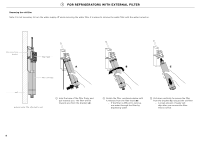
4 FOR RF730Q MODELS Installing the new filter Note: It is not necessary to turn the water supply off when installing the water filter. A B lugs C 1 Locate the filter hatch between the two produce bins inside the fresh food compartment. Lift the hatch to access the filter tool (A). D 2 Align the filter correctly (B). Insert the filter into the filter housing until the tool is flush and in the unlock position (C). 3 Push the filter firmly in and rotate clockwise 90° into the lock position (D) to allow water to flow. - If the filter will not turn, ensure the filter is correctly aligned, (C) to allow the filter to be pushed firmly into the filter head. 4 Close the filter hatch. IMPORTANT! After installation, the water filter MUST be flushed. Refer to 'Flushing the water filter' for details. 7
-
 1
1 -
2
-
3
-
 4
4 -
 5
5 -
 6
6 -
 7
7 -
 8
8 -
 9
9 -
 10
10 -
 11
11 -
 12
12 -
 13
13 -
 14
14 -
15
-
16
-
17
-
18
-
19
-
20
 |
 |
