Frigidaire FEQ332ES Installation Instructions (All Languages) - Page 6

Side View, Rear View - electric clothes dryer

Page 6 highlights

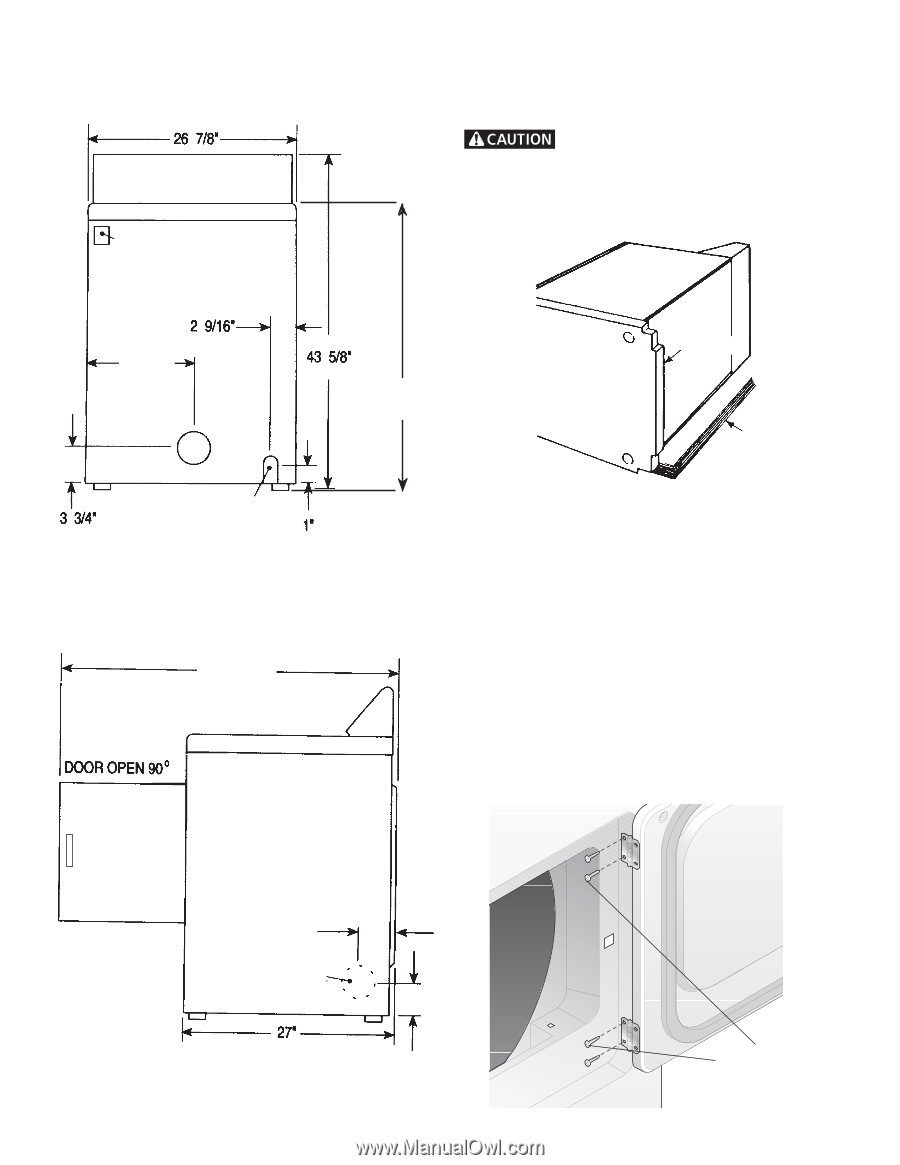
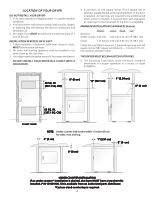
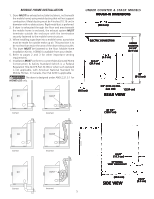
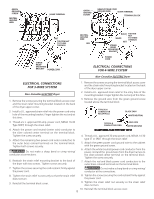
TOP CONSOLE MODELS ROUGH-IN DIMENSIONS (68.3 cm) ELECTRIC CONNECTION UNPACKING 1. Using the four shipping carton corner posts (two on each side), carefully lay the dryer on its left side and remove foam shipping base. To prevent damage, do not use the control panel as a means to pick up or move the dryer. NOTE: On under counter model clothes dryers, the top panel may be removed for installation. 2. Return the dryer to an upright position. (6.5 cm) 13 1/2" (34.4 cm) (110.7 cm) 36" (91.5 cm) FOAM SHIPPING PACKING (9.5 cm) 3/8" (0.96 cm) DIA. GAS PIPE (2.54 cm) REAR VIEW 47 1/2" (120.7 cm) REVERSING DOOR SWING Your dryer is designed so the door swing may be reversed at any time without additional parts. Conversion is accomplished by transferring hinges to the opposite side of the cabinet. To change the direction of the door opening: 1. Open the dryer door. Remove the four hinge hole plugs from the left side of the door opening. Place nearby for future installation. NOTE: You may need a plastic knife to help pull out the plugs. Be careful not to scratch the paint. 2. Remove the four screws that secure the door hinges to the dryer front panel (see below). NOTE: Remove one screw from each of the two hinges first. Hold the door firmly before removing the last two screws. 3. Rotate the door 180° and reinstall the door hinges to the dryer front panel with the four screws. 4. Install the four hinge hole plugs in the open screw holes on the right side of the door opening. 4 3/8" (11.1 cm) OPTIONAL VENT KNOCKOUT (68.6 cm) SIDE VIEW 3 3/4" (9.5 cm) 6 REMOVE 4 SCREWS (ONE FROM EACH HINGE FIRST)

  • 1
  • 2
  • 3
  • 4
  • 5
  • 6
  • 7
  • 8
  • 9
  • 10
  • 11
  • 12
  • 13
  • 14
  • 15
  • 16
  • 17
  • 18
  • 19
  • 20
  • 21
  • 22
  • 23
  • 24
  • 25
  • 26
  • 27

6
REVERSING DOOR SWING
Your dryer is designed so the door swing may be reversed at
any time without additional parts. Conversion is accomplished
by transferring hinges to the opposite side of the cabinet.
To change the direction of the door opening:
1.
Open the dryer door. Remove the four hinge hole plugs from
the left side of the door opening. Place nearby for future
installation.
NOTE
: You may need a plastic knife to help pull
out the plugs. Be careful not to scratch the paint.
2.
Remove the four screws that secure the door hinges to the
dryer front panel (see below).
NOTE:
Remove one screw
from each of the two hinges first. Hold the door firmly before
removing the last two screws.
3.
Rotate the door 180° and reinstall the door hinges to the
dryer front panel with the four screws.
4.
Install the four hinge hole plugs in the open screw holes on
the right side of the door opening.
UNPACKING
1.
Using the four shipping carton corner posts (two on each
side), carefully lay the dryer on its left side and remove foam
shipping base.
To prevent damage, do not use the control panel
as a means to pick up or move the dryer.
NOTE:
On under counter model clothes dryers, the top panel
may be removed for installation.
2.
Return the dryer to an upright position.
PACKING
FOAM
SHIPPING
REMOVE 4 SCREWS
(ONE FROM EACH
HINGE FIRST)
ROUGH-IN DIMENSIONS
ROUGH-IN DIMENSIONS
ROUGH-IN DIMENSIONS
ROUGH-IN DIMENSIONS
ROUGH-IN DIMENSIONS
TOP CONSOLE MODELS
(68.6 cm)
(68.6 cm)
(68.6 cm)
(68.6 cm)
(68.6 cm)
SIDE VIEW
SIDE VIEW
SIDE VIEW
SIDE VIEW
SIDE VIEW
OPTIONAL
OPTIONAL
OPTIONAL
OPTIONAL
OPTIONAL
VENT KNOCKOUT
VENT KNOCKOUT
VENT KNOCKOUT
VENT KNOCKOUT
VENT KNOCKOUT
4 3/8"
4 3/8"
4 3/8"
4 3/8"
4 3/8"
(11.1 cm)
(11.1 cm)
(11.1 cm)
(11.1 cm)
(11.1 cm)
47 1/2"
47 1/2"
47 1/2"
47 1/2"
47 1/2"
(120.7 cm)
(120.7 cm)
(120.7 cm)
(120.7 cm)
(120.7 cm)
REAR VIEW
REAR VIEW
REAR VIEW
REAR VIEW
REAR VIEW
(68.3 cm)
(68.3 cm)
(68.3 cm)
(68.3 cm)
(68.3 cm)
(2.54 cm)
(2.54 cm)
(2.54 cm)
(2.54 cm)
(2.54 cm)
(110.7 cm)
(110.7 cm)
(110.7 cm)
(110.7 cm)
(110.7 cm)
(6.5 cm)
(6.5 cm)
(6.5 cm)
(6.5 cm)
(6.5 cm)
(9.5 cm)
(9.5 cm)
(9.5 cm)
(9.5 cm)
(9.5 cm)
3/8" (0.96 cm) DIA.
3/8" (0.96 cm) DIA.
3/8" (0.96 cm) DIA.
3/8" (0.96 cm) DIA.
3/8" (0.96 cm) DIA.
GAS PIPE
GAS PIPE
GAS PIPE
GAS PIPE
GAS PIPE
ELECTRIC CONNECTION
ELECTRIC CONNECTION
ELECTRIC CONNECTION
ELECTRIC CONNECTION
ELECTRIC CONNECTION
13 1/2"
13 1/2"
13 1/2"
13 1/2"
13 1/2"
(34.4 cm)
(34.4 cm)
(34.4 cm)
(34.4 cm)
(34.4 cm)
3 3/4"
3 3/4"
3 3/4"
3 3/4"
3 3/4"
(9.5 cm)
(9.5 cm)
(9.5 cm)
(9.5 cm)
(9.5 cm)
36"
36"
36"
36"
36"
(91.5 cm)
(91.5 cm)
(91.5 cm)
(91.5 cm)
(91.5 cm)