Garmin Edge 1000 Owner's Manual - Page 10
Putting On the Heart Rate Monitor, Installing the Speed Sensor
 |
View all Garmin Edge 1000 manuals
Add to My Manuals
Save this manual to your list of manuals |
Page 10 highlights
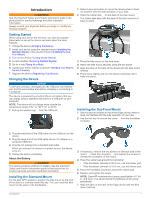
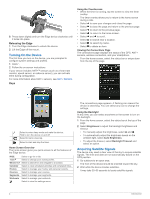
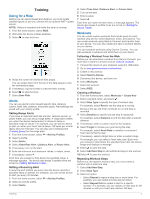
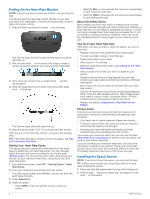
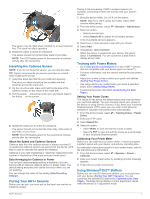
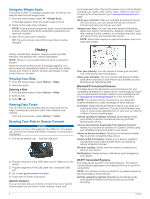
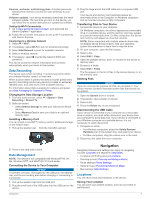
Putting On the Heart Rate Monitor NOTE: If you do not have a heart rate monitor, you can skip this task. You should wear the heart rate monitor directly on your skin, just below your breastplate. It should be snug enough to stay in place during your activity. 1 Snap the heart rate monitor module À onto the strap. The Garmin logos (on the module and the strap) should be right-side up. 2 Wet the electrodes Á on the back of the strap to create a strong connection between your chest and the transmitter. 3 If the heart rate monitor has a contact patch Â, wet the contact patch. 4 Wrap the strap around your chest, and connect the strap hook à to the loop Ä. The Garmin logos should be right-side up. 5 Bring the device within 10 ft. (3 m) of the heart rate monitor. After you put on the heart rate monitor, it is active and sending data. TIP: If the heart rate data is erratic or does not appear, see Tips for Erratic Heart Rate Data. Setting Your Heart Rate Zones The device uses your user profile information from the initial setup to determine your heart rate zones. You can manually adjust the heart rate zones according to your fitness goals (Fitness Goals). For the most accurate calorie data during your activity, set your maximum heart rate, resting heart rate, and heart rate zones. 1 From the home screen, select > Training Zones > Heart Rate Zones. 2 Enter your maximum and resting heart rate values. The zone values update automatically, but you can also edit each value manually. 3 Select Based On:. 4 Select an option: • Select BPM to view and edit the zones in beats per minute. • Select % Max. to view and edit the zones as a percentage of your maximum heart rate. • Select % HRR to view and edit the zones as a percentage of your resting heart rate. About Heart Rate Zones Many athletes use heart rate zones to measure and increase their cardiovascular strength and improve their level of fitness. A heart rate zone is a set range of heartbeats per minute. The five commonly accepted heart rate zones are numbered from 1 to 5 according to increasing intensity. Generally, heart rate zones are calculated based on percentages of your maximum heart rate. Tips for Erratic Heart Rate Data If the heart rate data is erratic or does not appear, you can try these tips. • Reapply moisture to the electrodes and contact patch. You can use water, saliva, or electrode gel. • Tighten the strap on your chest. • Warm up for 5-10 minutes. • Wash the strap after every seven uses (Caring for the Heart Rate Monitor). • Wear a cotton shirt or wet your shirt if suitable for your activity. Synthetic fabrics that rub or flap against the heart rate monitor can create static electricity that interferes with heart rate signals. • Move away from sources that can interfere with your heart rate monitor. Sources of interference may include strong electromagnetic fields, some 2. 4 GHz wireless sensors, high-voltage power lines, electric motors, ovens, microwave ovens, 2. 4 GHz cordless phones, and wireless LAN access points. • Replace the battery (Replacing the Heart Rate Monitor Battery). Fitness Goals Knowing your heart rate zones can help you measure and improve your fitness by understanding and applying these principles. • Your heart rate is a good measure of exercise intensity. • Training in certain heart rate zones can help you improve cardiovascular capacity and strength. • Knowing your heart rate zones can prevent you from overtraining and can decrease your risk of injury. If you know your maximum heart rate, you can use the table (Heart Rate Zone Calculations) to determine the best heart rate zone for your fitness objectives. If you do not know your maximum heart rate, use one of the calculators available on the Internet. Some gyms and health centers can provide a test that measures maximum heart rate. The default maximum heart rate is 220 minus your age. Installing the Speed Sensor NOTE: If you do not have this sensor, you can skip this task. TIP: Garmin recommends you secure your bike on a stand while installing the sensor. 1 Place and hold the speed sensor on top of the wheel hub. 2 Pull the strap À around the wheel hub, and attach it to the hook Á on the sensor. 6 ANT+ Sensors
-
 1
1 -
2
-
3
-
4
-
 5
5 -
 6
6 -
 7
7 -
 8
8 -
 9
9 -
 10
10 -
 11
11 -
 12
12 -
 13
13 -
 14
14 -
 15
15 -
16
-
17
-
18
-
19
-
20
-
21
-
22
-
23
-
24
 |
 |
