Garmin Edge 1000 Owner's Manual - Page 14
Planning and Riding a Route - won t connect to computer
 |
View all Garmin Edge 1000 manuals
Add to My Manuals
Save this manual to your list of manuals |
Page 14 highlights
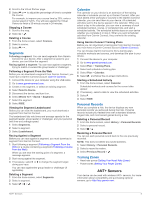
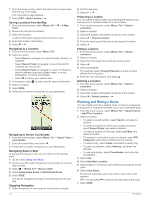
1 From the home screen, select the status bar or swipe down from the top of the page. The connections page appears. 2 Select GPS > Mark Location > . Saving Locations from the Map 1 From the home screen, select Where To? > > A Map Point. 2 Browse the map for the location. 3 Select the location. Location information appears at the top of the map. 4 Select the location information. 5 Select > . Navigating to a Location 1 From the home screen, select Where To?. 2 Select an option: • Select Saved to navigate to a saved course, location, or segment. • Select Recent Finds to navigate to one of the last 50 locations you have found. • Select Search Tools to navigate to a point of interest or specific address (requires routable maps), or a city, intersection, or known coordinates. • Select to narrow your search area. 3 If necessary, select to enter specific search information. 4 Select a location. 5 Select RIDE. 6 Follow the on-screen instructions to your destination. Navigating to Known Coordinates 1 From the home screen, select Where To? > Search Tools > Coordinates. 2 Enter the coordinates, and select . 3 Follow the on-screen instructions to your destination. Navigating Back to Start At any point during your ride, you can return to the starting point. 1 Go for a ride (Going for a Ride). 2 During your ride, select anywhere on the screen to view the timer overlay. 3 Select > Where To? > Back to Start. 4 Select Along Same Route or Most Direct Route. 5 Select RIDE. The device navigates you back to the starting point of your ride. Stopping Navigation 1 Select anywhere on the screen to view the timer overlay. 2 Scroll to the map. 3 Select > . Projecting a Location You can create a new location by projecting the distance and bearing from a marked location to a new location. 1 From the home screen, select Where To? > Saved > Locations. 2 Select a location. 3 Select the location information at the top of the screen. 4 Select > Project Location. 5 Enter the bearing and distance to the projected location. 6 Select . Editing Locations 1 From the home screen, select Where To? > Saved > Locations. 2 Select a location. 3 Select the information bar at the top of the screen. 4 Select . 5 Select an attribute. For example, select Change Elevation to enter a known altitude for the location. 6 Enter the new information, and select . Deleting a Location 1 From the home screen, select Where To? > Saved > Locations. 2 Select a location. 3 Select the location information at the top of the screen. 4 Select > Delete Location > . Planning and Riding a Route You can create and ride a custom route. A route is a sequence of waypoints or locations that leads you to your final destination. 1 From the home screen, select Where To? > Route Planner > Add First Location. 2 Select an option: • To select a saved location, select Saved, and select a location. • To select a location for which you recently searched, select Recent Finds, and select a location. • To select a location on the map, select Use Map, and select a location. • To browse for and select a point of interest, select POI Categories, and select a nearby point of interest. • To select a city, select Cities, and select a nearby city. • To select an address, select Address, and enter the address. • To use coordinates, select Coordinates, and enter the coordinates. 3 Select Use. 4 Select Add Next Location. 5 Repeat steps 2-4 until you have selected all locations for the route. 6 Select View Route. The device calculates your route, and a map of the route appears. TIP: You can select to view an elevation plot of the route. 7 Select RIDE. 10 Navigation
-
 1
1 -
2
-
3
-
4
-
5
-
6
-
7
-
8
-
 9
9 -
 10
10 -
 11
11 -
 12
12 -
 13
13 -
 14
14 -
 15
15 -
 16
16 -
 17
17 -
 18
18 -
 19
19 -
20
-
21
-
22
-
23
-
24
 |
 |