Garmin Edge 1000 Owner's Manual - Page 8
Using Virtual Partner, Courses - review
 |
View all Garmin Edge 1000 manuals
Add to My Manuals
Save this manual to your list of manuals |
Page 8 highlights
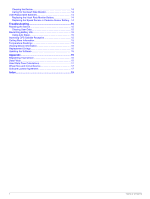
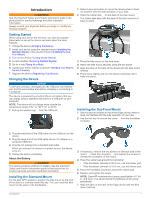
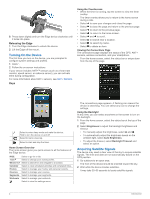
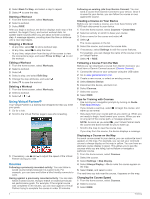
4 Select Back To Step, and select a step to repeat. 5 Select to save the step. Starting a Workout 1 From the home screen, select Workouts. 2 Select a workout. 3 Select RIDE. After you begin a workout, the device displays each step of the workout, the target (if any), and current workout data. An audible alarm sounds when you are about to finish a workout step. A message appears, counting down the time or distance until a new step begins. Stopping a Workout • At any time, select to end a workout step. • At any time, select to stop the timer. • At any time, swipe down from the top of the screen to view the connections page, and select Press to Stop > to end the workout. Editing a Workout 1 From the home screen, select Workouts. 2 Select a workout. 3 Select . 4 Select a step, and select Edit Step. 5 Change the step attributes, and select . 6 Select to save the workout. Deleting a Workout 1 From the home screen, select Workouts. 2 Select a workout. 3 Select > > . Using Virtual Partner® Your Virtual Partner is a training tool designed to help you meet your goals. 1 Go for a ride. 2 Scroll to the Virtual Partner page to see who is leading. 3 If necessary, use and to adjust the speed of the Virtual Partner during your ride. Courses Following a previously recorded activity: You can follow a saved course simply because it is a good route. For example, you can save and follow a bike friendly commute to work. Racing against a previously recorded activity: You can also follow a saved course, trying to match or exceed previously set performance goals. For example, if the original course was completed in 30 minutes, you can race against a Virtual Partner trying to complete the course in under 30 minutes. Following an existing ride from Garmin Connect: You can send a course from Garmin Connect to your device. Once it is saved to your device, you can follow the course or race against the course. Creating a Course on Your Device Before you can create a course, you must have history with GPS track data saved to your device. 1 From the home screen, select Courses > Create New. 2 Select an activity on which to base your course. 3 Enter a name for the course and select . 4 Select . The course appears in the list. 5 Select the course, and review the course data. 6 If necessary, select Settings to edit the course features. For example, you can change the name of the course or turn on Virtual Partner. 7 Select > RIDE. Following a Course From the Web Before you can download a course from Garmin Connect, you must have a Garmin Connect account (Garmin Connect). 1 Connect the device to your computer using the USB cable. 2 Go to www.garminconnect.com. 3 Create a new course, or select an existing course. 4 Select Send to Device. 5 Disconnect the device, and turn it on. 6 Select Courses. 7 Select the course. 8 Select RIDE. Tips for Training with Courses • Use turn-by-turn navigation prompts by turning on Guide Text (Map Settings). • If you include a warmup, select to begin the course, and warm up as normal. • Stay away from your course path as you warm up. When you are ready to begin, head toward your course. When you are on any part of the course path, a message appears. NOTE: As soon as you select , your Virtual Partner starts the course and does not wait for you to warm up. • Scroll to the map to view the course map. If you stray from the course, the device displays a message. Displaying a Course on the Map For each course saved to your device, you can customize how it appears on the map. For example, you can set your commute course to always display on the map in yellow. You can have an alternate course display in green. This allows you to see the courses while you are riding, but not follow or navigate a particular course. 1 From the home screen, select Courses. 2 Select the course. 3 Select Settings > Map Display. 4 Select Always Display > On to make the course appear on the map. 5 Select Color, and select a color. The next time you ride near the course, it appears on the map. Changing the Course Speed 1 From the home screen, select Courses. 2 Select a course. 3 Select RIDE. 4 Training
-
 1
1 -
2
-
 3
3 -
 4
4 -
 5
5 -
 6
6 -
 7
7 -
 8
8 -
 9
9 -
 10
10 -
 11
11 -
 12
12 -
 13
13 -
14
-
15
-
16
-
17
-
18
-
19
-
20
-
21
-
22
-
23
-
24
 |
 |