Garmin LiveScope LVS32-IF Installation Instructions - Page 8
Installing the Transom-Mount Hardware
 |
View all Garmin LiveScope LVS32-IF manuals
Add to My Manuals
Save this manual to your list of manuals |
Page 8 highlights
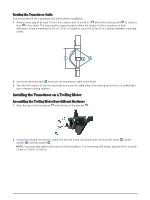
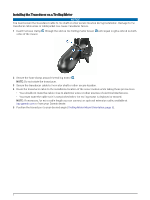
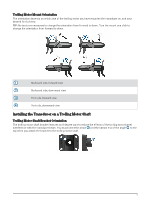
Installing the Transom-Mount Hardware NOTICE If you are mounting the bracket on fiberglass with screws, it is recommended to use a countersink bit to drill a clearance counterbore through only the top gel-coat layer. This will help to avoid cracking in the gel-coat layer when the screws are tightened. 1 Place the transducer mount so the top of the transducer is even with or up to 12.7 mm (1/2 in.) above the bottom edge of the transom. 2 Using the transom mount as a template, mark the location of the pilot holes. 3 Wrap a piece of tape around a 4 mm (5/32 in.) bit at 19 mm (7/10 in.) from the point of the bit, to avoid drilling the pilot holes too deep. 4 If you are installing the bracket on fiberglass, place a piece of tape over the pilot-hole location to reduce cracking of the gel coat. 5 Using the 4 mm (5/32 in.) bit, drill the pilot holes approximately 19 mm (3/4 in.) deep at the marked locations. 6 Apply marine sealant to the included 20 mm screws. 7 Using the four 20 mm screws , attach the transducer mount to the transom. NOTICE When mounting the transducer, be sure to secure all four corners of the mount with the included screws . This is especially important on vessels that operate at high speeds. If only the top or bottom holes are used, the bracket may bend or break when the vessel moves at high speeds, dislodging the transducer. 8 If you must route the cable through the transom, choose a pilot-hole location well above the waterline and mark it. 9 If you marked a pilot hole in step 8, use a 32 mm (1 1/4 in.) hole saw to drill a pass-through hole completely through the transom. 10 Route the transducer cable to the sonar module: • If you are routing the cable using a pass-through hole, push it through the hole you drilled in step 9. • If you are not routing the cable using a pass-through hole, route the cable up and over the top of the transom . You should avoid routing the cable close to electrical wires or other sources of electrical interference. 8
-
 1
1 -
2
-
 3
3 -
 4
4 -
 5
5 -
 6
6 -
 7
7 -
 8
8 -
 9
9 -
 10
10 -
 11
11 -
 12
12 -
 13
13 -
14
 |
 |
