Garmin T 5 Mini Dog Device Owners Manual - Page 5
Setting Up the System, Device Overviews, Installing Batteries
 |
View all Garmin T 5 Mini Dog Device manuals
Add to My Manuals
Save this manual to your list of manuals |
Page 5 highlights
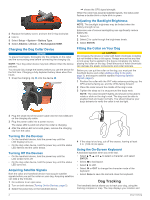
Introduction WARNING See the Important Safety and Product Information guide in the product box for product warnings and other important information. Keypad Setting Up the System You must set up the handheld device and the dog collar device before you can use the devices. 1 Install batteries in the handheld device (Installing Batteries, page 1). 2 Charge the dog collar device (Charging the Dog Collar Device, page 2). 3 Turn on the devices (Turning On the Devices, page 2). 4 If necessary, add the dog collar device to the handheld device (Adding a Dog to the Astro, page 3). 5 Acquire satellite signals (Acquiring Satellite Signals, page 2). Device Overviews Astro 320 Handheld Device NOTICE Avoid using a high-powered radio (greater than 5 watts) in close proximity to the handheld device. It may cause irreversible damage to the handheld device. IN Select to zoom in on the map. OUT Select to zoom out on the map. MAP Select to view the map. MENU Select to open the menu for the active page. Select twice to open the main menu. ENTER Select to select options and acknowledge messages. BACK Select to cancel data entry or return to the previous menu or page. MARK Select to mark your current location. DOG Select to view the dog tracking page. Select to view or scroll through options and to move the map pointer. Locking the Keypad 1 Select . 2 Select OUT. Dog Collar Device NOTE: Your dog collar device may look different than the device pictured. GPS antenna VHF antenna Power key Display Keypad USB port (under weather cap) microSD™ card slot (under battery door) Mounting spine Battery cover D-ring Introduction VHF antenna GPS antenna Power key Status LED and flashing beacon LEDs Installing Batteries The handheld device operates on two AA batteries (not included). Use NiMH or lithium batteries for best results. 1 Turn the D-ring counter-clockwise, and pull up to remove the cover. 2 Insert two AA batteries, observing polarity. 1
-
 1
1 -
 2
2 -
 3
3 -
 4
4 -
 5
5 -
 6
6 -
 7
7 -
 8
8 -
 9
9 -
 10
10 -
 11
11 -
12
-
13
-
14
-
15
-
16
-
17
-
18
-
19
-
20
-
21
-
22
 |
 |
