Garmin T 5 Mini Dog Device Owners Manual - Page 6
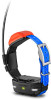
Fitting the Collar on Your Dog
 |
View all Garmin T 5 Mini Dog Device manuals
Add to My Manuals
Save this manual to your list of manuals |
Page 6 highlights
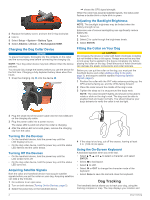
shows the GPS signal strength. When the collar has acquired satellite signals, the status LED flashes a double-blink or triple-blink in green. 3 Replace the battery cover, and turn the D-ring clockwise. 4 Hold . 5 Select Setup > System > Battery Type. 6 Select Alkaline, Lithium, or Rechargeable NiMH. Charging the Dog Collar Device NOTICE To prevent corrosion, thoroughly dry the contacts on the collar and the surrounding area before connecting the charging clip. NOTE: Your dog collar device may look different than the device pictured. You should fully charge the battery before you use the device for the first time. Charging a fully depleted battery takes about five hours. 1 Snap the charging clip onto the device . Adjusting the Backlight Brightness NOTE: The backlight brightness may be limited when the battery strength is low. Extensive use of screen backlighting can significantly reduce battery life. 1 Select . 2 Select to cycle through the brightness levels. 3 Select ENTER. Fitting the Collar on Your Dog CAUTION Do not spray the device or collar with harsh chemicals including but not limited to flea or tick spray. Always ensure that any flea or tick spray that is applied to the dog is completely dry before placing the collar on the dog. Small amounts of harsh chemicals can damage the plastic components and collar laminate. Before you can put the collar on the dog, you must pair the handheld device and collar (Adding a Dog to the Astro, page 3), and acquire satellite signals (Acquiring Satellite Signals, page 2). 1 Position the collar with the VHF whip antenna pointing up, the GPS antenna facing up, and the LEDs facing forward. 2 Place the collar around the middle of the dog's neck. 3 Tighten the strap so it is snug around the dog's neck. NOTE: The collar should fit tightly and should not be able to rotate or slide on the dog's neck. The dog must be able to swallow food and water normally. You should observe your dog's behavior to verify the collar is not too tight. 2 Plug the small end of the power cable into the mini-USB port on the charging clip cable. 3 Plug the power cable into a power source. The status LED is solid red when the collar is charging. 4 After the status LED turns solid green, remove the charging clip from the collar. Turning On the Devices • On the handheld device, hold the power key until the LCD display turns on. • On the dog collar device, hold the power key until the status LED flashes and the collar beeps. Turning Off the Devices • On the handheld device, hold the power key until the LCD screen turns off. • On the dog collar device, hold the power key until the status LED turns red. Acquiring Satellite Signals Both the collar and handheld device must acquire satellite signals before you put the collar on your dog. Acquiring satellites can take a few minutes. 1 Go outdoors to an open area. 2 Turn on both devices (Turning On the Devices, page 2). 3 Select the power key on the handheld device. 4 If the strap is too long, cut off the excess, leaving at least 3 in. (7.62 cm) to spare. Using the On-Screen Keyboard A keyboard appears when you enter text. • Select , , , and to select a character, and select ENTER. • Select to backspace. • Select to shift. • Select IN or OUT to change the character mode of the keyboard. • Select Done to save the text and close the keyboard. Dog Tracking The handheld device allows you to track your dog, using the tracking compass or map. The map displays your location and 2 Dog Tracking
-
 1
1 -
 2
2 -
 3
3 -
 4
4 -
 5
5 -
 6
6 -
 7
7 -
 8
8 -
 9
9 -
 10
10 -
 11
11 -
 12
12 -
13
-
14
-
15
-
16
-
17
-
18
-
19
-
20
-
21
-
22
 |
 |
