Garmin zumo 395LM Owners Manual - Page 6
Removing Your Device from the Motorcycle, Mount, Mounting Your Device in an Automobile - motorcycle mount
 |
View all Garmin zumo 395LM manuals
Add to My Manuals
Save this manual to your list of manuals |
Page 6 highlights
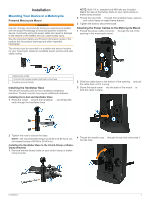
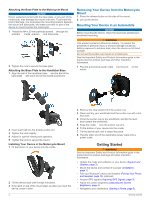
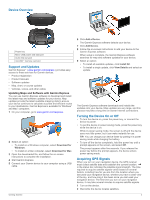
Attaching the Base Plate to the Motorcycle Mount NOTICE Direct, sustained contact with the base plate, or any part of the motorcycle, may damage the mount over time. To prevent this kind of damage, you must place the mounting spacers between the mount and base plate, and make sure that no part of the device or mount touches the motorcycle. 1 Thread the M4 x 20 mm panhead screws through the À washers , cradle, spacers , and base plate . Á  à 2 Tighten the nuts to secure the base plate. Attaching the Base Plate to the Handlebar Base 1 Align the ball of the handlebar base and the ball of the À base plate with each end of the double-socket arm . Á  Removing Your Device from the Motorcycle Mount 1 Press the release button on the side of the mount. 2 Lift out the device. Mounting Your Device in an Automobile NOTICE Before mounting the device, check the local laws pertaining to windshield mounting. WARNING This product contains a lithium-ion battery. To prevent the possibility of personal injury or product damage caused by battery exposure to extreme heat, store the device out of direct sunlight. Do not use the suction cup mount on a motorcycle. See the Important Safety and Product Information guide in the product box for product warnings and other important information. 1 Plug the automotive power cable into the port on the À Á mount. 2 Insert each ball into the double-socket arm. 3 Tighten the knob slightly. 4 Adjust for optimal viewing and operation. 5 Tighten the knob to secure the mount. Installing Your Device in the Motorcycle Mount 1 Fit the bottom of your device into the cradle. 2 Tilt the device back until it snaps into place. 3 If the latch on top of the mount stays up after you insert the device, press it down. 2 2 Remove the clear plastic from the suction cup .  3 Clean and dry your windshield and the suction cup with a lintfree cloth. 4 Press the suction cup to the windshield, and flip the lever à back toward the windshield. 5 Snap the cradle onto the suction cup arm. Ä 6 Fit the bottom of your device into the cradle. 7 Tilt the device back until it snaps into place. 8 Plug the other end of the automotive power cable into a power outlet. Getting Started WARNING See the Important Safety and Product Information guide in the product box for product warnings and other important information. • Update the maps and software on your device (Support and Updates, page 3). • Mount the device and connect it to power (Installation, page 1). • Pair your Bluetooth® phone and headset (Pairing Your Phone and Headset, page 12) (optional). • Acquire GPS signals (Acquiring GPS Signals, page 3). • Adjust the screen brightness (Adjusting the Screen Brightness, page 4). • Navigate to your destination (Starting a Route, page 5). Getting Started
-
 1
1 -
 2
2 -
 3
3 -
 4
4 -
 5
5 -
 6
6 -
 7
7 -
 8
8 -
 9
9 -
 10
10 -
 11
11 -
 12
12 -
13
-
14
-
15
-
16
-
17
-
18
-
19
-
20
-
21
-
22
-
23
-
24
-
25
-
26
 |
 |
