Garmin zumo 395LM Owners Manual - Page 9
Viewing Helmet Law Notifications, Searching for Helmet Laws, Routes, Starting a Route - canada
 |
View all Garmin zumo 395LM manuals
Add to My Manuals
Save this manual to your list of manuals |
Page 9 highlights
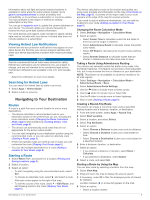
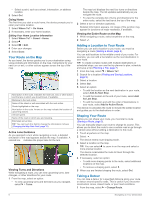
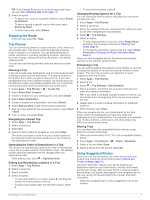
Information about red light and speed camera locations is available in some areas for some product models. Go to garmin.com/speedcameras to check availability and compatibility, or to purchase a subscription or one-time update. You can purchase a new region or extend an existing subscription at any time. You can go to mygarmin.com to update the camera database on your device. You should update your device frequently to receive the most up-to-date camera information. For some devices and regions, basic red light or speed camera data may be included with your device. Included data does not include updates or a subscription. Viewing Helmet Law Notifications Helmet law and eye protection notifications may appear on your zūmo device the first time your device acquires satellites and when your device approaches a location with motorcycle safety rules. NOTICE Garmin recommends that all riders wear helmets for safety. Helmet law notifications are for reference only, are subject to change, and are not intended to be considered legal advice. Helmet law notifications are available in the U.S. and Canada only. Select the notification to view more details. Searching for Helmet Laws You can search for helmet laws by state or province. 1 Select Apps > Helmet Guide. 2 Select a state or province. Navigating to Your Destination Routes A route is a path from your current location to one or more destinations. • The device calculates a recommended route to your destination based on the preferences you set, including the route calculation mode (Changing the Route Calculation Mode, page 5) and avoidances (Avoiding Delays, Tolls, and Areas, page 8). • The device can automatically avoid roads that are not appropriate for the active vehicle profile. • You can start navigating to your destination quickly using the recommended route, or you can select an alternate route (Starting a Route, page 5). • If there are specific roads you need to use or avoid, you can customize the route (Shaping Your Route, page 6). • You can add multiple destinations to a route (Adding a Location to Your Route, page 6). Starting a Route 1 Select Where To?, and search for a location (Finding and Saving Locations, page 9). 2 Select a location. 3 Select an option: • To start navigating using the recommended route, select Go!. • To choose an alternate route, select , and select a route. Alternate routes appear to the right of the map. • To edit the course of the route, select > Edit Route, and add shaping points to the route (Shaping Your Route, page 6). The device calculates a route to the location and guides you using voice prompts and information on the map (Your Route on the Map, page 6). A preview of the major roads in your route appears at the edge of the map for several seconds. If you need to stop at additional destinations, you can add the locations to your route (Adding a Location to Your Route, page 6). Changing the Route Calculation Mode 1 Select Settings > Navigation > Calculation Mode. 2 Select an option: • Select Faster Time to calculate routes that are faster to drive but can be longer in distance. • Select Adventurous Route to calculate routes that prefer curvy roads. • Select Off Road to calculate point-to-point routes (without roads). • Select Shorter Distance to calculate routes that are shorter in distance but can take more time to drive. Taking a Route Using Adventurous Routing Your device can calculate routes that prefer curvy roads, hills, and fewer highways. This feature can provide a more enjoyable ride, but it may increase the time or distance to your destination. NOTE: This feature is not available on all device models or for all map regions. 1 Select Settings > Navigation > Calculation Mode > Adventurous Route > Save. 2 Select Adventurous Route Settings. 3 Use the slider to include more or fewer curves. 4 Use the slider to include more or fewer hills. 5 Use the slider to include more or fewer highways. 6 Start a route (Starting a Route, page 5). Creating a Round-Trip Route The device can create a round-trip route using a specified starting location and a distance, duration, or destination. 1 From the home screen, select Apps > Round Trip. 2 Select Start Location. 3 Select a location, and select Select. 4 Select Trip Attributes. 5 Select an option: • Select Choose a Distance to plan your route by distance. • Select Choose a Duration to plan your route based on time. • Select Choose a Destination to plan your route based on a specified location. 6 Enter a distance, duration, or destination. 7 Select an option: • If you entered a distance or duration, select Done > Calculate. • If you selected a destination, select Select. 8 Select a route, and select Go!. Starting a Route by Using the Map You can start route by selecting a location from the map. 1 Select View Map. 2 Drag and zoom the map to display the area to search. 3 If necessary, select to filter the displayed points of interest by category. Location markers ( or a blue dot) appear on the map. 4 Select an option: • Select a location marker. Navigating to Your Destination 5
-
 1
1 -
2
-
3
-
 4
4 -
 5
5 -
 6
6 -
 7
7 -
 8
8 -
 9
9 -
 10
10 -
 11
11 -
 12
12 -
 13
13 -
 14
14 -
15
-
16
-
17
-
18
-
19
-
20
-
21
-
22
-
23
-
24
-
25
-
26
 |
 |
