GE PD900DP Installation Instructions - Page 10
Install Stop Screw, Opening Continued, Remove the Protective Channels, if provided
 |
View all GE PD900DP manuals
Add to My Manuals
Save this manual to your list of manuals |
Page 10 highlights
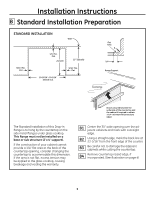
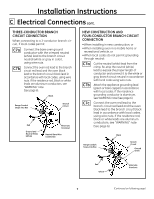
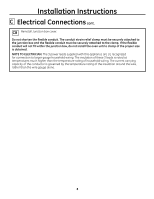
Installation Instructions D Standard Installation Instructions cont. D2 Install Stop Screw These screws prevent the range from sliding out of position during operation. D3 Placing the Range into the Opening (Continued) Carefully slide the range toward the back of the opening. Stop pushing the Range when there is still a 4" gap at the front before flushing the Range with the countertop. Countertop Gap Approx. 4" Carefully mark the cabinet for the location of the stop screws. Drill 1/8" pilot holes into the cabinet, each side of the range. (Make sure not to drill entirely through the cabinet wall.) Carefully turn the shoulder screws into the pilot holes until they are tight. D3 Placing the Range into the Opening It is suggested that two people lift the range into place, carefully setting the side metal flanges under the glass on the edges of the countertop opening. The protective channels must be in place (if supplied) during this operation. Lift and Slide Range on Countertop Range Countertop Cabinet Gap Approx. 4" D4 Remove the Protective Channels (if provided) Carefully remove the protective channels from the sides of the glass cooktop. This may require a slight lifting of the range to remove the weight of the range from the protective channels. Glass Cooktop Protective Cover Remove Protective Cover From Both Sides After Range Is In Cabinet 10 (Continued on following page)
-
 1
1 -
2
-
3
-
4
-
 5
5 -
 6
6 -
 7
7 -
 8
8 -
 9
9 -
 10
10 -
 11
11 -
 12
12 -
 13
13 -
 14
14 -
 15
15 -
16
 |
 |
