GE PD900DP Installation Instructions - Page 9
Standard Installation Instructions
 |
View all GE PD900DP manuals
Add to My Manuals
Save this manual to your list of manuals |
Page 9 highlights
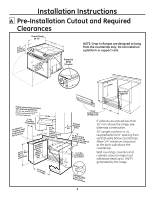
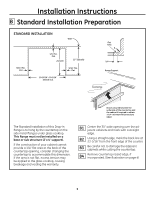
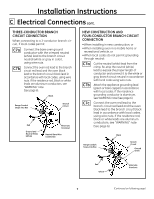
Installation Instructions D Standard Installation Instructions D1 Installing the Anti-Tip Bracket The anti-tip bracket is attached to the back of the Drop-In Range. It is designed to fit under the bottom of the countertop opening at the rear. Measure counter thickness at back of cutout to determine correct bracket location. Select the proper position for the countertop thickness and move bracket to proper position. (Unit is supplied with bracket in position 1.) 1 For 3/4" Counter 2 For 1.18" (3 cm) Counter 3 For 1.5" Counter 4 For 3.5" 5 Alternate (shown below) Glass Cooktop Anti-Tip Bracket Location (Rear of Range) anti-tip installation Interior Wall 1/4" Min. Flat Area Wall Stud Glass Maintop Anti-Tip Bracket Bottom of Countertop to Engage Bracket by 1/2" Min. Countertop Thickness Bottom of Countertop Wire Cover alternate anti-tip installation Interior Wall Non-Kit Application Glass Maintop Wall Stud Countertop Surface Attachment Position #5 Non-Kit Application Anti-Tip Bracket *Attachment To Engage Bracket By 1/2" Min. 9 10-3/8" Wire Cover 1-1/2" Attachment Anchored To Wall Stud Is Required (Continued on following page)
-
 1
1 -
2
-
3
-
 4
4 -
 5
5 -
 6
6 -
 7
7 -
 8
8 -
 9
9 -
 10
10 -
 11
11 -
 12
12 -
 13
13 -
 14
14 -
15
-
16
 |
 |
