GE PD900DP Installation Instructions - Page 3
Pre-Installation Checklist - electric range
 |
View all GE PD900DP manuals
Add to My Manuals
Save this manual to your list of manuals |
Page 3 highlights
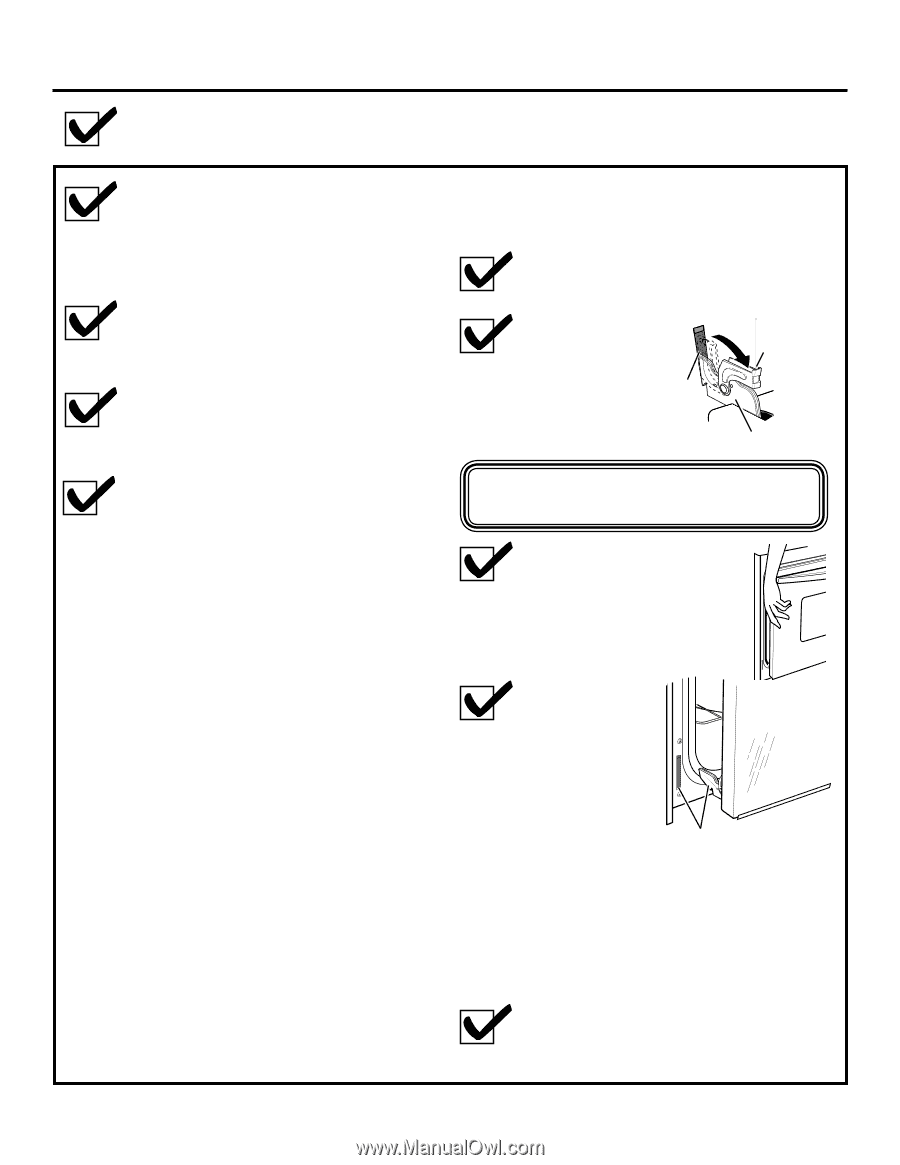
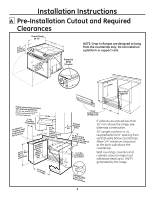
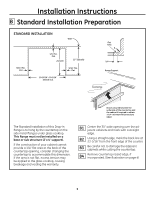
Installation Instructions Pre-Installation Checklist Move Range Indoors In Front of Cabinet Opening (Do not use hand trucks when moving the unpackaged range. Cooktop glass may be broken.) Door removal is not a requirement for installation of the product, but is an added convenience. To remove the door: Open the oven door as far as it will go. Protect the kitchen floor! Flatten and place a piece of the shipping carton in front of the installation location to protect the flooring. Do not remove the protective channel from the sides of the glass cooktop until later in installation. (If supplied) Push both hinge locks down toward the door frame, to the unlocked Hinge position. This may Slot require a flat blade screwdriver. Hinge Lock (Unlocked Position) Hinge Arm Inspect Installation Location Inspect cutout dimensions and location of electrical junction box to be sure it fits within the layout location. See page 4. Refer to alternate construction section for the following non-standard installations. a. Counter opening extends to the wall: Maintop Filler Kit (JXS66XX), or Backguard Kit (JXS36XX or JXS39SS). WARNING: If you do not use these kits, the anti-tip bracket must fit under an attachment to the wall that can withstand a force of 200lbs. in the upward direction. See Section D1. b. Island Installation: To provide an optimum installation, the top surface of the countertop must be level and flat (lie on the same plane) around the 3 sides that are adjacent to range cooktop. Proper adjustments to make the top flat should be made or gaps between the countertop and range cooktop may occur. Forcing the cooktop to fit may cause excessive gaps, or could break the glass cooktop and void the warranty. DO NOT LIFT THE DOOR BY THE HANDLE! Place hands on both sides of the door, and close the oven door to the removal position. This is half way between the broil stop and fully closed. Lift door up and out until the hinge arms clear the slots. Hinge Clears Slot NOTE: The oven door is very heavy. Be sure you have a firm grip before lifting the oven door off the hinges. Use caution once the door is removed. Do not lay the door on its handle. This could cause dents or scratches. To obtain Kits: a. Visit GE Web Site (See page 1) b. Call GE Answer Center (See page 1) c. Contact Dealer Remove packing materials. Remove labels on door, plastic on trims and panel, and all tape around the range. 3 (Continued on following page)
-
 1
1 -
 2
2 -
 3
3 -
 4
4 -
 5
5 -
 6
6 -
 7
7 -
 8
8 -
 9
9 -
10
-
11
-
12
-
13
-
14
-
15
-
16
 |
 |