GE PD900DP Installation Instructions - Page 11
Check For Proper Installation of, the Stop Screw, Locating the Stop Screw, Attach the Lower Trim
 |
View all GE PD900DP manuals
Add to My Manuals
Save this manual to your list of manuals |
Page 11 highlights
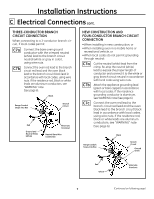
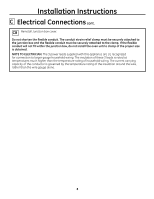
Installation Instructions D Standard Installation Instructions cont. D5 Attach the Lower Trim Attach the lower trim (supplied separately with the range) to the bottom of the vertical side trim with the 4 screws supplied. Side trim Lower trim Attach 2 screws each side Lower right end of front frame D7 Check For Proper Installation of the Stop Screw Look at both sides of the range under the door. The stop screws must be located in the notch on the sides of the range, and not touch the top of the notch when the range is fully seated on the countertop. If the screws do not meet the requirements, move the screws to a position that meets these requirements. (See illustration below.) Lower trim Clear D6 Locating the Stop Screw It is suggested that two people lift the range and carefully slide it towards the back of the opening. When the range is approximately 1" from the back of the opening, lift the front of the range approximatley 1/2" to clear the stop screw located in the sides of the cabinet. Slide the range until the range is seated into the opening. Lower the front of the range onto the countertop. Shoulder screw Notch in bottom of side trim 11 (Continued on following page)
-
 1
1 -
2
-
3
-
4
-
5
-
 6
6 -
 7
7 -
 8
8 -
 9
9 -
 10
10 -
 11
11 -
 12
12 -
 13
13 -
 14
14 -
 15
15 -
 16
16
 |
 |
