Harman Kardon AVR 1710 Owners Manual - Page 5
Front-Panel Controls, continued - remote
 |
View all Harman Kardon AVR 1710 manuals
Add to My Manuals
Save this manual to your list of manuals |
Page 5 highlights
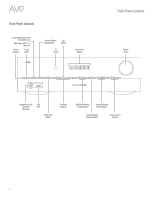
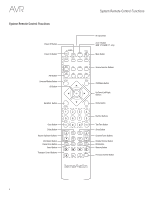
English AVR Front-Panel Controls Front-Panel Controls, continued Power indicator/Power button: The AVR has three different power modes: • Off (Power indicator glows solid amber):The Off mode minimizes energy consumption when you're not using the AVR. When the AVR is off, it will not automatically turn on or play audio in response to an AirPlay stream from a networked device (AVR 1710/ AVR 171 only). When the AVR is off, pressing the Power button turns it on. To turn the AVR off when it is on, press the Power button for more than three seconds. The Front-Panel Display will indicate "Your device is switched off" for two seconds, then will switch off. NOTE: You can use the System Setup menu to set the AVR to automatically enter the off mode after it has been in the Sleep mode for a certain period of time. See System Settings, on page 34. • Sleep (Power indicator glows solid amber and front-panel display indicates "Device sleep"): The Sleep mode powers-down some of the AVR's circuitry, but allows the AVR to automatically turn on and play audio in response to an AirPlay or DLNA DMR stream from a networked device (AVR 1710/AVR 171 only). When the AVR is in Sleep, pressing the Power button turns it on. To put the AVR into Sleep when it is on, press the Power button for less than three seconds. The front-panel display will indicate "Device sleep" while the AVR is in the Sleep mode. NOTE: The AVR will automatically enter the Sleep mode after 30 minutes of no audio signal or user control input , unless USB, iPod, Home Network, vTuner, AirPlay, or DLNA DMR is active. In these cases, the AVR will automatically enter the Sleep mode after the number of hours set in the Auto Power Off system setting. See System Settings, on page 34. • On (Power indicator glows solid white): When the AVR is on it is fully operational. Headphone jack/EzSet/EQ Mic input: Connect a 1/4" stereo headphone plug to this jack for private listening. This jack is also used to connect the supplied microphone for the EzSet/EQ setup procedure described in Configure the AVR For Your Speakers, on page 22. Tuning Mode button (AVR 1710/AVR 1610 only): Press this button to toggle the radio between the manual (one frequency step at a time) and automatic (seeks frequencies with acceptable signal strength) FM tuning mode. The button also toggles the radio between stereo and mono modes when an FM station is tuned in. RDS button (AVR 171/AVR 161 only): When listening to an FM radio station that broadcasts RDS information, this button activates the various RDS functions. USB port: The USB port can be used to play audio files from an Apple iOS® device connected to the port, and can also be used to play MP3 and WMA audio files from a USB device inserted into the port. Insert the connector or device into the USB port oriented so it fits all the way into the port. You may insert or remove the connector or device at any time - there is no installation or ejection procedure. You can also use the USB port to perform firmware upgrades. If an upgrade for the AVR's operating system is released in the future, you will be able to download it to the AVR using this port. Complete instructions will be provided at that time. IMPORTANT: Do not connect a PC or other USB host/controller to this port, or you may damage both the AVR and the other device. Channel Volume Adjust button: Press this button to activate the individual channel level adjustment. After pressing this button, use the Up/Down buttons/Tuning buttons to select the channel for adjustment and use theLeft/Right buttons to adjust the channel's level. Audio Input button: Press this button to change the audio input connection for the current source. Use the Left/Right buttons to cycle through the available input connections, and press the Set button to assign the currently-displayed connection to the source. IR sensor: This sensor receives infrared (IR) commands from the remote control. Make sure that the sensor is not blocked. Set button: Press this button to select the currently highlighted menu item. Left/Right buttons: Use these buttons to navigate the AVR's menus. Front-panel display: Various messages appear on this two-line display in response to commands and changes in the incoming signal. In normal operation, the current source name appears on the upper line, while the active surround mode is displayed on the lower line. When the on-screen display menu system (OSD) is in use, the current menu settings appear. Up/Down buttons/Tuning buttons: Use these buttons to navigate the AVR's menus. When the radio is the active source, use these buttons to tune stations according to the setting of the Tuning Mode button (see above). Surround Mode Category button: Press this button to select a surround-sound category. Each press changes the surround-mode category: Auto Select, Virtual, Stereo, HARMAN NSP, Movie, Music and Video Game. To change the specific surround-sound mode within the category, use the Surround Mode Select buttons. See Audio Processing and Surround Sound, on page 29, for more information about surround modes. Surround Mode Select buttons: After you have selected the desired surround-mode category, press these buttons to select a specific mode within the category, such as to change from Dolby® Pro Logic® II Movie mode to DTS® NEO:6 Cinema mode. Surround mode availability depends on the nature of the source input signal, i.e., digital versus analog, and the number of channels encoded within the signal. Source Select buttons: Press these buttons to select the active source. Volume knob: Turn this knob to raise or lower the volume. 5
-
 1
1 -
 2
2 -
 3
3 -
 4
4 -
 5
5 -
 6
6 -
 7
7 -
 8
8 -
 9
9 -
 10
10 -
 11
11 -
12
-
13
-
14
-
15
-
16
-
17
-
18
-
19
-
20
-
21
-
22
-
23
-
24
-
25
-
26
-
27
-
28
-
29
-
30
-
31
-
32
-
33
-
34
-
35
-
36
-
37
-
38
-
39
-
40
-
41
-
42
-
43
-
44
-
45
-
46
-
47
-
48
-
49
-
50
-
51
-
52
 |
 |