Hayward CAT 6000 CAT 6000 Owners Manual - Page 11
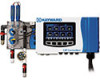
G. The system should resemble the picture below.
 |
View all Hayward CAT 6000 manuals
Add to My Manuals
Save this manual to your list of manuals |
Page 11 highlights
F. Align the chlorine sensor in the bottom keyed flange. Push in on the sensor and turn it clockwise until it is fully seated in the correct position, as shown on the top of the next page. G. The system should resemble the picture below. 10 USE ONLY HAYWARD GENUINE REPLACEMENT PARTS
-
 1
1 -
2
-
3
-
4
-
5
-
 6
6 -
 7
7 -
 8
8 -
 9
9 -
 10
10 -
 11
11 -
 12
12 -
 13
13 -
 14
14 -
 15
15 -
 16
16 -
17
-
18
-
19
-
20
-
21
-
22
-
23
-
24
-
25
-
26
-
27
-
28
-
29
-
30
-
31
-
32
-
33
-
34
-
35
-
36
-
37
-
38
-
39
-
40
-
41
-
42
-
43
-
44
-
45
-
46
-
47
-
48
 |
 |

USE ONLY HAYWARD GENUINE REPLACEMENT PARTS
10
F.
Align the chlorine sensor in the bottom keyed flange. Push in on the sensor and
turn it clockwise until it is fully seated in the correct position, as shown on the top
of the next page.
G. The system should resemble the picture below.