Hayward CAT 6000 CAT 6000 Owners Manual - Page 8
Note: Do not touch the capped end of any sensor after the cap is removed.
 |
View all Hayward CAT 6000 manuals
Add to My Manuals
Save this manual to your list of manuals |
Page 8 highlights
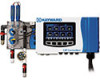
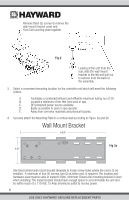
6. The system should resemble the picture below. 7. Ready each of the sensors for installation according to the steps and illustrations below. Note: Do not touch the capped end of any sensor after the cap is removed. Note: Do not remove the battery from the chlorine sensor until instructed to do so. Fig 5 7 USE ONLY HAYWARD GENUINE REPLACEMENT PARTS
-
 1
1 -
2
-
 3
3 -
 4
4 -
 5
5 -
 6
6 -
 7
7 -
 8
8 -
 9
9 -
 10
10 -
 11
11 -
 12
12 -
 13
13 -
14
-
15
-
16
-
17
-
18
-
19
-
20
-
21
-
22
-
23
-
24
-
25
-
26
-
27
-
28
-
29
-
30
-
31
-
32
-
33
-
34
-
35
-
36
-
37
-
38
-
39
-
40
-
41
-
42
-
43
-
44
-
45
-
46
-
47
-
48
 |
 |

USE ONLY HAYWARD GENUINE REPLACEMENT PARTS
7
6.
The system should resemble the picture below.
7.
Ready each of the sensors for installation according to the steps and illustrations below.
Note: Do not touch the capped end of any sensor after the cap is removed.
Note: Do not remove the battery from the chlorine sensor until instructed to do so.
Fig 5