HP 1022n HP LaserJet 1022nw - Wireless Getting Started Guide - Page 26
Connecting to a wireless network (Macintosh), Wireless Network Connection - change ip address
 |
UPC - 829160711102
View all HP 1022n manuals
Add to My Manuals
Save this manual to your list of manuals |
Page 26 highlights
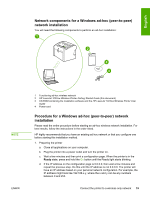
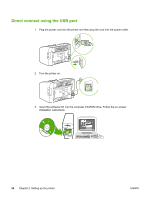
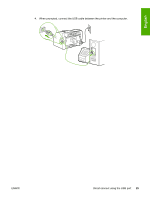
e. On the configuration page, confirm that there is a Network Name (SSID), such as hpsetup. 2. Preparing your computer a. Unplug any network cable connected to your computer. This will disable any wired network. Only the wireless network should be active during the installation. To verify that your wired network is disabled, click Start, Control Panel, and Network Connections. (The unplugged cables should be reconnected after the installation is complete.) b. In the configuration properties for your computer's wireless network card, verify that the hpsetup network is available and connect to it. (For example, in Windows XP, to connect to the hpsetup wireless network, click Start, Control Panel, Network Connections, and Wireless Network Connection. Then click Properties and select the Wireless Networks tab. In the Available networks box, select hpsetup and click Configure. Click OK. The network name, hpsetup, should now be available in the Preferred networks section. Click Refresh if the hpsetup network is not listed.) If you are using a wireless card or wireless adapter, use the utility that came with your wireless card or wireless adapter to add hpsetup to your network options. The network name, hpsetup, should only be used to configure the printer. c. Ensure that your computer has an automatic IP address before starting the software installation. Your computer may take a few moments to acquire an automatic IP address. (For example, in Windows XP, to check whether your computer has an automatic IP address, click Start, All programs, Connect To or click Start, Connect To and Show all connections. Then select Wireless Network Connection. In the Details section, verify that the IP address is similar to 192.168.x.y, where x and y are any numbers between 0 and 255. Also, verify that the peer-to-peer network name is hpsetup.) If the computer has not yet acquired a valid automatic IP address, wait a few minutes. The Details section of the Network Connections box will change to show the new IP address when it is valid. Now you are ready to start the software installation. 3. Installing the Software a. Insert the software CD into your computer's CD-ROM drive. Start the software installation, and follow the on-screen instructions. b. If one or more printers are found and displayed on the Printers Found page, select the printer that has the same IP address as the one you are installing, and then click Next. c. HP highly recommends that you select Change Settings on the Confirm Settings page to configure your device's network to match the settings of the existing ad-hoc network on your computer. If you do not have an existing ad-hoc network, then accept the default settings. d. Accept the settings on the Confirm Settings page. e. Continue with the installation until the process is complete. f. After the software installation is complete and your computer has been restarted, reconnect any network cables that you may have unplugged during the installation. Connecting to a wireless network (Macintosh) Use the following steps to setup a wireless network on a Macintosh. 20 Chapter 2 Setting up the printer ENWW
-
 1
1 -
2
-
3
-
4
-
5
-
6
-
7
-
8
-
9
-
10
-
11
-
12
-
13
-
14
-
15
-
16
-
17
-
18
-
19
-
20
-
 21
21 -
 22
22 -
 23
23 -
 24
24 -
 25
25 -
 26
26 -
 27
27 -
 28
28 -
 29
29 -
 30
30 -
 31
31 -
32
-
33
-
34
-
35
-
36
-
37
-
38
-
39
-
40
-
41
-
42
-
43
-
44
-
45
-
46
-
47
-
48
-
49
-
50
-
51
-
52
-
53
-
54
-
55
-
56
-
57
-
58
-
59
-
60
-
61
-
62
-
63
-
64
-
65
-
66
-
67
-
68
-
69
-
70
-
71
-
72
-
73
-
74
-
75
-
76
-
77
-
78
-
79
-
80
-
81
-
82
-
83
-
84
-
85
-
86
-
87
-
88
-
89
-
90
-
91
-
92
-
93
-
94
-
95
-
96
-
97
-
98
-
99
-
100
-
101
-
102
-
103
-
104
-
105
-
106
-
107
-
108
-
109
-
110
-
111
-
112
-
113
-
114
-
115
-
116
-
117
-
118
-
119
-
120
-
121
-
122
-
123
-
124
 |
 |