HP 60 HP StorageWorks 60 Modular Smart Array Enclosure Maintenance and Service - Page 25
Front UID board
 |
View all HP 60 manuals
Add to My Manuals
Save this manual to your list of manuals |
Page 25 highlights
4. Remove the module (3). NOTE: Use this same procedure to remove an I/O blank. To replace the component, reverse the removal procedure. Verifying proper operation After replacing the component, check the status LED. Front UID board Verifying component failure Before replacing the component, check the status LED ("Front panel LEDs and buttons" on page 34). To remove the components: 1. Power down the storage enclosure (on page 19). 2. Remove the plastic cover (1). 3. Remove the T-10 screw to release the board from the chassis (2). Removal and replacement procedures 25
-
 1
1 -
2
-
3
-
4
-
5
-
6
-
7
-
8
-
9
-
10
-
11
-
12
-
13
-
14
-
15
-
16
-
17
-
18
-
19
-
 20
20 -
 21
21 -
 22
22 -
 23
23 -
 24
24 -
 25
25 -
 26
26 -
 27
27 -
 28
28 -
 29
29 -
 30
30 -
31
-
32
-
33
-
34
-
35
-
36
-
37
-
38
-
39
-
40
-
41
-
42
 |
 |

Removal and replacement procedures
25
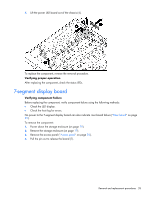
4.
Remove the module (3).
NOTE:
Use this same procedure to remove an I/O blank.
To replace the component, reverse the removal procedure.
Verifying proper operation
After replacing the component, check the status LED.
Front UID board
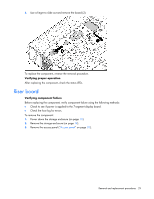
Verifying component failure
Before replacing the component, check the status LED ("
Front panel LEDs and buttons
" on page
34
).
To remove the components:
1.
Power down the storage enclosure (on page
19
).
2.
Remove the plastic cover (1).
3.
Remove the T-10 screw to release the board from the chassis (2).