HP 60 HP StorageWorks 60 Modular Smart Array Enclosure Maintenance and Service - Page 29
Riser board
 |
View all HP 60 manuals
Add to My Manuals
Save this manual to your list of manuals |
Page 29 highlights
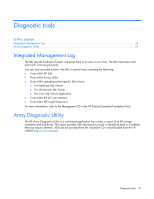
5. Use a finger to slide out and remove the board (2). To replace the component, reverse the removal procedure. Verifying proper operation After replacing the component, check the status LEDs. Riser board Verifying component failure Before replacing the component, verify component failure using the following methods: • Check to see if power is applied to the 7-segment display board. • Check the host log for errors. To remove the component: 1. Power down the storage enclosure (on page 19). 2. Remove the storage enclosure (on page 19). 3. Remove the access panel ("Access panel" on page 20). Removal and replacement procedures 29
-
 1
1 -
2
-
3
-
4
-
5
-
6
-
7
-
8
-
9
-
10
-
11
-
12
-
13
-
14
-
15
-
16
-
17
-
18
-
19
-
20
-
21
-
22
-
23
-
 24
24 -
 25
25 -
 26
26 -
 27
27 -
 28
28 -
 29
29 -
 30
30 -
 31
31 -
 32
32 -
 33
33 -
 34
34 -
35
-
36
-
37
-
38
-
39
-
40
-
41
-
42
 |
 |

Removal and replacement procedures
29
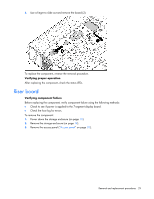
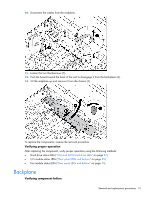
5.
Use a finger to slide out and remove the board (2).
To replace the component, reverse the removal procedure.
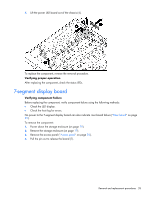
Verifying proper operation
After replacing the component, check the status LEDs.
Riser board
Verifying component failure
Before replacing the component, verify component failure using the following methods:
•
Check to see if power is applied to the 7-segment display board.
•
Check the host log for errors.
To remove the component:
1.
Power down the storage enclosure (on page
19
).
2.
Remove the storage enclosure (on page
19
).
3.
Remove the access panel ("
Access panel
" on page
20
).