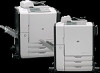
HP CM8000 HP CM8060/CM8050 Color MFP with Edgeline Technology - System Adminis - Page 201
Use Windows PC fax send, Send a fax to a single recipient
 |
View all HP CM8000 manuals
Add to My Manuals
Save this manual to your list of manuals |
Page 201 highlights
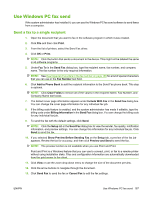
Use Windows PC fax send If the system administrator has installed it, you can use the Windows PC fax send software to send faxes from a computer. Send a fax to a single recipient 1. Open the document that you want to fax in the software program in which it was created. 2. Click File and then click Print. 3. From the list of printers, select the Send Fax driver. 4. Click OK or Print. NOTE: Click the button that sends a document to the device. This might not be labeled the same in all software programs. 5. Under Fax To in the Send Fax dialog box, type the recipient name, fax number, and company name. The fax number is the only required information. NOTE: See Insert special characters in the fax number on page 188 for a list of special characters that you can use in the Fax Number text field. 6. Click Add to Phone Book to add the recipient information to the Send Fax phone book. This step is optional. NOTE: Click Clear Fields to remove all of the values in the recipient Name, Fax Number, and Company Name text boxes. 7. The default cover page information appears under Include With Fax in the Send Fax dialog box. You can change the cover page information for any individual fax job. 8. If the billing code feature is enabled, and the system administrator has made it editable, type the billing code under Billing Information in the Send Fax dialog box. You can change the billing code for any individual fax job. 9. To send the fax with the default settings, click Send. NOTE: Click the Setup tab in the Send Fax dialog box to view the sender, fax quality, notification information, and preview settings. You can change this information for any individual fax job. Click Send to send the fax. 10. If you selected Show Preview Before Sending Fax on the Setup tab, a preview of the fax job appears. Review the fax for accuracy, and then click Preview and Send to send the fax. NOTE: The preview function is not available when you use Point and Print. Point and Print is a Windows feature that you can use to connect, print, or fax to a remote printer without using installation disks. Files and configuration information are automatically downloaded from the print server to the client. 11. Click View or use the zoom drop-down menu to change the size of the document preview. 12. Click the arrow buttons to navigate through the document. 13. Click Send Fax to send the fax or Cancel Fax to edit the fax settings. ENWW Use Windows PC fax send 187
-
 1
1 -
2
-
3
-
4
-
5
-
6
-
7
-
8
-
9
-
10
-
11
-
12
-
13
-
14
-
15
-
16
-
17
-
18
-
19
-
20
-
21
-
22
-
23
-
24
-
25
-
26
-
27
-
28
-
29
-
30
-
31
-
32
-
33
-
34
-
35
-
36
-
37
-
38
-
39
-
40
-
41
-
42
-
43
-
44
-
45
-
46
-
47
-
48
-
49
-
50
-
51
-
52
-
53
-
54
-
55
-
56
-
57
-
58
-
59
-
60
-
61
-
62
-
63
-
64
-
65
-
66
-
67
-
68
-
69
-
70
-
71
-
72
-
73
-
74
-
75
-
76
-
77
-
78
-
79
-
80
-
81
-
82
-
83
-
84
-
85
-
86
-
87
-
88
-
89
-
90
-
91
-
92
-
93
-
94
-
95
-
96
-
97
-
98
-
99
-
100
-
101
-
102
-
103
-
104
-
105
-
106
-
107
-
108
-
109
-
110
-
111
-
112
-
113
-
114
-
115
-
116
-
117
-
118
-
119
-
120
-
121
-
122
-
123
-
124
-
125
-
126
-
127
-
128
-
129
-
130
-
131
-
132
-
133
-
134
-
135
-
136
-
137
-
138
-
139
-
140
-
141
-
142
-
143
-
144
-
145
-
146
-
147
-
148
-
149
-
150
-
151
-
152
-
153
-
154
-
155
-
156
-
157
-
158
-
159
-
160
-
161
-
162
-
163
-
164
-
165
-
166
-
167
-
168
-
169
-
170
-
171
-
172
-
173
-
174
-
175
-
176
-
177
-
178
-
179
-
180
-
181
-
182
-
183
-
184
-
185
-
186
-
187
-
188
-
189
-
190
-
191
-
192
-
193
-
194
-
195
-
 196
196 -
 197
197 -
 198
198 -
 199
199 -
 200
200 -
 201
201 -
 202
202 -
 203
203 -
 204
204 -
 205
205 -
 206
206 -
207
-
208
-
209
-
210
-
211
-
212
-
213
-
214
-
215
-
216
-
217
-
218
-
219
-
220
-
221
-
222
-
223
-
224
-
225
-
226
-
227
-
228
-
229
-
230
-
231
-
232
-
233
-
234
-
235
-
236
-
237
-
238
-
239
-
240
-
241
-
242
-
243
-
244
-
245
-
246
-
247
-
248
-
249
-
250
-
251
-
252
-
253
-
254
-
255
-
256
-
257
-
258
-
259
-
260
-
261
-
262
-
263
-
264
-
265
-
266
-
267
-
268
-
269
-
270
-
271
-
272
-
273
-
274
-
275
-
276
-
277
-
278
-
279
-
280
-
281
-
282
-
283
-
284
-
285
-
286
-
287
-
288
-
289
-
290
-
291
-
292
-
293
-
294
-
295
-
296
-
297
-
298
-
299
-
300
-
301
-
302
-
303
-
304
-
305
-
306
 |
 |