HP Cp1700 Service Manual
HP Cp1700 - Color Inkjet Printer Manual
 |
View all HP Cp1700 manuals
Add to My Manuals
Save this manual to your list of manuals |
HP Cp1700 manual content summary:
- HP Cp1700 | Service Manual - Page 1
- HP Cp1700 | Service Manual - Page 2
hp color inkjet printer cp1700/ hp color inkjet printer cp1700ps 9 hp color inkjet printer cp1700d 9 top of the printer...10 front of the printer...11 rear of the printer ...12 controls ...13 auto-duplex unit...14 product specifications...15 model numbers ...15 serial number location...15 printer - HP Cp1700 | Service Manual - Page 3
expiration dates ...25 Manuals...27 upgrades...28 model upgrades ...28 firmware upgrades ...28 software upgrades...28 service and support...29 support pack options...29 web links...29 telephone support...29 calling from elsewhere in the world 31 support ...32 customer sends unit directly to HP - HP Cp1700 | Service Manual - Page 4
hp color inkjet printer cp1700/ hp color inkjet printer cp1700ps 9 Fig 1.11 hp color inkjet printer cp1700d 9 top of the printer...10 Front of the printer ...11 rear of the printer ...12 controls ...13 auto-duplex unit...14 hp color inkjet printer cp1700 15 hp color inkjet printer cp1700d 15 hp - HP Cp1700 | Service Manual - Page 5
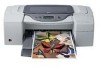
Figure 1 - hp color inkjet printer cp1700 •=Product positioning: High performance, wide-format printer providing the benefits of individual color cartridges for small business •=Takes over the price points of the DJ 1220C with higher performance and expandability options •=Printer price: USD 499 - HP Cp1700 | Service Manual - Page 6
Adobe PostScript 3 software RIP included with the hp color inkjet printer cp1700ps provides: •=Greater color accuracy •=Support for industry color management standards including ColorSync, ICC Profiles, PANTONE •=Emulation for press standards, such as SWOP/EuroScale •=ADI Driver (releases 13 onwards - HP Cp1700 | Service Manual - Page 7
costs •=Four separate high-volume ink cartridges •=Low-ink status indicator LCD •=Front-panel cancel button to help maximize your consumables •=Duty cycle of an average of 5000 pages per month •=Low Costs: 2.2 cents K/8.4 cents (CMYK), 1750 pages out 1 - 6 hp confidential tour of the product - HP Cp1700 | Service Manual - Page 8
unique product features Figure 1.2 - hp color inkjet printer cp1700 •=Superior print quality •=outstanding photo quality (with HP PhotoRet III) •=Up to 2400 x 1200 dpi resolution on premium photo paper only •=CANCEL button terminates print jobs at one touch of the key, reducing ink and time wastage - HP Cp1700 | Service Manual - Page 9
localized language options: available language options Reference Guide o Starter CD 1 o Starter CD 2 Packaging o US English o Bahasa Indonesia o Traditional Chinese o Simplified Chinese o Korean and Japanese o Starter CD1 Windows Driver: US English, Portuguese(Brazilian), Euro-Spanish, French - HP Cp1700 | Service Manual - Page 10
print hp color inkjet printer cp1700/ hp color inkjet printer cp1700ps Fig 1.10 hp color inkjet printer cp1700/ hp color inkjet printer cp1700ps •=Weight: 13.5 kilograms •=Width: 673.3 mm •=Height: 284.3 mm •=Depth: 567.7 mm hp color inkjet printer cp1700d Fig 1.11 hp color inkjet printer cp1700d - HP Cp1700 | Service Manual - Page 11
of the printer top of the printer The top of the printer displays the following: 1. Ink cartridge cover - Provides access to the ink cartridges 2. Printhead cover - Provides access to the printheads 3. Printhead access latch - Lifts to allow each printhead to be removed from its color- coded socket - HP Cp1700 | Service Manual - Page 12
front of the printer Front of the printer The front of the printer displays the following: 1. Front manual feed - Holds the paper to be fed into the printer. The paper width guide slides to fit the width of the paper. 2. Tray 1 - Holds plain paper and special media. 3. Tray 2 - Holds plain paper. - HP Cp1700 | Service Manual - Page 13
printer rear of the printer The rear of the printer displays the following: 1. USB port - Attach a USB cable. 2. Parallel port - Attach the parallel cable 3. LIO Adaptor Slot - Install an optional HP required for straight paper path (rear manual feed). 1 - 12 hp confidential tour of the product - HP Cp1700 | Service Manual - Page 14
. 3. Power button: Controls power to the printer. Press to turn the printer on or off. 4. LCD: Displays messages relating to the current state of the printer and the ink levels in the individual ink cartridges. 5. RESUME light: Blinks whenever the printer requires user intervention (for example, to - HP Cp1700 | Service Manual - Page 15
unit from the printer. 2. Rear cover: Remove to clear a paper jam from the auto-duplex unit. 3. Handles: Press to remove the rear cover from the auto-duplex unit. Note The auto-duplex unit is a standard accessory provided with the hp color inkjet printer cp1700d. 1 - 14 hp confidential tour of - HP Cp1700 | Service Manual - Page 16
inkjet printer cp1700d hp color inkjet printer cp1700 (base model) hp color inkjet printer cp1700d(base printer plus autoduplexer) hp color inkjet printer cp 1700ps (base printer plus software Adobe PostScript 3 RIP) C8108A C8106A C2691A printer model numbers hp color inkjet printer cp1700ps - HP Cp1700 | Service Manual - Page 17
•=Low-ink indicator and printer status LCD •=ADI Driver (releases 13 onwards) for AutoCAD users (for Windows only) •=The hp color inkjet printer cp1700 series supports the printing of Hagaki cards in the Japan region. printer features print speed print speed: letter/A4 These are approximate page- - HP Cp1700 | Service Manual - Page 18
requirements system requirements Windows 95/98 Windows NT 4.0 Windows Me Windows 2000 Mac OS HP supplies and accessories accessories part name Auto-duplex unit Second input paper tray ink information part number C8219A C8220A HP accessories printheads HP No. 11 Black HP No. 11 Cyan HP Part - HP Cp1700 | Service Manual - Page 19
. 11 Magenta HP No. 11 Yellow C4812A C4813A printheads ink cartridges HP No. 10 Black (69 ml) HP No. 11 Cyan (28 ml) HP No. 11 Magenta (28 ml) HP No. 11 Yellow (28 ml) HP part number C4844A C4836A C4837A C4838A ink cartridges hp photo quality inkjet paper print server HP part number Two-sided - HP Cp1700 | Service Manual - Page 20
inches 10.12 x 14.33 inches 7.17 x 10.12 inches paper specifications envelopes (tray 1 and rear manual feed only) media U.S. No. 10 Monarch DL A2 Kaku No.2 JIS Envelope 3 JIS Envelope 4 C6 cards inches 8.27 x 11.7 inches transparency specifications Tour of the product hp confidential 1 - 19 - HP Cp1700 | Service Manual - Page 21
manual feed •= 16 to 72 lb Bond using rear manual feed 20 to 24 lb Bond 110 lb Index media weight maximum number of pages supported supported Plain paper 250 sheets tray 2: number of pages supported memory information hp color inkjet printer cp1700 series •=16 MB built-in RAM 1 - 20 hp - HP Cp1700 | Service Manual - Page 22
Printer Duty Cycle Black Printhead Color Printheads specification 5,000 pages/month 18 months (from DOM2) or 200 ml 18 months (from DOM) or 530 ml reliability 2- DOM = Date of Manufacture physical specifications Note The specifications below are given for a printer hp confidential 1 - 21 - HP Cp1700 | Service Manual - Page 23
) •=TUV-GS (Germany) •=K Mark and MIC Mark (Korea) •=LS (Lithuania) •=EEI (Estonia) •=CE (European Union) •=B mark (Poland) EMC •=FCC Title 47 CFR Part 15 Class B (USA) •=CTICK (Australia and New Zealand) •=VCCI (Japan) •=CE (European Union) •=BSMI (Taiwan) •=GOST (Russia) •=ICES (Canada) 1 - 22 - HP Cp1700 | Service Manual - Page 24
TrueType (TM) is a U.S. trademark of Apple Computer,Inc. Windows NT (R) is a U.S. registered trademark of Microsoft Corporation. Windows (R) and MS Windows,(R) are U.S. registered trademarks of Microsoft Corp. Copyright C Hewlett-Packard Co. 2000 This information is subject to change without notice - HP Cp1700 | Service Manual - Page 25
printer. part name part number Assy - Cleanout Trough SVC Assy - Tray Main SVC Assy - Output Tray SVC HP No. 11 Black Printhead HP No. 11 Cyan Printhead HP No. 11 Magenta Printhead HP No. 11Yellow Printhead HP No. 10 Black ink cartridge HP No. 11 Cyan ink cartridge HP No. 11 Magenta ink cartridge - HP Cp1700 | Service Manual - Page 26
HP No. 11Yellow Printhead C4813A $39.99 printheads ~ $35 24,000 name part no. ink list price capacity (US$) street price (US$) Black ink cartridge HP No. 10 Black ink cartridge HP No. 11 Cyan ink cartridge HP No. 11 Magenta ink cartridge HP No. 11 Yellow ink cartridge C4840A C4844A C4836A - HP Cp1700 | Service Manual - Page 27
C7013A C7014A C7007A C6983A C6984A C7006A hp design paper hp professional brochure and flyer paper C6791A C6817A C6818A C7020A hp heavyweight paper hp premium inkjet paper hp premium inkjet transparency film hp social expressions banner paper hp social expressions greeting cards C6821A C6820A - HP Cp1700 | Service Manual - Page 28
10 sheets, A4 paper types Manuals documentation release notes Hp JetDirect guide user guide reference guide setup poster printer web sites purpose •= Includes installation and the latest printer information •= Includes last minute changes and software troubleshooting tips. •= Configuring the - HP Cp1700 | Service Manual - Page 29
the auto-duplex unit to upgrade from hp color inkjet printer cp1700 to hp color inkjet printer cp1700d. base model sku upgrade option upgraded sku hp color inkjet printer Auto-duplex hp color inkjet printer cp1700 (C8108A) unit(C8219A) cp1700d (C8106A) You can purchase the following - HP Cp1700 | Service Manual - Page 30
support, and details about the e-services, personal services, and business services offered by HP •=http://www.hp.com/cposupport Contains information about ordering, setting up, and using printers, and downloading printer drivers. •=http://www.software.hp.com HP Software Depot. Printer driver - HP Cp1700 | Service Manual - Page 31
free of cost during the printer warranty period. Customer support representatives answer questions regarding the setup, configuration, installation, and operation of the printer. They also help troubleshoot and diagnose printer problems and provide instructions for service and repair. region phone - HP Cp1700 | Service Manual - Page 32
5202 •= Caracas: 207 8488 •= Outside Caracas: 800 10111 8 823 4530 call center numbers calling from elsewhere in the world Contact the local dealer or nearest HP Sales and Support Office for technical assistance or hardware repair services. Tour of the product - HP Cp1700 | Service Manual - Page 33
or Repair, or Customer takes unit to Dealer/ASP and Dealer/ASP sends unit to HP for Exchange or Repair. centralized repair service HP centers (e.g. CRCS, SME, AP HUBS) dealer/ASP HP Exchange(FRU at product level) •= North America •= Middle East •= Latin America •= Europe •= Asia Pacific - HP Cp1700 | Service Manual - Page 34
to HP(Assembly Level Repair at PCA Level) other support offerings Response Center Support North America •= North America •= Middle East •= Europe •= Asia Pacific •= Africa Mfg Division Support only Customer Support Center Free Phone Support Toll Phone Support Email Support POP(Parts Ordering - HP Cp1700 | Service Manual - Page 35
Support Pack or E-Pack Offered CREW (Customer Replaceable End-User Warranty) Program •= North America •= Middle East •= Latin America •= Europe •= Asia Pacific •= Africa •= North America •= Middle East •= Latin America •= Europe •= Asia Pacific •= Africa 1 - 34 hp confidential tour of the - HP Cp1700 | Service Manual - Page 36
duration of warranty period hp product duration of limited warranty hp color inkjet printer cp1700 Software Accessories Ink cartridges Printer peripheral hardware 1 year 90 days 90 days 90 days 1 year duration of limited warranty Extent of limited warranty Hewlett-Packard warrants to the end - HP Cp1700 | Service Manual - Page 37
parts, components, or materials equivalent to new in performance. HP's Limited Warranty Statement is valid in any country where the covered HP product is distributed by HP. Contracts for additional warranty services, such as on-site service, are available from any authorized HP service - HP Cp1700 | Service Manual - Page 38
hp JetDirect 250m 27 install ink cartridges...28 identifying the part numbers and part names of ink cartridges 28 installing ink cartridges 28 guidelines for maintaining ink cartridges 29 identifying the expiration dates 29 install printheads ...31 identifying the part numbers and part names - HP Cp1700 | Service Manual - Page 39
page 44 install the printer software 46 printer software...46 steps to install the printer software 46 contents of the software CD ROM 50 identifying the contents of the software CD ROM 50 languages supported by CD 1 50 languages supported by CD 2 for Windows and Mac drivers 51 startup page - HP Cp1700 | Service Manual - Page 40
optional software ...84 establish a network connection using the LIO module 85 install a network printer on a client computer 85 hp file expansion utility ...86 establish a network connection using the LIO module 87 setup issues ...88 paper handling ...90 identifying the printer paper paths 90 - HP Cp1700 | Service Manual - Page 41
the toolbox ...22 printer services tab ...23 set language for LCD panel option 23 set the required language 24 remove the rear access panel 26 slide the auto-duplex unit 26 hp JetDirect print server/Internet connector LIO module 27 turning on the printer ...28 lifting the ink cartridge door - HP Cp1700 | Service Manual - Page 42
software 76 selecting the language version of DJCP 77 opening the Printers window 78 accessing the Add Printer wizard 79 selecting the Local printer option 79 selecting the printer port...79 selecting the printer manufacturer 80 selecting the model of the printer 80 specifying the location - HP Cp1700 | Service Manual - Page 43
the tray ...92 inserting paper into tray 1 92 sliding the paper guides...92 lowering the output tray ...93 sliding the paper guides...93 pushing the paper ...93 sliding the paper guides...94 inserting paper into the rear manual feed 94 pushing paper ...94 selecting the paper type and paper size - HP Cp1700 | Service Manual - Page 44
operating system requirements system requirements Windows 95/98 Windows ME Windows NT 4.0 (service pack 4 and above) Windows 2000 Mac OS 8.6 or requirements for postscript are: •=Mac OS 8.6 and above: G3; 300 MHz •=Windows: Pentium III; 350 MHz; 128-MB RAM Note The hardware setup requirements are - HP Cp1700 | Service Manual - Page 45
The auto-duplex unit is packaged with the hp color inkjet printer cp1700/d. 2 - 8 •=Ink cartridge box: Contains four ink cartridges in the following colors: •=Black •=Cyan •=Magenta •=Yellow •=Printheads box: Contains four printheads in the following colors: hp confidential set up and configure - HP Cp1700 | Service Manual - Page 46
Starter CD: Includes the printer software and other optional software. country Saudi Arabia Czech Rep.Hungary, Poland, Portugal, Spain, Turkey Norway, Finland, Sweden, Denmark part name o Driver Kit - CD1 o Starter CD - CD1 o Driver Kit - CD1 o Starter CD - CD1 o Driver Kit - CD2 o Starter CD - HP Cp1700 | Service Manual - Page 47
LAR, Mexico, Brazil o Driver Kit - CD1 o Starter CD - CD1 o Driver Kit - CD2 o Starter CD - CD2 o Driver Kit - CD1 o Starter CD - CD1 o Driver Kit - CD2 o Starter CD - CD2 o Driver Kit - CD2 o Starter CD2 o Driver Kit - CD2 o Starter CD2 o Driver Kit - CD2 o Starter CD2 o Driver Kit - CD1 o Starter - HP Cp1700 | Service Manual - Page 48
C8108-90001 C8108-90001 C8108-90001 C8108-90001 C8108-90001 C8108-90001 C8108-90001 Reference guide: Includes information to set up the printer and install the printer software: country Saudi Arabia Czech Rep., Hungary, Poland, Portugal, Spain, Turkey Norway, Finland, Sweden, Denmark UK - HP Cp1700 | Service Manual - Page 49
o o Regulatory Guide - UGFIDAPS o o Reference Guide - UFPS o o Regulatory Guide - UGFIDAPS o o Reference Guide - UFPS o o Regulatory Guide - UGFIDAPS o reference and regulatory guide information C8108-90006 C8108-90008 C8108-90018 C8108-90008 C8108-90018 C8108-90008 2 - 12 hp confidential - HP Cp1700 | Service Manual - Page 50
basis of the types of SKUs •=hp color inkjet printer cp1700: Packaged with the base printer •=hp color inkjet printer cp1700ps: Packaged with the base printer and Adobe PostScript 3 Software RIP •=hp color inkjet printer cp1700/d: Packaged with the base printer and auto- duplex unit steps to unpack - HP Cp1700 | Service Manual - Page 51
optional tray 2 Steps to unpack Tray 2 Tray 2 is an optional accessory that can be purchased separately. The steps to unpack Tray 2 are: 1. Unpack the printer. 2. Remove the packing tape and any shipping material from inside the trays. 2 - 14 hp confidential set up and configure - HP Cp1700 | Service Manual - Page 52
auto-duplex unit Steps to unpack the auto-duplex unit 1. Unpack the printer. 2. Remove the packing tape and any shipping materials from the auto-duplex unit. set up and configure hp confidential 2 - 15 - HP Cp1700 | Service Manual - Page 53
Tray 2, position the tray at the location where you want to place the printer. 4. Lift the printer and align the sides of Tray 1 with the sides of Tray 2. 5. Set the printer over Tray 2. unpacking the printer unpack the printer and install tray 2 2 - 16 hp confidential set up and configure - HP Cp1700 | Service Manual - Page 54
the auto-duplex unit setup procedure Install the autoduplex unit (Available with hp color inkjet printer cp1700/d) (Optional with hp color inkjet printer cp1700 and hp color inkjet printer cp1700 ps) Steps 1. At the rear of the printer, push the buttons on both sides of the rear access panel. Then - HP Cp1700 | Service Manual - Page 55
cartridges setup procedure Install ink cartridges Steps 1. Turn on the printer. 2. Lift the ink cartridge door. 3. Remove each ink cartridge from its package and install each ink cartridge in its respective color-coded socket. installing ink cartridges install ink cartridges install printheads - HP Cp1700 | Service Manual - Page 56
the hook catches the carriage lock. 2. Close the printhead and ink cartridge covers. 3. Wait until the printer initializes the printheads. When initialization is complete, an alignment page prints. Note Ensure that paper is present in the printer before an alignment page prints. load paper setup - HP Cp1700 | Service Manual - Page 57
Slide the paper length and width guides to fit against the paper. 4. Reinsert the tray. Load paper loading paper 1. To support paper larger than the legal size, locate the tray extension lock on the tray. loading paper larger than the legal size 2 - 20 hp confidential set up and configure - HP Cp1700 | Service Manual - Page 58
. resuming the print operation load paper install the printer software setup procedure Install the printer software Steps 1. Install the printer software from the starter CD. installing the printer software install the printer software connect the interface cable setup procedure Connect the - HP Cp1700 | Service Manual - Page 59
the LCD language using the Toolbox 1. Ensure that the printer is turned on. 2. Select the Start -> Programs -> HP Color Inkjet CP1700 -> HP Color Inkjet CP1700 Toolbox menu command to open the Toolbox. accessing the toolbox 3. Select the Printer Services tab. 2 - 22 hp confidential set up and - HP Cp1700 | Service Manual - Page 60
printer services tab 4. Select the Set Language for LCD panel option to set the required language. set language for LCD panel option 5. In the Set language for LCD panel dialog box, select the required language from the Set Language for LCD panel combo box. set up and configure hp confidential 2 - HP Cp1700 | Service Manual - Page 61
set the required language 2 - 24 hp confidential set up and configure - HP Cp1700 | Service Manual - Page 62
install tray 2 Tray 2 is an optional accessory for the hp color inkjet printer cp1700. The steps to install tray 2 are: 1. Position Tray 2 where the printer is to be placed. The printer is designed to rest directly on top of the tray. 2. Lift the printer and align the sides of Tray 1 with the sides - HP Cp1700 | Service Manual - Page 63
the auto-duplex unit, remove the preinstalled rear access panel. 1. At the rear of the printer, push the buttons on both sides of the rear access panel. Then, slide the rear access auto-duplex unit into the rear of the printer. slide the auto-duplex unit 2 - 26 hp confidential set up and configure - HP Cp1700 | Service Manual - Page 64
. By connecting their printer to the Internet with this print server, workgroups can use a variety of current and future printing e-services and other distributed printing services. differences between hp JetDirect 200m and hp JetDirect 250m The hp JetDirect 200m and the hp JetDirect 250m are very - HP Cp1700 | Service Manual - Page 65
part name part number Black ink cartridge HP No. 10 Black ink cartridge HP No. 11 Cyan ink cartridge HP No. 11 Magenta ink cartridge HP No. 11 Yellow ink cartridge C4840A C4844A C4836A C4837A C4838A part numbers and part names of ink cartridges installing ink cartridges 1. Turn on the printer - HP Cp1700 | Service Manual - Page 66
. •=Keep the opened ink cartridges in the printer or sealed in a plastic bag. •=Use the first-in first-out inventory process to avoid having expired ink cartridges in stock. •=Store ink cartridges at room temperature. identifying the expiration dates set up and configure hp confidential 2 - 29 - HP Cp1700 | Service Manual - Page 67
: YYMMDDhhmm. For example, an ink cartridge manufactured on November 19, 1999 at 1:12 pm has a Manufacture Date of 9911191312. •=End-of-Warranty Date: Printed directly on ink cartridges. It marks the end date of the warranty period for ink cartridges. 2 - 30 hp confidential set up and configure - HP Cp1700 | Service Manual - Page 68
. 11 Cyan Printhead HP No. 11 Magenta Printhead HP No. 11 Yellow Printhead C4810A C4811A C4812A C4813A part numbers and part names of printheads Warning Before installing the printheads ensure that you move the carriage to the docking position. installing printheads 1. Ensure that the printer is - HP Cp1700 | Service Manual - Page 69
opening the printhead access latch 4. Lift and push the printhead access latch toward the rear of the printer. lifting the printhead access latch 5. Remove the package and protective tape from each printhead. 2 - 32 hp confidential set up and configure - HP Cp1700 | Service Manual - Page 70
removing the protective tape 6. Insert each printhead in its respective color-coded socket. inserting the printhead 7. Press each printhead firmly to ensure proper contact after installation. set up and configure hp confidential 2 - 33 - HP Cp1700 | Service Manual - Page 71
ensuring correct installation 8. Close the printhead access latch firmly so that the hook catches the carriage lock. closing the printhead access latch 9. Close the printhead and ink cartridge covers. 2 - 34 hp confidential set up and configure - HP Cp1700 | Service Manual - Page 72
Power button. Do not power off the printer by unplugging the power cord. Powering off with the Power button returns the Carriage to the Service Station. The Service Station caps the printhead ink nozzles to prevent them from drying. identifying the expiration dates •=Install-by Date: Printed on the - HP Cp1700 | Service Manual - Page 73
media type matrix rear manual feed Yes Yes Yes Yes Yes Yes Yes Yes The printer supports media ranging from 4 x 6 inches to 13 x 19 inches. The printer has 4 paper paths: •=Tray 1 (default tray) •=Tray 2 (optional accessory) •=Front manual feed •=Rear manual feed 2 - 36 hp confidential set up - HP Cp1700 | Service Manual - Page 74
manual feed Rear manual feed Output tray Autoduplex unit size or type of media weight •= Paper (Plain, Inkjet, Photo, Brochure paper) •= Envelopes •= Cards •= Transparencies •= Plain paper up to 13 x 19 inches •= Paper (All paper types supported set up and configure hp confidential 2 - 37 - HP Cp1700 | Service Manual - Page 75
than the default size of paper for the trays: Adjust the paper width and length guides in the required tray. •=For paper of sizes A3, 11 x 17 inches, and when printing in landscape orientation. Select the output orientation from the software used. Note To prevent a paper jam, do not load more - HP Cp1700 | Service Manual - Page 76
tray 2 You need to extend the tray to load paper that is larger than the legal size. The steps to extend tray 1 or tray 2 are: 1. Locate the tray extension lock on the front left of the tray. 2. Slide the tray extension lock to the left and then release it. tray extension - HP Cp1700 | Service Manual - Page 77
paper width guide against the paper load the rear manual feed The steps to load the rear manual feed are: 1. Insert a single sheet of paper. •=Insert the paper in portrait orientation. •=Insert the paper to the left of the rear manual feed. The printer sensors activate the rear manual feed mechanism - HP Cp1700 | Service Manual - Page 78
upward. inserting paper 2. Push the paper into the printer until it reaches the maximum depth. When the printer sensors detect the paper, the printer pulls the paper further into the printer. Note The printer sensors activate the rear manual feed mechanism after 2 seconds. pushing the paper set - HP Cp1700 | Service Manual - Page 79
enables you to clean the system in the following situations: •=A failed uninstallation •=An unclean uninstallation Note The scrubber utility is available only for Windows 2000 and Windows 98/ME. •=Reads the .ini file for all information. •=Deletes all printers using the driver specified. •=Deletes - HP Cp1700 | Service Manual - Page 80
connectivity options connection points in the rear of the printer set up and configure hp confidential 2 - 43 - HP Cp1700 | Service Manual - Page 81
RESUME button for three seconds. 4. Release the POWER button to print the demo page. demo page print a double-sided demo page To check whether the printer is working with the auto-duplex unit, print a double-sided demo page. 2 - 44 hp confidential set up and configure - HP Cp1700 | Service Manual - Page 82
with only a power supply connection by using the CANCEL and RESUME buttons. The steps to print a double-sided demo page are: 1. Turn on the printer. 2. Press and hold down the POWER button. 3. Press the CANCEL button three times. 4. Press the RESUME button once. 5. Release the POWER button to print - HP Cp1700 | Service Manual - Page 83
access to a CD-ROM drive, download the printer software and other updates from the Internet at the following address: www.hp.com/support/c1p1700. The following Windows operating systems support the printer software: •=Windows 95 •=Windows 98 •=Windows Me •=Windows NT 4.0 •=Windows 2000 You must have - HP Cp1700 | Service Manual - Page 84
Connected to this computer and click Next . If the printer is set up for network printing, continue with step 9. setting up the printer for local printing 7. Select the type of cable to connect the printer to the computer in the Cable Type Selection window and click Next . set up and configure - HP Cp1700 | Service Manual - Page 85
network and is managed by a server or another computer. 11. To complete installing the software for network connection, follow the instructions that appear on the screen. Note You can also install the printer software by using the Add Printer wizard. 2 - 48 hp confidential set up and configure - HP Cp1700 | Service Manual - Page 86
completing the installation of the software for local connection set up and configure hp confidential 2 - 49 - HP Cp1700 | Service Manual - Page 87
2000 platforms •=Drivers: Windows, Mac, and ADI •=Toolbox •=Optional software: Print Creator and Acrobat •=Documentation: User Guide and Quick Tour •=Miscellaneous drivers and utilities for other operating systems: •=DOS DJCP •=Scrubber utility •=HP File Expansion utility languages supported by CD - HP Cp1700 | Service Manual - Page 88
languages supported by CD 2 for Windows and Mac drivers Europe AP Windows driver Mac driver •= US English •= Swedish •= Norwegian •= Danish •= Finish (Brazilian) •= Euro-Spanish •= Swedish •= French •= Italian •= Germany •= Dutch •= Japanese languages supported by CD 2 set up and configure - HP Cp1700 | Service Manual - Page 89
printer and access service or support. 4. Customization utility: Enables you to copy the printer software onto disks, hard drive or network drive. 5. Optional software: Enables you to install the following optional software: •=HP Web JetAdmin •=AutoCAD Driver •=IrPrint •=HP Photo Printing software - HP Cp1700 | Service Manual - Page 90
software installation requirements software installation requirement in Windows •=Windows 95 •=Windows 98 •=Windows Me •=Windows NT 4.0 •=Windows 2000 software installation requirement in Macintosh •=USB port/IR port/LIO module •=Mac OS 8.6 and above set up and configure hp confidential 2 - 53 - HP Cp1700 | Service Manual - Page 91
from the Apple menu. 3. Click the HP Deskjet xx Printer icon on the left of the Chooser window, where xx represents the version of the current printer driver. 4. Select HP Color Inkjet CP1700 from the right of the Chooser window. 5. Close the Chooser window. Note Use the USB cable, which is - HP Cp1700 | Service Manual - Page 92
represents either Europe or chi_tra. changing to the CD-ROM drive 3. Type INSTALL and press ENTER. typing install to install the printer software 4. Type the letter of the language version of DJCP to be installed from the language menu displayed. set up and configure hp confidential - HP Cp1700 | Service Manual - Page 93
identifying the language version of DJCP 2 - 56 hp confidential set up and configure - HP Cp1700 | Service Manual - Page 94
printer software for local printing using the add printer wizard The steps to install the printer software local printing are: 1. Select the Start -> Settings -> Printers menu command. opening the Printers window 2. Double-click the Add Printer icon and click Next button. set up and configure hp - HP Cp1700 | Service Manual - Page 95
accessing the Add Printer wizard 3. Select the Local Printer option and click Next . selecting the Local printer option 4. Select the printer port and click Next . 2 - 58 hp confidential set up and configure - HP Cp1700 | Service Manual - Page 96
selecting the printer port 5. Select the manufacturer of the printer as HP. selecting the printer manufacturer 6. Select the model of the printer as HP Color Inkjet CP1700 and click the Have Disk button. set up and configure hp confidential 2 - 59 - HP Cp1700 | Service Manual - Page 97
selecting the model of the printer 7. Insert the installation disk. inserting the installation disk 8. Specify the location of the hp1700k.inf file in the Copy manufacturer file from combo box, click OK , and click the Next button. 2 - 60 hp confidential set up and configure - HP Cp1700 | Service Manual - Page 98
specifying the location of the hp1700k.inf file 9. Specify whether you want to use the existing driver or replace the existing driver and click the Next button. specifying whether to keep or replace the existing driver 10. Specify the printer name and whether the printer is to be set as default and - HP Cp1700 | Service Manual - Page 99
specifying the printer name 11. Indicate whether you want to share the printer and click the Next button. specifying whether to share the printer 12. Specify whether you want to print a test page and click the Next button. 2 - 62 hp confidential set up and configure - HP Cp1700 | Service Manual - Page 100
specifying whether to print a test page 13. Click the Finish button to complete the Add Printer wizard and install the printer software. completing the installation of the printer software set up and configure hp confidential 2 - 63 - HP Cp1700 | Service Manual - Page 101
browse documentation browse documentation 2 - 64 hp confidential set up and configure - HP Cp1700 | Service Manual - Page 102
web site is displayed:http://register.hp.com/servlet/WebReg.servlets.EntryServlet?appID=java_wre g_wreg_genpg By registering the product you can have access to: 1. Enhanced customer service 2. Faster expert technical support 3. Timely notices of product and software upgrades 4. Free newsletters - HP Cp1700 | Service Manual - Page 103
system and click the Next button. 5. Select the components that you require to install and click the Next button. 6. Select the destination path for the driver. •=Select the 3.5" Floppy Disks option to copy the printer software onto a floppy disk. 2 - 66 hp confidential set up and configure - HP Cp1700 | Service Manual - Page 104
to complete copying the printer software onto the hard drive or onto disks. copy printer software to a network Select the Other Media option. 7. Click the Browse button to display the Choose Folder dialog box. 8. Click the Network button to printer software onto a network drive. set up and configure - HP Cp1700 | Service Manual - Page 105
+%26+Management+Software&lsidebarLayId=79&rsidebarLayId=6 2 •=AutoCAD driver: You can install the ADI driver for AutoCAD Release 13/14 to support the printer. You can install Hewlett-Packard HP GL/2 drivers for AutoCAD on the computer. •=IrPrint: You can download IrPrint for the printer to print - HP Cp1700 | Service Manual - Page 106
•=Expandability options: Provides the various expandability options available for the printer. •=Connectivity: Provides the connectivity options available with the printer. •=Smart software features: Provides the various software features available with the printer. quick tour set up and configure - HP Cp1700 | Service Manual - Page 107
installation Perform the following steps to test the software installation: 1. Ensure that the interface cable is properly connected and the printer is turned on. 2. Select the Start -> Settings -> Printers menu command. 3. Right-click the printer icon and select Properties . 4. On the General tab - HP Cp1700 | Service Manual - Page 108
To uninstall the printer software from the Windows NT 4.0 operating system, you require administrator privileges. 1. Start the Windows operating system and ensure that no other Windows applications are running. 2. Select the Start -> Programs -> HP Color Inkjet Printer cp1700 -> Uninstaller menu - HP Cp1700 | Service Manual - Page 109
be uninstalled 5. Click the Finish button to complete the uninstallation procedure. completing the uninstallation procedure uninstall the printer software using the Add printer wizard in Windows 1. Select the Start -> Settings -> Printers menu command. 2 - 72 hp confidential set up and configure - HP Cp1700 | Service Manual - Page 110
accessing the Add printer wizard 2. Select the File -> Server Properties menu command. accessing the printer server properties 3. Select the Drivers tab in the Print Servers Properties dialog box. set up and configure hp confidential 2 - 73 - HP Cp1700 | Service Manual - Page 111
accessing the Drivers tab 4. Select the HP Color Inkjet CP1700 from the Installed printer drivers list. 2 - 74 hp confidential set up and configure - HP Cp1700 | Service Manual - Page 112
Software window is displayed. If the HP Printer Software window is not displayed, doubleclick the icon for HP Printer Software. 3. Double-click the Installer icon. 4. Select Uninstall from the drop-down menu in the upper left corner of the main installation dialog box. 5. Follow the instructions - HP Cp1700 | Service Manual - Page 113
\dos\\ where represents either Europe or chi_tra. changing to the CD-ROM drive 3. Type INSTALL and press ENTER. typing install to install the printer software 4. Type the letter of the language version of DJCP to be installed from the language menu displayed. 2 - 76 hp - HP Cp1700 | Service Manual - Page 114
selecting the language version of DJCP set up and configure hp confidential 2 - 77 - HP Cp1700 | Service Manual - Page 115
install the printer software using the add printer wizard install the printer software for local printing using the add printer wizard 1. Select the Start -> Settings -> Printers menu command. opening the Printers window 2. Double-click the Add Printer icon and click Next . 2 - 78 hp confidential - HP Cp1700 | Service Manual - Page 116
accessing the Add Printer wizard 3. Select the Local Printer option and click Next . selecting the Local printer option 4. Select the printer port and click Next . selecting the printer port set up and configure hp confidential 2 - 79 - HP Cp1700 | Service Manual - Page 117
5. Select the manufacturer of the printer as HP. selecting the printer manufacturer 6. Select the model of the printer as HP Color Inkjet CP1700 and click the Have Disk button. 2 - 80 selecting the model of the printer hp confidential set up and configure - HP Cp1700 | Service Manual - Page 118
OK , and click Next . specifying the location of the hp1700k.inf file 8. Specify whether you want to use the existing driver or replace the existing driver and click Next . specifying whether to keep or replace the existing driver 9. Specify the printer name and whether the printer is to be set as - HP Cp1700 | Service Manual - Page 119
specifying the printer name 10. Indicate whether you want to share the printer and click Next . specifying whether to share the printer 11. Specify whether you want to print a test page and click Next . 2 - 82 hp confidential set up and configure - HP Cp1700 | Service Manual - Page 120
specifying whether to print a test page 12. Click Finish to complete the Add Printer wizard and install the printer software. completing the installation of the printer software set up and configure hp confidential 2 - 83 - HP Cp1700 | Service Manual - Page 121
+Servers+and+Network+Software%2 1Installation+%26+Management+Software&lsidebarLayId=79&rsidebarLayId=6 2 •=AutoCAD driver: Install the ADI driver for AutoCAD Release 13/14 to support the printer. Install Hewlett-Packard HP GL/2 drivers for AutoCAD on the computer. •=IrPrint: Download IrPrint for the - HP Cp1700 | Service Manual - Page 122
Install the software from the starter CD or by adding a printer to the computer and browsing for the .inf file. install a network printer on a client computer 1. Select the Start -> Settings -> Printers dialog box. 2. Double-click Add Printer. 3. When prompted: •=Click Network Printer in Windows 95 - HP Cp1700 | Service Manual - Page 123
hp file expansion utility The hp File Expansion Utility is used for manually expanding the compressed file drivers. 2 - 86 hp confidential set up and configure - HP Cp1700 | Service Manual - Page 124
95/98/Me. •=Click Network Print Server in Windows NT 4.0/2000. 4. Type the network path of the shared printer and click the Have Disk... option when prompted to select the printer model. 5. Click Browse... and browse to the .inf file located on the starter CD. 6. Follow the on-screen directions - HP Cp1700 | Service Manual - Page 125
off, an alert message appears on the computer screen. •= If the printer is turned off and no message is displayed when executing a print command, the printer setup might be incorrect. •= To correct the printer setup, reinstall the printer software. 2 - 88 hp confidential set up and configure - HP Cp1700 | Service Manual - Page 126
/ accessories / supplies installation Incorrect network installation / configuration •= Check the printer setup. •= Ensure that the following components are loaded correctly: o Ink cartridges o Printheads o Paper •= Ensure that all the printer covers are closed. •= Ensure that the tape is removed - HP Cp1700 | Service Manual - Page 127
sheet The printer supports paper ranging from 4 x 6 inches to 13 x 19 inches. The following table lists the type of paper, including transparencies, which you can print from each paper path. media type tray 1 tray 2 front rear manual manual feed feed Plain Paper Y Y Y Y Inkjet Paper - HP Cp1700 | Service Manual - Page 128
tray 2 3. Press and slide the paper length guide and paper width guide to the outermost positions. sliding paper guides 4. To load paper larger than legal size, follow these steps to extend the tray: •=Locate the tray extension lock on the front left part of the tray. •=Slide the lock to the - HP Cp1700 | Service Manual - Page 129
250 sheets of paper (up to .98 in or 25 mm thick) into the tray. inserting paper into tray 1 6. Press and slide the paper length guide and paper width guide until they fit tightly against the paper. sliding the paper guides 7. Lower the output tray to its original position. 2 - 92 - HP Cp1700 | Service Manual - Page 130
cover with the opening in the printer. •=Slide it back into place. loading paper in the front manual feed 1. Slide the paper width guide on the output tray to its outermost position. sliding the paper guides 2. Insert paper or transparencies into the front manual feed. 3. Place the paper along the - HP Cp1700 | Service Manual - Page 131
maximum depth. When the printer sensors detect the paper, the printer pulls the paper further into the printer. pushing paper printing on special media printing on envelopes and cards Print envelopes and cards from Tray 1 of the hp color inkjet printer cp1700 series •=Dimensions of media: 4 inches - HP Cp1700 | Service Manual - Page 132
button to open the printer driver. 3. From the options on HP glossy greeting card paper, select the HP glossy greeting card option as the paper type. 4. Select the envelope or card size from the Paper Size menu. selecting the paper type and paper size 5. Lift the output tray of the printer - HP Cp1700 | Service Manual - Page 133
1. inserting cards 8. Slide in the paper width and length guides to align with the edges of the envelopes or cards. sliding the paper guides 9. Lower the output tray. lowering the output tray 10. Ensure the folds of the envelopes are sharply creased. 2 - 96 hp confidential set up and configure - HP Cp1700 | Service Manual - Page 134
Print dialog box to display the printer driver. 3. In the Setup tab of the printer driver, select the Rear Manual Feed option from the Paper printer driver. 6. Click the OK button to print. 7. Insert a single sheet of paper in portrait orientation into the rear manual feed. set up and configure hp - HP Cp1700 | Service Manual - Page 135
option in the software used. •=To remove the paper after inserting it into the rear manual feed, press the CANCEL button. The printer ejects the paper tray 1 3. Slide the width and length guides to align with the edge of the transparencies. sliding paper guides 4. Slide the tray back into the closed - HP Cp1700 | Service Manual - Page 136
box to display the printer driver. 7. printer driver. 11. Click the OK button to print the transparencies. printing on custom - size paper To print on custom - size paper from the front manual feed, use Tray 1, or Tray 2 of the hp color inkjet printer cp1700 series. If the application in use supports - HP Cp1700 | Service Manual - Page 137
to print correctly on a custom - size paper. The steps to print on custom - size paper are: 1. Lift the output tray of the printer. lifting the output tray 2. Remove existing paper from the trays. removing paper 3. Insert the custom - sized paper into the required tray. inserting custom - HP Cp1700 | Service Manual - Page 138
guides 5. Lower the output tray. 6. Select the File -> Print menu command. 7. Click the Properties button in the Print dialog box to display the printer driver. printer properties dialog box. 11. Click the OK button to print on a custom - size paper. set up and configure hp confidential 2 - 101 - HP Cp1700 | Service Manual - Page 139
2 - 102 hp confidential set up and configure - HP Cp1700 | Service Manual - Page 140
17 cleaning the printer...20 printer cleaning procedure 20 cleaning the printer...23 cleaning the hp color inkjet printer cp1700 series 23 cleaning and maintaining printheads 26 level-one cleaning...26 level-two cleaning...28 level-three cleaning ...29 cleaning printheads by using the Toolbox 30 - HP Cp1700 | Service Manual - Page 141
51 advanced features ...51 changing default software settings 53 changing the default printer settings 53 changing print settings for the current document 53 troubleshooting usage issues 54 power light of the printer blinks amber and green, alternately 54 printer takes a long time to print 54 - HP Cp1700 | Service Manual - Page 142
in the rear manual feed 16 removing paper from tray 1 16 inserting transparencies in tray 1 16 sliding paper guides ...17 sliding printer 21 cleaning dust from the paper feed guides 21 closing the top cover ...22 plugging in the power cord...22 turning on the printer...22 turning off the printer - HP Cp1700 | Service Manual - Page 143
the printhead cover ...37 turning on the printer...40 lifting the ink cartridge cover 41 removing the empty ink cartridge 41 inserting the new ink cartridge 42 pressing the new cartridge ...42 closing the ink cartridge cover 43 auto-pick feature...44 printer driver features ...45 printer driver - HP Cp1700 | Service Manual - Page 144
features overview The hp color inkjet printer cp1700 series printer has the following hardware components: •=control panel •=infrared lens •=paper input and output trays control panel The control panel consists of the LCD (Liquid Crystal Display) that displays information regarding the current - HP Cp1700 | Service Manual - Page 145
operation after temporary interruption, such as adding paper to printer. 4. LCD: Displays messages relating to the current state of the printer and the ink levels in the individual ink cartridges. 5. Power light: Blinks when the printer is initializing, canceling a job, or turning off. 6. POWER - HP Cp1700 | Service Manual - Page 146
desktop The steps to cancel a print job by using the printer icon on the desktop are: 1. Double-click the printer icon on the lower-right corner of the computer screen. 2. Select the print job that you want to cancel in the printer window. 3. Click the Document -> Cancel menu command to cancel the - HP Cp1700 | Service Manual - Page 147
diagnostic page Information displayed on the Diagnostic page: •=Printer information: Firmware version number, Model, and Service ID •=Printhead information: Technical information on printhead performance •=Technical information: Technical information on printheads and ink cartridges The steps to - HP Cp1700 | Service Manual - Page 148
Note If the self-test page does not print, check the printer configuration. The steps to print a self-test page is: 1. Press and hold down the POWER button. 2. While holding down the POWER button, press the RESUME button four times. displaying printhead health You can view the condition of the - HP Cp1700 | Service Manual - Page 149
IR connectivity Perform infrared printing by establishing a wireless connection between an infrared device and the printer. Following are the steps to perform infrared printing from a handheld device or laptop: 1. Locate the infrared (IR) lens on the device or the laptop. 2. Align the device IR lens - HP Cp1700 | Service Manual - Page 150
sheets •=Tray 2 (optional accessory): Holds a maximum of 250 sheets •=Front manual feed: Holds a maximum of 10 sheets •=Rear manual feed: Holds one sheet paper types supported by the printer media type Plain Paper Inkjet Paper Photo Paper Transparency Film Special Paper (Banner paper, restickables - HP Cp1700 | Service Manual - Page 151
hp color inkjet printer cp1700 series. •=Dimensions of media: 4 inches x 6 inches (101.6 x 152.4 mm) or larger. Note The hp color inkjet printer cp1700 series supports menu command. 2. Click the Properties button to open the printer driver. 3. From the options on the Setup tab, select the paper type - HP Cp1700 | Service Manual - Page 152
selecting the card size 5. Lift the output tray of the printer. lifting the output tray 6. Remove all the papers from tray 1. use and maintain removing paper from tray 1 hp confidential 3 - 13 - HP Cp1700 | Service Manual - Page 153
guides to align with the edges of the envelopes or cards. 9. Lower the output tray. lowering the output tray 10. Print the document. printing on thick paper by using the rear manual feed Use the rear manual feed of the printer manual feed is not available. To restore the rear manual feed, replace the auto- - HP Cp1700 | Service Manual - Page 154
manual feed •=To print in landscape orientation, select the option in the software used. •=To remove the paper after inserting it into the rear manual feed, press the CANCEL button. The printer to display the printer driver. 3. In the Setup tab of the printer driver, select the Rear Manual Feed - HP Cp1700 | Service Manual - Page 155
rear manual feed printing on transparencies To print on transparencies, use: •=HP Premium Transparency films. •=Other transparency films designed for inkjet printers. The 1 3. Slide the width and length guides to align with the edge of the transparencies. 3 - 16 hp confidential use and maintain - HP Cp1700 | Service Manual - Page 156
Click the OK button to close the printer driver. 11. Click the OK button to print the transparencies. printing on custom-size paper To print on custom-size paper from the front manual feed, use tray 1, or tray 2 of the hp color inkjet printer cp1700 series. use and maintain hp confidential 3 - 17 - HP Cp1700 | Service Manual - Page 157
. If the application in use does not support custom-size paper: 1. Set the size in the printer driver. 2. Create the document. 3. Print the printer. lifting the output tray 2. Remove existing paper from the trays. removing paper 3. Insert the custom-sized paper into the required tray. 3 - 18 hp - HP Cp1700 | Service Manual - Page 158
custom-sized paper 4. Slide the width and length guides to the edges of the paper. sliding the paper guides 5. Lower the output tray. 6. Select the File -> Print menu command. 7. Click the Properties button in the Print dialog box to display the printer driver. 8. In the Setup tab, select the paper - HP Cp1700 | Service Manual - Page 159
cleaning the printer printer cleaning procedure The hp color inkjet printer cp1700 series does not require scheduled maintenance. However, you should clean the printer to keep it in peak condition. You can also diagnose printer problems easily by cleaning the printer. •=To clean the case of the - HP Cp1700 | Service Manual - Page 160
opening the top cover of the printer 4. Clean dust or dirt from the paper feed guides by using a dry, lint free cloth. cleaning dust from the paper feed guides 5. Close the top cover. use and maintain hp confidential 3 - 21 - HP Cp1700 | Service Manual - Page 161
closing the top cover 6. Plug in the power cord. plugging in the power cord 7. Turn on the printer. turning on the printer 3 - 22 hp confidential use and maintain - HP Cp1700 | Service Manual - Page 162
The hp color inkjet printer cp1700 series does not require scheduled maintenance. However, you should clean the printer to keep it in peak condition. You can also diagnose printer problems easily by cleaning the printer. The following are the steps to clean the printer: 1. Turn the printer off - HP Cp1700 | Service Manual - Page 163
opening the top cover 4. Clean dust or dirt from the paper feed guides by using a dry, lint - free cloth. cleaning the paper feed guides 5. Close the top cover. 3 - 24 hp confidential use and maintain - HP Cp1700 | Service Manual - Page 164
cover 6. Plug in the power cord. plugging in the power cord 7. Turn on the printer. turning on the printer Use the following guidelines to clean the hp color inkjet printer cp1700: •=To clean the case of the printer: •=Use a soft cloth moistened with water or water mixed with mild detergent. •=To - HP Cp1700 | Service Manual - Page 165
•=24,000 color pages Ink nozzles might clog due to prolonged exposure to air, and result in incomplete printed characters. To ensure proper printing and avoid incomplete printouts, the printheads must be cleaned, aligned, or replaced. To perform these maintenance activities, use the toolbox or the - HP Cp1700 | Service Manual - Page 166
pressing and holding the POWER button 2. Press the CANCEL button two times while holding down the POWER button. pressing the CANCEL button with the POWER button pressed 3. Release the POWER button. use and maintain releasing the POWER button hp confidential 3 - 27 - HP Cp1700 | Service Manual - Page 167
-two cleaning are: 1. Press and hold down the POWER button. pressing the POWER button 2. Press the CANCEL button two times and the RESUME button once while holding down the POWER button. pressing the CANCEL and RESUME button with the POWER button depressed 3. Release the POWER button. 3 - 28 hp - HP Cp1700 | Service Manual - Page 168
it consumes the maximum ink and time. The steps to perform level-three cleaning are: 1. Press and hold down the POWER button. pressing the POWER button 2. Press the CANCEL button two times and the RESUME button twice while holding down the POWER button. use and maintain hp confidential 3 - 29 - HP Cp1700 | Service Manual - Page 169
install the Toolbox to use it. The steps to clean printheads by using the Toolbox are: 1. Select the Start -> Programs -> HP Color Inkjet CP1700 -> HP Color Inkjet CP1700 Toolbox menu command. 2. Click the Printer Services tab in the Toolbox. 3. Click Clean Printheads . 3 - 30 hp confidential use - HP Cp1700 | Service Manual - Page 170
clicking the Clean Printheads button aligning printheads by using the Toolbox The steps to align printheads by using the Toolbox are: 1. Select the Start -> Programs -> HP Color Inkjet CP1700 -> HP Color Inkjet CP1700 Toolbox menu command. 2. Click the Printer Services tab in the Toolbox. 3. Click - HP Cp1700 | Service Manual - Page 171
the Align button in the Align Printheads dialog box to start the alignment process. starting the alignment process aligning printheads by using the LCD panel The steps to align printheads by using the LCD panel are: 1. Press and hold down the POWER button. 3 - 32 hp confidential use and maintain - HP Cp1700 | Service Manual - Page 172
Replace a printhead when LCD displays a warning message. Note Do not need to replace all the four printheads at once. Replace only the printhead that is exhausted. The steps to replace a printhead are: 1. Turn on the printer. turning on the printer 2. Lift the printhead cover. use and maintain hp - HP Cp1700 | Service Manual - Page 173
lifting the printhead cover 3. Open the printhead access latch by lifting the latch from the rear. opening the printhead access latch 4. Pull the latch forward and down to release the hook from the carriage lock. 3 - 34 hp confidential use and maintain - HP Cp1700 | Service Manual - Page 174
pulling the printhead access latch forward 5. Hold both ends of the printhead firmly and pull it up straight out of its slot. pulling out the printhead 6. Install the new printhead in the color-coded slot that matches the color of the printhead. use and maintain installing the new printhead hp - HP Cp1700 | Service Manual - Page 175
7. Press the printhead firmly to ensure proper contact. pressing the installed printhead 8. Close the printhead access latch firmly to ensure that the hook catches the carriage lock. closing the printhead latch 9. Close the printhead cover. 3 - 36 hp confidential use and maintain - HP Cp1700 | Service Manual - Page 176
closing the printhead cover use and maintain hp confidential 3 - 37 - HP Cp1700 | Service Manual - Page 177
or on LIO cards. Low-level configurations of the IO cards will be provided by host software or its equivalent, through the driver or through a combination of driver/firmware. The printer front panel has a LCD display, two LEDs and three key buttons, which are the POWER, RESUME and CANCEL buttons - HP Cp1700 | Service Manual - Page 178
Unrecoverable Error Turn power off State Special Display Turn power off Indicate to the printer that the intervention is complete (if required). Disabled Clear current display CANCEL Cancels job if in processing job state. Eject page loaded from rear manual feed if in ready state. Cancels job - HP Cp1700 | Service Manual - Page 179
printer cartridge maintenance procedure 1. Ink cartridges do not require maintenance. 2. Life of Ink Cartridge: An ink cartridge should print 1750 pages in black or color. 3. Checking status of ink cartridge: Use the Toolbox to check the status of the ink cartridges. In addition, LCD displays - HP Cp1700 | Service Manual - Page 180
the ink cartridge cover 3. Remove the empty ink cartridge by holding it firmly between the thumb and the forefinger and pulling it out. removing the empty ink cartridge 4. Insert the new ink cartridge into the color-coded slot that matches the color of the ink cartridge. use and maintain hp - HP Cp1700 | Service Manual - Page 181
inserting the new ink cartridge 5. Press the new cartridge firmly to ensure a proper contact after installation. pressing the new cartridge 6. Close the ink cartridge cover. 3 - 42 hp confidential use and maintain - HP Cp1700 | Service Manual - Page 182
closing the ink cartridge cover use and maintain hp confidential 3 - 43 - HP Cp1700 | Service Manual - Page 183
The printer displays a message that instructs Windows 2000 •=Document Defaults for Windows NT 4.0 4. Click the Features tab. 5. Click the Advanced Features button. 6. Select the Auto-Pick from Next Tray check box in the Advanced Features dialog box. 7. Click OK to close the dialog box. 3 - 44 hp - HP Cp1700 | Service Manual - Page 184
software features and functions overview Use the options of the Setup and Features tabs in the printer driver of the hp color inkjet printer cp1700 series to perform the following functions: printer driver features printer driver features 1. Print in duplex mode : Print on both sides of a page by - HP Cp1700 | Service Manual - Page 185
you might want to print draft or confidential diagonally across the first page or all pages of a document. 6. Create a banner : Create a banner by using software, such as Corel Print House, Microsoft Publisher, and Broderbund Print Shop. 7. Resize document views : Resize document views by using the - HP Cp1700 | Service Manual - Page 186
sides of a paper by using the hp inkjet color printer cp1700 series. This is called duplexing. Enable the duplexing feature of the hp color inkjet printer cp1700 series by checking the Two-sided Printing (Duplex) check box in the Features tab of the printer driver. 1. Book radio button: Enables the - HP Cp1700 | Service Manual - Page 187
a multiple page document on to a single sheet of paper. Enable the handout feature of the hp color inkjet printer cp1700 series by checking the Handout check box in the Features tab of the printer driver. 1. Pages Per Sheet list box: Enables the user to print a multiple page document in a single - HP Cp1700 | Service Manual - Page 188
the booklet feature automatically activates two-sided printing. You enable the booklet feature of the hp color inkjet printer cp1700 series by checking the Booklet Printing check box in the Features tab of the printer driver. 1. Print on one side check box: Enables the user to print on a single side - HP Cp1700 | Service Manual - Page 189
by using the watermark feature of the hp color inkjet printer cp1700 series. Select the required watermark option from the Watermark list box in the Features tab of the printer driver. Clicking the Edit button in the Features tab of the printer driver displays the Watermark Details dialog box that - HP Cp1700 | Service Manual - Page 190
or reducing documents Enlarge or reduce document views by using the ZoomSmart feature of the hp color inkjet printer cp1700 series. To enable the ZoomSmart feature, click the HP ZoomSmart button in the printer driver to display the Scale to fit dialog box. The Scale to fit dialog box has the - HP Cp1700 | Service Manual - Page 191
Click the Properties button in the Print dialog box to display the printer driver. 3. Click the Features tab. 4. Select the required option. The advanced features of the hp color inkjet printer cp1700 series driver are: 1. Ink Volume : The ink volume feature enables the user to adjust the amount of - HP Cp1700 | Service Manual - Page 192
paper. Following are the steps to change default print settings: 1. Select the Start -> Settings -> Printers menu command to display the Printers window. 2. Right-click the icon for the printer. 3. From the context menu, select the required menu item, depending on the operating system: •=Properties - HP Cp1700 | Service Manual - Page 193
troubleshooting usage issues power light of the printer blinks amber and green, alternately symptom Power light of the printer blinks amber and green, alternately cause solution •= A nonrecoverable error has occurred. (e.g. a the carriage might be stalled) •= The latest version of the firmware - HP Cp1700 | Service Manual - Page 194
troubleshooting paper jams To clear a paper jam, first check the paper input paths. If the jammed paper is visible from one of the input trays or the front manual feed, carefully pull the jammed paper straight up and out of the printer. Select new paper and reload the printer printer. 2. Locate and - HP Cp1700 | Service Manual - Page 195
printer. 2. Locate and remove the jammed paper from Tray 2. 3. If you cannot locate the jammed paper, turn off the printer and remove the power cord. 1. Lift the printer access panel. 2. Pull the panel out of the printer. 3. Remove the jammed paper by pulling it out with both hands. 4. Place the - HP Cp1700 | Service Manual - Page 196
troubleshooting poor print quality symptom Poor print quality cause solution •= Printer needs cleaning •= Ink supplies issues •= Check the printheads and ink cartridges o Check and replace clogged or worn printheads. o Check and replace low or empty ink cartridges hp confidential 3 - 57 - HP Cp1700 | Service Manual - Page 197
Print ...12 Print Creator ...12 windows XP statement ...13 driver features ...14 software drivers available with the hp color inkjet printer cp1700 14 features of the software driver for each OS 14 smart features for each OS 14 troubleshooting process ...16 check the printer setup ...16 check the - HP Cp1700 | Service Manual - Page 198
printheads ...26 continuous color H pattern 26 software troubleshooting 30 performing internal diagnostic tests 31 diagnostic test : output - LCD panel 31 diagnostic test : output - printout 31 diagnostic tests : no output action 31 repackage for return shipment 32 escalation and support - HP Cp1700 | Service Manual - Page 199
Table of figures controls ...6 demo page...19 pen calibration test ...20 list of available tests ...21 self-diagnostic page ...22 NVRAM contents ...23 technical diagnostic page ...24 repackaging for return shipment 32 support hp confidential 4 - 3 - HP Cp1700 | Service Manual - Page 200
the latest firmware flash code, perform the following steps: 1. Download the latest firmware flash code. 2. Set the printer in manufacturing mode by holding down the RESUME button and hitting the firmware flash code version sent, print the 4-button self-test page. 4 - 4 hp confidential support - HP Cp1700 | Service Manual - Page 201
Set the printer in manufacturing mode by holding down the RESUME button and hitting the POWER button. 3. 3.Initiate the DOS prompt. 4. 4.At the MS-DOS prompt enter the command copy /b " lpt1 5. 5.To check the firmware flash code version sent, print the 4-button self-test page. support hp - HP Cp1700 | Service Manual - Page 202
on LIO cards. Low-level configurations of the IO cards will be provided by host software or its equivalent, through the driver or through a combination of driver/firmware. The printer front panel has a LCD display, two LEDs and three key buttons, which are the POWER, RESUME and CANCEL buttons. key - HP Cp1700 | Service Manual - Page 203
PAPER JAM,OPEN COVER AND CLEAR PAPER PRESS RESUME TO CONTINUE [COLOR] INK CARTRIDGE EMPTY REPLACE [COLOR] INK CARTRIDGE [COLOR] INK CARTRIDGE MISSING [COLOR] INK IS LOW [COLOR] INK CARTRIDGE EXPIRED explanation Paper is jammed in the printer. recommended action •= Clear the jammed paper. For more - HP Cp1700 | Service Manual - Page 204
REPLACE [COLOR] PRINTHEAD The printer detects a faulty ink printhead. [COLOR] PRINTHEAD MISSING The printer cannot detect the ink printhead because it is missing, improperly installed, or defective. BAD INK CARTRIDGE OR PRINTHEAD INCOMPATIBLE [COLOR] PRINTHEAD LOAD [MEDIA TYPE] in [TRAY] PRESS - HP Cp1700 | Service Manual - Page 205
more covers on the printer are open. REAR MANUAL FEED Check to see printer to automatically resume printing after the drying period. •= If you want the printer •= When the printer releases the current printer. •= If you have purchased Tray 2, make sure it is installed correctly in the printer. - HP Cp1700 | Service Manual - Page 206
by pushing down firmly on each printhead. •= Make sure the rear access panel is inserted correctly and completely into the printer. •= For information about changing the display language, see "Setting the LCD language." details of messages that require action 4 - 10 hp confidential support - HP Cp1700 | Service Manual - Page 207
and OS driver/SKU matrix PCL3 driver PCL3 printer features •= hp color inkjet printer cp1700 •= hp color inkjet printer cp1700d •= hp color inkjet printer cp1700 ps •= Object-based language •= Use to print from DOS as no DOS driver is available PCL3 features support hp confidential 4 - 11 - HP Cp1700 | Service Manual - Page 208
PostScript features ADI driver driver ADI driver printer features •= hp color inkjet printer cp1700 •= hp color inkjet printer cp1700d •= hp color inkjet printer cp1700 ps •= Provides AutoCAD support for graphic designer segment •= Host based Postscript software RIP. Adobe Postscript - HP Cp1700 | Service Manual - Page 209
windows XP statement •=The Unidriver PCL 3 driver will be available as part of the Windows Update by December 2001 support hp confidential 4 - 13 - HP Cp1700 | Service Manual - Page 210
driver features software drivers available with the hp color inkjet printer cp1700 •=Postscript •=The Postscript software provides an affordable postscript solution for low-end graphic professionals. The RIP software allows customers to print PostScript files. The target customer for the postscript - HP Cp1700 | Service Manual - Page 211
Scale to Fit (ZoomSmart) Yes Yes Color Options Automatic Image Yes Yes Enhancement (*on) Two-sided printing Yes Yes Multiple pages per Sheet Yes Yes Yes Yes Sepia No Yes Media type sensing Yes Yes Media width sensing Yes Yes features and OS support hp confidential 4 - 15 - HP Cp1700 | Service Manual - Page 212
driver, the OS to printer connectivity is working. check the self diagnostic page •=With a self-diagnostic page, all configuration information regarding the printer in the current state, such as the health of the printheads and the ink cartridge usage is available. 4 - 16 hp confidential support - HP Cp1700 | Service Manual - Page 213
button. The firmware revision number of the hp color inkjet printer cp1700 series is displayed on the LCD panel. most recent error code To identify the latest error code: 1. Press the RESUME button six times. The latest error code is available on the LCD panel. support hp confidential 4 - 17 - HP Cp1700 | Service Manual - Page 214
printer. 2. Press and hold down the POWER button. 3. While holding down the POWER button, press the CANCEL button thrice and the RESUME button thrice. 4. Release the POWER button. The health of printheads is displayed serial number of the printer is displayed in the LCD panel. Output - printout - HP Cp1700 | Service Manual - Page 215
page to check whether the printer is working with the auto-duplex print a double-sided demo page are: 1. Turn on the printer. 2. Press and hold down the POWER button. 3. Press the to print a double-sided demo page. align printheads The steps to align printheads by using the LCD panel are: 1. Press - HP Cp1700 | Service Manual - Page 216
prints an alignment page. list of available tests A self-test page verifies if the: •=Printer is connected to the computer properly. •=Printer and printer software are functioning properly. To obtain a list of available tests: 1. Press the RESUME button four times. 4 - 20 hp confidential support - HP Cp1700 | Service Manual - Page 217
diagnostic page Information displayed on the Diagnostic page: •=Printer information: Firmware version number, Model, and Service ID •=Printhead information: Technical information on printhead performance •=Technical information: Technical information on printheads and ink cartridges The steps to - HP Cp1700 | Service Manual - Page 218
calibration data The steps to print the paper data are: 1. Press the CANCEL button once. 2. Press the RESUME button once. The paper path data is displayed in a printout. NVRAM contents The steps to print the NVRAM contents are: 1. Press the CANCEL button once. 4 - 22 - HP Cp1700 | Service Manual - Page 219
2. Press the RESUME button twice. NVRAM contents The contents of the NVRAM are displayed in a printout. technical diagnostic page The steps to print a technical diagnostic page . It contains advanced configuration information for use of CCC and service center users. support hp confidential 4 - 23 - HP Cp1700 | Service Manual - Page 220
spot sensor check The spot sensor check is useful to service Center and test the accuracy of the spot sensor. mode - A size - tray 1 Use the skew test to test for paper tray with the specified location, paper size, and print mode. The steps to perform the skew test are: 1. Press the CANCEL button - HP Cp1700 | Service Manual - Page 221
tray 1 Use the skew test to test for paper tray with the specified location, paper size, and print mode. The steps to perform the skew test are printhead health and check for blocked printhead nozzles. The steps to print the nozzle pattern are: 1. Turn on the printer. support hp confidential 4 - 25 - HP Cp1700 | Service Manual - Page 222
the printer. The printer picks paper continuously and prints a page each of the letter H. The steps to print the continuous color H pattern are: 1. Press the CANCEL button once. 2. Press the RESUME button three times. pen recovery level 1 The steps to perform level-one cleaning of the printheads are - HP Cp1700 | Service Manual - Page 223
problems, : 2nd To diagnose the causes for paper handling problems, such as paper jams, perform the continuous paper To diagnose the causes for paper handling problems, such as paper jams, perform the continuous To diagnose the causes for paper handling problems, such as paper jams, perform the - HP Cp1700 | Service Manual - Page 224
printer is in a cool, dry location. printer status symptom Blank page printed Wrong fonts printed Jagged text cause solution •= Printhead problems •= Incorrect driver 2. Check the font type of the software 3. Check the bitmap image of text print quality issues 4 - 28 hp confidential support - HP Cp1700 | Service Manual - Page 225
the margin settings for the document do not exceed the printable area of the printer. 3. Check color print settings. 4. Deselect the Grayscale option in the Print Settings dialog box. in the system is not set to ECP (Windows 3.1x/95/98 only). connectivity problems support hp confidential 4 - 29 - HP Cp1700 | Service Manual - Page 226
performing print software troubleshooting HP offers: •=Support services to troubleshoot and diagnose printer problems •=Instructions for service and repair •=Documentation for troubleshooting •=Online and telephone support for troubleshooting •=URL for support: •=During the warranty period, - HP Cp1700 | Service Manual - Page 227
printheads in KCMY sequence 43 Total numbers of pages picked from tray 1 44 Total numbers of pages picked from tray 2 45 Displays serial number of the printer 20 Pen cleaning : Basic 21 Pen cleaning : Intermediate 22 Pen cleaning : Advanced no output action support hp confidential 4 - HP Cp1700 | Service Manual - Page 228
repackage for return shipment Perform the following checks while repackaging the printer for return shipment: •=Ensure that the ink cartridges are removed. •=Ensure that the printheads are removed. repackaging for return shipment 4 - 32 hp confidential support - HP Cp1700 | Service Manual - Page 229
America Support FlowEnd Customer->Dealer->Call Center->Division-> Escalation FlowEnd Customer->Dealer->Call Center->Division-> Europe Support FlowEnd Customer->Dealer->Call Center->Division-> Escalation FlowEnd Customer->Dealer->Call Center->Division-> Asia Pacific Support FlowEnd - HP Cp1700 | Service Manual - Page 230
Output tray - C8108-67045 11 non V-coded parts ...12 2nd bin SVC - C8108-67052 12 C8108-67031 20 Assy. Service Station - C8108-67011 20 Assy. Ink Supply Station - C8108- troubleshooting power-on problems 26 troubleshooting printer initialization problems 29 troubleshooting LCD messages 31 - HP Cp1700 | Service Manual - Page 231
the demo page 36 clean printheads...36 change the ink cartridges 36 troubleshooting paper eject problems 37 troubleshooting paper eject problems 38 error codes ...39 Introduction ...39 Recoverable error codes...39 troubleshooting problems with parts 43 troubleshooting unusual noises 45 - HP Cp1700 | Service Manual - Page 232
troubleshooting printer initialization problems 29 Fig 5.86 troubleshooting LCD messages 31 Fig 5.87 troubleshooting paper feed problems 33 Fig 5.88 troubleshooting demo page 35 Fig 5.89 troubleshooting paper eject problems 37 Fig 5.90 troubleshooting unusual noises 45 service and repair hp - HP Cp1700 | Service Manual - Page 233
Test : Output - LCD Panel test description procedure Firmware Revision Most recent error code Display Printhead health Pages Picked: Tray 1 Pages Picked: Tray 2 Serial Number Press the RESUME CANCEL button nine times and the RESUME button two times. 5 - 4 hp confidential service and repair - HP Cp1700 | Service Manual - Page 234
: No Output - (Action to be performed) test description procedure Continuous H pattern Continuous color H pattern Pen recovery level 1 Pen recovery level 2 Pen recovery level 3 Purge RIDS and the RESUME button eight times. Diagnostic Tests : No Output service and repair hp confidential 5 - 5 - HP Cp1700 | Service Manual - Page 235
exploded view S. Part Name No. 1. Serial label 2. hp jetdirect 200mhp exploded view Service Bar codes Level NV 5 - 6 hp confidential Part Number C8108-67025 J6039A service and repair - HP Cp1700 | Service Manual - Page 236
power supply NV 21. Assy. USB SVC NV 22. PCA Duplexer NV Interconnect 23. Assy. Service NV station 24. Assy. Ink supply NV station 25. Base NV absorber/basin SVC service and repair hp confidential J6042A C8108-67014 C8108-67044 C8108-67052 C8108-67045 C8108-67020 C8108-67022 C8108 - HP Cp1700 | Service Manual - Page 237
26. Bottom Cover - NV Main Case 27. Holder - NV raceway/hanger SVC 28. Assy. Replaceable NV IDS SVC 29. Carriage Rod NV C8108-67023 C8108-67024 C8108-67012 C8108-67008 5 - 8 hp confidential service and repair - HP Cp1700 | Service Manual - Page 238
repair flowchart repair flowchart service and repair hp confidential 5 - 9 - HP Cp1700 | Service Manual - Page 239
high failure rate parts part number part name part AFR or % repair C8108-67011 C8108-67013 C8108-67019 C8108-67045 C8108-67003 C8108-67010 C8108-67012 C8108-67016 C8108-67017 C8108-67020 C8108-67022 C8108-67044 Assy. Service Station SVC Assy. Ink Supply Station SVC Assy. Case Main SVC Assy. - HP Cp1700 | Service Manual - Page 240
two buttons located on both sides of the cleanout trough to remove it. Assy. Tray main - C8108-67044 1. Lift the output tray. 2. Pull to remove the main tray. Assy. Output tray - C8108-67045 1. Lift the output tray. 2. Pull to remove the output tray. service and repair hp confidential 5 - 11 - HP Cp1700 | Service Manual - Page 241
non V-coded parts 2nd bin SVC - C8108-67052 1. Lift the printer off the 2nd bin SVC. Assy. Door Main - C8108-67020 1. Lift the Assy. Door Main. 2. Release the two tabs and remove the Door Main. Assy. Access Door - C8108-67022 5 - 12 hp confidential service and repair - HP Cp1700 | Service Manual - Page 242
the access door and remove it. Cover LIO SVC - C8108-67014 1. Remove the LIO cover from its slot. Duplexer SVC - C8108-67053 1. Push the buttons located on both sides of the auto-duplex unit to remove it. service and repair hp confidential 5 - 13 - HP Cp1700 | Service Manual - Page 243
the following: 1. Auto-duplex unit/ rear access panel 2. Assy. Pick Roller 2 screws 1. Use a T-20 bit screwdriver to remove the T-20 screws. 2. Remove Case Left. 5 - 14 hp confidential service and repair - HP Cp1700 | Service Manual - Page 244
T-20 screws. 2. Remove Case Right. Bezel SVC - C8108-67015 1. Lift the Main door. 2. Use a flathead screwdriver to release the six catches and remove the Bezel. service and repair hp confidential 5 - 15 - HP Cp1700 | Service Manual - Page 245
. 2. Remove the cover key panel. Assy. Lightpipe SVC and PCA Key panel - C8108-67021 & C8108-67007 First remove the following: 1. Bezel 2. Cover key panel 5 - 16 hp confidential service and repair - HP Cp1700 | Service Manual - Page 246
remove the T-10 screws. 2. Pull out the harness. 3. Release the four catches located on the back. 4. Remove the Assy. lightpipe and the PCA key panel. Assy. 6. Case Right 7. Bezel 8. Cover Key Panel 9. Assy. Lightpipe & PCA key panel service and repair Step 1 Step 2 Step 3 hp confidential 5 - 17 - HP Cp1700 | Service Manual - Page 247
push the cable through the slot. 2. Use a flathead screwdriver to release the six locks located at the bottom of the printer. 3. Remove the Assy. Case Main. PCA Assy. Logic SVC - C8108-67005 First Door Main 4. Assy. Access Door 5. Case Left 6. Case Right 5 - 18 hp confidential service and repair - HP Cp1700 | Service Manual - Page 248
4. Assy. Access Door 5. Case Left 6. Case Right 7. Bezel 8. Cover Key Panel 9. Assy. Lightpipe & PCA key panel 10. Assy. Case Main 11. PCA Assy. Logic 2 screws service and repair 1. Remove the T-10 screws - HP Cp1700 | Service Manual - Page 249
roller 4. Case Left Step 1 1 screw Step 2 1. Remove the T-10 screw. 2. Turn the Duplexer Interconnect unit to pull out the harness. Assy. Service Station - C8108-67011 First remove the following: 1. Assy. Door Main 2. Auto-duplex unit/ rear access panel 3. Assy. Pick roller 4. Case Left 5 - 20 - HP Cp1700 | Service Manual - Page 250
Remove the Encoder holder. 4. Use manual uncap, if necessary. 5. Pull out the two harnesses. 6. Remove the Assy. Service station. Assy. Ink Supply Station - C8108-67013 First remove Case Main 12. PCA Duplexer interconnect 13. Assy. Service station Step 1 Step 2 3 screws 1. Remove the T-10 screws - HP Cp1700 | Service Manual - Page 251
pliers to cut the clip to remove the harness. 4. Remove the ink supply station. Remove Ink Supply Station - C8108-67013 Base Absorber/Basin SVC - C8108-67003 Main 12. PCA Duplexer interconnect 13. Assy. Service station 14. Assy. Ink supply station 1. Remove the base absorber. 2. Remove the Basin SVC. - HP Cp1700 | Service Manual - Page 252
PCA Duplexer interconnect 13. Assy. Service station 14. Assy. Ink supply station 15. Base absorber/ basin SVC 1. Use long nosed pliers to push the two tabs located on the bottom cover. 2. / rear access panel 6. Assy. Pick roller 7. Case Left 8. Case Right service and repair hp confidential 5 - 23 - HP Cp1700 | Service Manual - Page 253
key panel 12. Assy. Case Main 13. Assy. Service station Step 1 Step 2 5 screws Step 3 1. Remove the T-10 screws. 2. Lift the printhead access latch to remove the hanger SVC. 3. Separate the access panel 6. Assy. Pick roller 7. Case Left 8. Case Right 5 - 24 hp confidential service and repair - HP Cp1700 | Service Manual - Page 254
9. Bezel Cover Key Panel 10. Assy. Lightpipe & PCA key panel 11. Assy. Case Main 12. PCA Duplexer interconnect 13. Assy. Service station 14. Assy. Ink supply station 1. Remove the Encoder strip from its slot. 2. Remove the Encoder strip from its slot in the Encoder holder. 3. Slide out the Encoder - HP Cp1700 | Service Manual - Page 255
troubleshooting power-on problems Fig 5.84 troubleshooting power-on problems 5 - 26 hp confidential service and repair - HP Cp1700 | Service Manual - Page 256
LCD panel displays the message CLOSE ALL COVERS, open and reclose all access doors. Check the vents. If the printer's vents are covered, and the printer overheats, it automatically turns off. Ensure the vents are not covered and the printer is placed in a cool, dry location. Ensure the printer is - HP Cp1700 | Service Manual - Page 257
Note If PCA/power supply is replaced, hardware tests must be performed. 5 - 28 hp confidential service and repair - HP Cp1700 | Service Manual - Page 258
troubleshooting printer initialization problems Fig 5.85 troubleshooting printer initialization problems service and repair hp confidential 5 - 29 - HP Cp1700 | Service Manual - Page 259
a dry cotton swab. Clean the electrical contacts on the printheads with a dry, lint free cloth. To prevent damage to the electrical contacts, you should wipe the contacts only once. Do not wipe the ink nozzles on the printheads. Re-install the printheads. 5 - 30 hp confidential service and repair - HP Cp1700 | Service Manual - Page 260
in the printer. AND CLEAR PAPER PRESS RESUME TO CONTINUE [COLOR] INK CARTRIDGE The cartridge is out of ink and the printer will EMPTY not print until the cartridge is replaced. REPLACE [COLOR] INK The printer detects a faulty ink cartridge. CARTRIDGE service and repair hp confidential - HP Cp1700 | Service Manual - Page 261
COLOR] INK IS LOW The specified ink cartridge is running low on ink. [COLOR] INK CARTRIDGE The expiration date for the specified ink EXPIRED cartridge has passed. REPLACE [COLOR] PRINTHEAD The printer detects a faulty ink printhead. [COLOR] PRINTHEAD MISSING The printer cannot detect the ink - HP Cp1700 | Service Manual - Page 262
print media problems Fig 5.87 troubleshooting paper feed problems print media symptom Special media does not pull in Loosen Width Adjuster if necessary. The Envelope Feed only supports one envelope at a time. To print more than one envelope, use Tray 1. service and repair hp confidential 5 - 33 - HP Cp1700 | Service Manual - Page 263
of Input Tray. Dirt accumulated Use the cleaning kit to clean the on pick and drive rollers. Replace Drive Shaft/Pivot rollers Assembly if cleaning several times does not help. Paper has failed. Electrical contacts Change Main Harness if necessary 5 - 34 hp confidential service and repair - HP Cp1700 | Service Manual - Page 264
troubleshooting the demo page Fig 5.88 troubleshooting demo page service and repair hp confidential 5 - 35 - HP Cp1700 | Service Manual - Page 265
formulated by Hewlett-Packard to ensure superior print quality and compatibility with your printer. Damage to the printer or the print cartridge resulting from modifying or refilling the ink cartridge is not the responsibility of HP. 5 - 36 1. Remove the printheads from the printer. 2. Clean the - HP Cp1700 | Service Manual - Page 266
troubleshooting paper eject problems Fig 5.89 troubleshooting paper eject problems service and repair hp confidential 5 - 37 - HP Cp1700 | Service Manual - Page 267
troubleshooting paper eject problems symptom Skew Test Failure Paper does not Exit Printer Paper Guide Assembly, assembly may be faulty If paper forms a "U" on the Up/Rear Paper Guide Assembly, the assembly may be faulty. Replace the Up/Rear Paper Guide Assembly. 5 - 38 hp confidential service - HP Cp1700 | Service Manual - Page 268
printer. Clear the jammed paper. For more information, see "Print media is jammed." [COLOR] INK CARTRIDGE EMPTY The cartridge is out of ink and Remove the ink cartridge and the printer will not print until the install a new cartridge. cartridge is replaced. service and repair hp confidential - HP Cp1700 | Service Manual - Page 269
COLOR] INK CARTRIDGE [COLOR] INK CARTRIDGE MISSING [COLOR] INK IS LOW [COLOR] INK CARTRIDGE EXPIRED REPLACE [COLOR] PRINTHEAD [COLOR] PRINTHEAD MISSING BAD INK CARTRIDGE OR PRINTHEAD INCOMPATIBLE [COLOR] PRINTHEAD LOAD [MEDIA TYPE] in [TRAY] PRESS RESUME TO CONTINUE The printer detects a faulty ink - HP Cp1700 | Service Manual - Page 270
REAR MANUAL FEED manual duplexing. Indicates that printing on the first side of the media is complete. Follow the instructions in the printer message. Wait for the printer printer. If you have purchased Tray 2, make sure it is installed correctly in the printer correctly in the printer. Otherwise, - HP Cp1700 | Service Manual - Page 271
that the printheads are seated properly by pushing down firmly on each printhead. Make sure the rear access panel is inserted correctly and completely into the printer. For information about changing the display language, see "Setting the LCD language." 5 - 42 hp confidential service and repair - HP Cp1700 | Service Manual - Page 272
troubleshooting problems with parts part symptom description recommended action (OOPS Sensor) Door sensor (combined) Media sensor Line sensor Carriage Assembly Key Panel PCA Power Supply Service Station Assembly Logic PCA Continuous paper feed Indicates carriage door open No detection of - HP Cp1700 | Service Manual - Page 273
Assembly No power light. Service Station does not move smoothly. Carriage does not move out of home position. Drive Shaft/Pivot Assembly rollers do not rotate. No paper feed. Self-Test does not look OK. Gaps in Test pattern. Printer/Carriage stall. Error code displayed if alignment extremely poor - HP Cp1700 | Service Manual - Page 274
unusual noises Fig 5.90 troubleshooting unusual noises symptom cause solution Noise from the right side of Printer Faulty Service Station Assembly If the right side of the printer is making unusual noises, the Service Station Assembly or one of its parts may be faulty. Noise from - HP Cp1700 | Service Manual - Page 275
and the Up/Rear Paper Guide Assembly have rollers responsible for feeding the paper in to the printer. Faulty rollers cause unusual noises. Check the Carriage Shaft for dirt particles. To check the sliders on the Carriage, you must remove the Carriage. 5 - 46 hp confidential service and repair - HP Cp1700 | Service Manual - Page 276
printer is turned off, an alert message appears on the computer screen. If the printer is turned off and no message is displayed when executing a print command, the printer setup might be incorrect. To correct the printer setup, reinstall the printer software. service and repair hp confidential - HP Cp1700 | Service Manual - Page 277
carriage might be stalled) printer again. The latest version of the Turn off the printer and then firmware is absent or the turn it on again. firmware might have been If the problem persists, it might incorrectly flashed be a hardware issue or fault. 5 - 48 hp confidential service and repair - HP Cp1700 | Service Manual - Page 278
that are low on ink. troubleshooting paper jams tips and tricks To clear a paper jam, first check the paper input paths. If the jammed paper is visible from one of the input trays or the front manual feed, carefully pull the jammed paper straight up and out of the printer. Select new paper and - HP Cp1700 | Service Manual - Page 279
print quality troubleshooting symptom Poor print quality cause Printer needs cleaning Ink supplies issues Meaningless characters printed Incorrect connectivity Incorrect document settings solution Check the printheads and ink cartridges Check and replace clogged or worn printheads. Check and - HP Cp1700 | Service Manual - Page 280
Power Supply Harness Assembly when you are finished. Turn the printer off and then power the printer on again. It might also be due to an Opto- performed. troubleshooting printer initialization problems symptom cause Service station mechanism solution Rotate the gears of the Service Station - HP Cp1700 | Service Manual - Page 281
swab. Clean the electrical contacts on the printheads with a dry, lint free cloth. To prevent damage to the electrical contacts, you should wipe the contacts only once. Do not wipe the ink nozzles on the printheads. Re-install the printheads. troubleshooting print media problems symptom Special - HP Cp1700 | Service Manual - Page 282
bar, click Printer and select Properties . Click Print Test Page at the bottom of the page. The printer prints a Self-test page. Out of Ink If printing black text and a blank page prints, the black ink cartridge might be empty. Replace the black ink cartridge. service and repair hp confidential - HP Cp1700 | Service Manual - Page 283
troubleshooting paper eject problems symptom Skew Test Failure Paper does not Exit Printer Paper forms a "U" cause Paper Paper Guide Guide Assembly, the assembly might be Assembly might be faulty. Replace the Up/Rear Paper Guide faulty Assembly. 5 - 54 hp confidential service and repair - HP Cp1700 | Service Manual - Page 284
covered, and the printer is in a cool and dry location. troubleshooting print quality issues symptom Blank page printed cause Printhead problems Incorrect driver Media mispick issue action Ensure that the tape is removed from the printheads. Check for empty ink cartridges. Check that the paper - HP Cp1700 | Service Manual - Page 285
the Grayscale option in the color settings Print Settings dialog box. printing Incorrect page settings Check the page orientation. Check the paper size. Check margin settings. Check how the paper is loaded. troubleshooting connectivity problems symptom Problems printing over a network cause - HP Cp1700 | Service Manual - Page 286
Carriage stall, shutdown Service Station Problems Problems with carriage board, Power supply, PCA logic board Pen & Supply errors Real Time Clock errors recommended action Replace sensor. Replace carriage motor, PCA, Replace/Clean repair service station Troubleshoot parts Replace printheads Replace - HP Cp1700 | Service Manual - Page 287
faulty, or service station lost sequence position. Printout edges, lines and •= Bad bi-directional alignment. text misaligned •= Econofast mode. •= Encoder strip dirty (printer may stall and display error code due to misalignment) Noise coming from •= Clean electrical contacts. Replace - HP Cp1700 | Service Manual - Page 288
cartridge. If problem is not resolved, replace Logic PCA. Printer/Carriage stall. Replace dirty or faulty Encoder Strip. Error code displayed Clean rollers. If problem is not paper feeding due to resolved, replace Drive Shaft/Pivot roller contamination. Assembly. service and repair hp - HP Cp1700 | Service Manual - Page 289
5 - 60 hp confidential service and repair - HP Cp1700 | Service Manual - Page 290
copyright 2001 Hewlett-Packard Company printed in Singapore C8108-67905
-
 1
1 -
 2
2 -
 3
3 -
 4
4 -
 5
5 -
 6
6 -
 7
7 -
8
-
9
-
10
-
11
-
12
-
13
-
14
-
15
-
16
-
17
-
18
-
19
-
20
-
21
-
22
-
23
-
24
-
25
-
26
-
27
-
28
-
29
-
30
-
31
-
32
-
33
-
34
-
35
-
36
-
37
-
38
-
39
-
40
-
41
-
42
-
43
-
44
-
45
-
46
-
47
-
48
-
49
-
50
-
51
-
52
-
53
-
54
-
55
-
56
-
57
-
58
-
59
-
60
-
61
-
62
-
63
-
64
-
65
-
66
-
67
-
68
-
69
-
70
-
71
-
72
-
73
-
74
-
75
-
76
-
77
-
78
-
79
-
80
-
81
-
82
-
83
-
84
-
85
-
86
-
87
-
88
-
89
-
90
-
91
-
92
-
93
-
94
-
95
-
96
-
97
-
98
-
99
-
100
-
101
-
102
-
103
-
104
-
105
-
106
-
107
-
108
-
109
-
110
-
111
-
112
-
113
-
114
-
115
-
116
-
117
-
118
-
119
-
120
-
121
-
122
-
123
-
124
-
125
-
126
-
127
-
128
-
129
-
130
-
131
-
132
-
133
-
134
-
135
-
136
-
137
-
138
-
139
-
140
-
141
-
142
-
143
-
144
-
145
-
146
-
147
-
148
-
149
-
150
-
151
-
152
-
153
-
154
-
155
-
156
-
157
-
158
-
159
-
160
-
161
-
162
-
163
-
164
-
165
-
166
-
167
-
168
-
169
-
170
-
171
-
172
-
173
-
174
-
175
-
176
-
177
-
178
-
179
-
180
-
181
-
182
-
183
-
184
-
185
-
186
-
187
-
188
-
189
-
190
-
191
-
192
-
193
-
194
-
195
-
196
-
197
-
198
-
199
-
200
-
201
-
202
-
203
-
204
-
205
-
206
-
207
-
208
-
209
-
210
-
211
-
212
-
213
-
214
-
215
-
216
-
217
-
218
-
219
-
220
-
221
-
222
-
223
-
224
-
225
-
226
-
227
-
228
-
229
-
230
-
231
-
232
-
233
-
234
-
235
-
236
-
237
-
238
-
239
-
240
-
241
-
242
-
243
-
244
-
245
-
246
-
247
-
248
-
249
-
250
-
251
-
252
-
253
-
254
-
255
-
256
-
257
-
258
-
259
-
260
-
261
-
262
-
263
-
264
-
265
-
266
-
267
-
268
-
269
-
270
-
271
-
272
-
273
-
274
-
275
-
276
-
277
-
278
-
279
-
280
-
281
-
282
-
283
-
284
-
285
-
286
-
287
-
288
-
289
-
290
 |
 |
