HP DreamColor Z27x User Guide 1 - Page 47
Using PIP as a Confidence Monitor, Use Video Levels (16–235), Overscan Within PIP
 |
View all HP DreamColor Z27x manuals
Add to My Manuals
Save this manual to your list of manuals |
Page 47 highlights
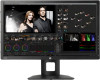
the PIP as a confidence monitor. Please refer to the following section for more information on this usage. 6. If you want to adjust the position of the PIP, select PIP Position in the OSD, then select either Top Left, Top Right, Bottom Left, Bottom Right, or Fine Tune Position. Using PIP as a Confidence Monitor As the PIP is primarily designed to be used at as a confidence monitor - at 100% size for 1080- or 720-line content, including DCI 2K content - many of the Image Adjustments available for the main input are also available for use within the PIP. Refer to Understanding the Z27x Image Adjustment Options on page 31 and Working with 2K and 4K Digital Cinema Image Formats on page 35 for further information on these adjustments. The following adjustments are available within the PIP. None are enabled by default. Use Video Levels (16-235) If monitoring a video signal output from a video capture card such as an AJA Kona or Blackmagic Design Decklink, this option should usually be enabled as video levels are typically used in video post-production workflows. Overscan Within PIP Use this option if you wish to see how your video output will be displayed on a consumer television. This is especially useful when ensuring that the margins for lower third graphics are correct and nothing will be cut off on a consumer television. Digital Cinema Options If you display a 2048 × 1080 signal as a PIP, you can instruct the monitor to display either the full DCI container or crop the PIP to either the 1.85:1 or 2.39:1 aspect ratio. If cropping to an aspect ratio, the shape of the PIP will change to the chosen aspect ratio. Black bars will not be visible at the edges of the PIP. Changing the Bezel Button Functions You can change the top-level front bezel button functions from their default values so that when the buttons are activated you can quickly access commonly used commands. The following commands can be mapped: ● Color Space Select - displays a list of available color space presets. Use to quickly switch from one color space preset to another. This command is mapped to Function Button One by default. ● Adjust Luminance - allows you to quickly change the monitor luminance. This command is mapped to Function Button Three by default. ● Video Input Select - displays a list of the available video inputs so you can switch to another input, as required. This command is mapped to Function Button Two by default. ● Switch to Next Active Video Input - use this command to quickly switch between all active video inputs. An active input is defined as one that is receiving a signal from a computer or other video source. ● Aspect Ratio Display - displays the Aspect Ratio Display sub-menu, providing quick access to this set of functions. Changing the Bezel Button Functions 39
-
 1
1 -
2
-
3
-
4
-
5
-
6
-
7
-
8
-
9
-
10
-
11
-
12
-
13
-
14
-
15
-
16
-
17
-
18
-
19
-
20
-
21
-
22
-
23
-
24
-
25
-
26
-
27
-
28
-
29
-
30
-
31
-
32
-
33
-
34
-
35
-
36
-
37
-
38
-
39
-
40
-
41
-
 42
42 -
 43
43 -
 44
44 -
 45
45 -
 46
46 -
 47
47 -
 48
48 -
 49
49 -
 50
50 -
 51
51 -
 52
52 -
53
-
54
-
55
-
56
-
57
-
58
-
59
-
60
-
61
-
62
-
63
-
64
-
65
-
66
-
67
-
68
-
69
-
70
-
71
 |
 |
