HP Evo Notebook PC n110 Compaq Armada 110 and Compaq Evo N110 Maintenance and - Page 82
Display, LED cover
 |
View all HP Evo Notebook PC n110 manuals
Add to My Manuals
Save this manual to your list of manuals |
Page 82 highlights
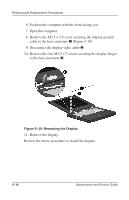
Removal and Replacement Procedures 5.9 Display Display Spare Part Number Information Displays 14.1-inch, XGA, CTFT (used only with computer models with 1.0-GHz processors) 14.1-inch, XGA, CTFT (used only with computer models with 850-, 800-, and 700-MHz processors) 12.1-inch, SVGA, CTFT (used only with computer models with 850-, 800-, and 700-MHz processors) 269909-001 233545-001 233544-001 ✎ When the display screws are removed, the display assembly is unsupported. Make sure to provide support for the display assembly when removing the display screws. 1. Prepare the computer for disassembly (Section 5.3) and, in the order below, remove the following components: ❏ LED cover (Section 5.6) ❏ Keyboard (Section 5.7) 2. Close the computer. 3. Position the computer with the rear panel facing you. 5-14 Maintenance and Service Guide
-
 1
1 -
2
-
3
-
4
-
5
-
6
-
7
-
8
-
9
-
10
-
11
-
12
-
13
-
14
-
15
-
16
-
17
-
18
-
19
-
20
-
21
-
22
-
23
-
24
-
25
-
26
-
27
-
28
-
29
-
30
-
31
-
32
-
33
-
34
-
35
-
36
-
37
-
38
-
39
-
40
-
41
-
42
-
43
-
44
-
45
-
46
-
47
-
48
-
49
-
50
-
51
-
52
-
53
-
54
-
55
-
56
-
57
-
58
-
59
-
60
-
61
-
62
-
63
-
64
-
65
-
66
-
67
-
68
-
69
-
70
-
71
-
72
-
73
-
74
-
75
-
76
-
 77
77 -
 78
78 -
 79
79 -
 80
80 -
 81
81 -
 82
82 -
 83
83 -
 84
84 -
 85
85 -
 86
86 -
 87
87 -
88
-
89
-
90
-
91
-
92
-
93
-
94
-
95
-
96
-
97
-
98
-
99
-
100
-
101
-
102
-
103
-
104
-
105
-
106
-
107
-
108
-
109
-
110
-
111
-
112
-
113
-
114
-
115
-
116
-
117
-
118
-
119
-
120
-
121
-
122
-
123
-
124
-
125
-
126
-
127
-
128
-
129
-
130
-
131
-
132
-
133
-
134
-
135
-
136
-
137
-
138
-
139
-
140
-
141
-
142
-
143
-
144
-
145
-
146
-
147
-
148
-
149
-
150
-
151
-
152
-
153
 |
 |
