HP J4580 User Guide - Page 40
Enhance light areas of your copy, Cancel a copy job
 |
UPC - 883585633531
View all HP J4580 manuals
Add to My Manuals
Save this manual to your list of manuals |
Page 40 highlights
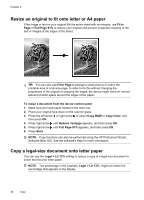
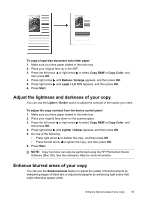
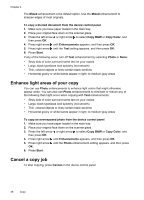
Chapter 4 The Mixed enhancement is the default option. Use the Mixed enhancement to sharpen edges of most originals. To copy a blurred document from the device control panel 1. Make sure you have paper loaded in the main tray. 2. Place your original face down on the scanner glass. 3. Press the left arrow or right arrow to select Copy B&W or Copy Color, and then press OK. 4. Press right arrow until Enhancements appears, and then press OK. 5. Press right arrow until the Text setting appears, and then press OK. 6. Press Start. If any of the following occur, turn off Text enhancement by selecting Photo or None: • Stray dots of color surround some text on your copies • Large, black typefaces look splotchy (not smooth) • Thin, colored objects or lines contain black sections • Horizontal grainy or white bands appear in light- to medium-gray areas Enhance light areas of your copy You can use Photo enhancements to enhance light colors that might otherwise appear white. You can also use Photo enhancements to eliminate or reduce any of the following that might occur when copying with Text enhancements: • Stray dots of color surround some text on your copies • Large, black typefaces look splotchy (not smooth) • Thin, colored objects or lines contain black sections • Horizontal grainy or white bands appear in light- to medium-gray areas To copy an overexposed photo from the device control panel 1. Make sure you have paper loaded in the main tray. 2. Place your original face down on the scanner glass. 3. Press the left arrow or right arrow to select Copy B&W or Copy Color, and then press OK. 4. Press right arrow until Enhancements appears, and then press OK. 5. Press right arrow until the Photo enhancement setting appears, and then press OK. 6. Press Start. Cancel a copy job To stop copying, press Cancel on the device control panel. 36 Copy
-
 1
1 -
2
-
3
-
4
-
5
-
6
-
7
-
8
-
9
-
10
-
11
-
12
-
13
-
14
-
15
-
16
-
17
-
18
-
19
-
20
-
21
-
22
-
23
-
24
-
25
-
26
-
27
-
28
-
29
-
30
-
31
-
32
-
33
-
34
-
 35
35 -
 36
36 -
 37
37 -
 38
38 -
 39
39 -
 40
40 -
 41
41 -
 42
42 -
 43
43 -
 44
44 -
 45
45 -
46
-
47
-
48
-
49
-
50
-
51
-
52
-
53
-
54
-
55
-
56
-
57
-
58
-
59
-
60
-
61
-
62
-
63
-
64
-
65
-
66
-
67
-
68
-
69
-
70
-
71
-
72
-
73
-
74
-
75
-
76
-
77
-
78
-
79
-
80
-
81
-
82
-
83
-
84
-
85
-
86
-
87
-
88
-
89
-
90
-
91
-
92
-
93
-
94
-
95
-
96
-
97
-
98
-
99
-
100
-
101
-
102
-
103
-
104
-
105
-
106
-
107
-
108
-
109
-
110
-
111
-
112
-
113
-
114
-
115
-
116
-
117
-
118
-
119
-
120
-
121
-
122
-
123
-
124
-
125
-
126
-
127
-
128
-
129
-
130
-
131
-
132
-
133
-
134
-
135
-
136
-
137
-
138
-
139
-
140
-
141
-
142
-
143
-
144
-
145
-
146
-
147
-
148
-
149
-
150
-
151
-
152
-
153
-
154
-
155
-
156
-
157
-
158
-
159
-
160
-
161
-
162
-
163
-
164
-
165
-
166
-
167
-
168
-
169
-
170
-
171
-
172
-
173
-
174
-
175
-
176
-
177
-
178
-
179
-
180
-
181
-
182
 |
 |