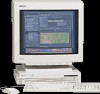
HP Model 712/100 hp 9000 series 700 model 712 service handbook (a2615-90039)
HP Model 712/100 - Workstation Manual
 |
View all HP Model 712/100 manuals
Add to My Manuals
Save this manual to your list of manuals |
HP Model 712/100 manual content summary:
- HP Model 712/100 | hp 9000 series 700 model 712 service handbook (a2615-90039) - Page 1
For:root Printed on:Wed, Sep 4, 1996 13:50:18 From book:sh_a2615_90617 Document:frtmtr Last saved on:Tue, Jul 25, 1995 07:29:04 - HP Model 712/100 | hp 9000 series 700 model 712 service handbook (a2615-90039) - Page 2
Service Handbook Model 712 Workstations HP Part Number. A2615-90039 R Hewlett-Packard Company 3404 East Harmony Road, Fort Collins, CO. 80525 - HP Model 712/100 | hp 9000 series 700 model 712 service handbook (a2615-90039) - Page 3
parts can be obtained from your local Sales and Service Office. E Copyright Hewlett-Packard Company 1995 This document contains information which is protected by copyright. All rights are reserved. Reproduction, adaptation, or translation without prior written permission is prohibited, except - HP Model 712/100 | hp 9000 series 700 model 712 service handbook (a2615-90039) - Page 4
previous edition. Update packages may be issued between editions and contain replacement and additional pages to be merged into the manual by the user. The manual printing date and part number indicate its current edition. The printing date changes when a new edition is printed. (Minor corrections - HP Model 712/100 | hp 9000 series 700 model 712 service handbook (a2615-90039) - Page 5
radio and television reception. All HP Apollo nodes and peripherals have been installed and used in accordance with the instruction manual, may cause harmful interference to radio to these regulations requires the use of shielded cables. Canadian Department of Communications (DOC) This digital - HP Model 712/100 | hp 9000 series 700 model 712 service handbook (a2615-90039) - Page 6
third-party I/O device installed in HP Apollo system(s) must be in accordance regulations requires the use of shielded cables. Electrostatic Discharge (ESD) Precautions free mat, static straps, routing nodes, and peripheral units. D Keep uninstalled printed circuit boards in their protective - HP Model 712/100 | hp 9000 series 700 model 712 service handbook (a2615-90039) - Page 7
Class-1 laser product under the U.S. Department of Health and Human services (DHHS) Radiation Performance Standard according to the Radiation Control for Health user operation. LASERTURVALLISUUS LUOKAN 1 LASERLAITE KLASS 1 LASER APPARAT HP A2655A CD-ROM-lukulaite sisältää laitteensisäisen CD-ROM- - HP Model 712/100 | hp 9000 series 700 model 712 service handbook (a2615-90039) - Page 8
IEC 825 Class 1 Laser Labels CLASS 1 LASER PRODUCT LASER KLASSE 1 vii - HP Model 712/100 | hp 9000 series 700 model 712 service handbook (a2615-90039) - Page 9
, die vom Kunden selber eingebaut werden können. AVERTISSEMENT: Des bords tranchants du châssis de l'équipement peuvent être exposés quand le cache de l'unité n'est pas en place. Pour éviter des blessures, faire très attention lors de l'installation de modules supplémentaires par le client. WARNING - HP Model 712/100 | hp 9000 series 700 model 712 service handbook (a2615-90039) - Page 10
ROM Drive. AVERTISSEMENT: Utiliser seulement le bloc d'alimentation ETHYP127MM pour le lecteur de CD-ROM A2655A. WARNING: Use only power supply Model ETYHP127MM with A2657A Hard Disk Drive. AVERTISSEMENT: Utiliser seulement le bloc d'alimentation ETHYP127MM pour le disque dur A2657A. CAUTION: System - HP Model 712/100 | hp 9000 series 700 model 712 service handbook (a2615-90039) - Page 11
x - HP Model 712/100 | hp 9000 series 700 model 712 service handbook (a2615-90039) - Page 12
For:root Printed on:Wed, Sep 4, 1996 13:50:21 From book:sh_a2615_90617 Document:toc-real Last saved on:Thu, Jun 1, 1995 08:09:55 - HP Model 712/100 | hp 9000 series 700 model 712 service handbook (a2615-90039) - Page 13
Floppy Drive Eject Button 1-4 Floppy Drive Activity LED 1-4 System Unit Rear Panel Connectors 1-4 Power Cord Connector 1-5 802.3 Network Connectors Monitor Connector 1-6 SCSI Connector 1-6 PS2 Connectors 1-7 HP Parallel I/O Connector 1-7 Audio Connectors 1-7 Optional TeleShare - HP Model 712/100 | hp 9000 series 700 model 712 service handbook (a2615-90039) - Page 14
Resolution Graphics 3-15 Monitor-Type Selection 3-15 Troubleshooting 4-1 Identifying LED-Indicated Conditions 4-4 Dealing with an Tape Drive (A2656A/C2954A 5-9 CD-ROM Drive (A2655A/C2943A 5-11 System Unit FRU Removal and Replacement 5-13 Stand 5-14 Top Cover 5-15 Memory Board - HP Model 712/100 | hp 9000 series 700 model 712 service handbook (a2615-90039) - Page 15
5-45 Diagrams 6-1 System Power 6-1 System Block Diagram 6-4 Reference 7-1 Installation Manual 7-1 Service Manuals 7-1 Reference Manuals 7-1 Service Notes 8-1 HP A2094 Color Monitors 8-3 Cables 8-4 Timing 8-4 Boot Console User Interface 9-1 Accessing the Boot Console User - HP Model 712/100 | hp 9000 series 700 model 712 service handbook (a2615-90039) - Page 16
Jumper Settings 3-12 3-12 Floppy Jumper 3-13 3-13 Memory Connectors 3-14 3-14 Model 712/100 Memory Connectors 3-15 4-1 LED Not Lit 4-2 4-2 Troubleshooting the Model 712 4-3 5-1 System Unit Illustrated Parts Breakdown 5-2 5-2 External Hard Disk Illustrated Parts Breakdown 5-7 5-3 External DDS - HP Model 712/100 | hp 9000 series 700 model 712 service handbook (a2615-90039) - Page 17
Power Supply Cover 5-30 5-21 Disconnecting the Fan Cable 5-31 5-22 Removing the Power Supply 5-32 5-23 Unit Functional Block Diagram 6-4 8-1 HP A2094 Monitor 8-3 Tables 1-1 Serial I/O Pins 1-6 1-2 PC Keyboard to ITF Keyboard Equivalent Keys 1-14 2-1 Environmental Specifications for Model 712 - HP Model 712/100 | hp 9000 series 700 model 712 service handbook (a2615-90039) - Page 18
Tables 5-7 External Hard Disk Nonexchange Assemblies 5-8 5-8 External DDS Tape Exchange Assemblies 5-10 5-9 External DDS Tape Nonexchange Assemblies 5-10 5-10 External CD-ROM Exchange Assemblies 5-12 5-11 External CD-ROM Nonexchange Assemblies 5-12 6-1 CPU Board Power Pinouts 6-2 6-2 Floppy - HP Model 712/100 | hp 9000 series 700 model 712 service handbook (a2615-90039) - Page 19
For:root Printed on:Wed, Sep 4, 1996 13:50:27 From book:sh_a2615_90617 Document:chap_1 Last saved on:Wed, May 31, 1995 09:25:48 - HP Model 712/100 | hp 9000 series 700 model 712 service handbook (a2615-90039) - Page 20
unit rear panel connectors D Monitor controls, connectors, and indicators Product Description The Model 712 workstation contains the following key features: D Operating System: Native HP/UX (version 9.03 and later, version 9.05 and later for 712/100 - 10 Mbit/second Product Information 1-1 - HP Model 712/100 | hp 9000 series 700 model 712 service handbook (a2615-90039) - Page 21
Hz (15-inch color monitors are not supported on the 712/100) - 1024 x 1280 resolution requires Video second synchronous 1.5 Mb/second asynchronous Supports 7 devices ALT-1 of SCSI-2, 50-pin high density connector Terminator not required when no cable attached. Active terminator required when cable - HP Model 712/100 | hp 9000 series 700 model 712 service handbook (a2615-90039) - Page 22
of the LAP-B data-link protocol Two-headed external cable allows simultaneous use of both functions - Graphics card Supports additional monitor, same type as system unit's D Optional I/O (supported by single TeleShare slot) - TeleShare board: integrates the telephone into the workstation - HP Model 712/100 | hp 9000 series 700 model 712 service handbook (a2615-90039) - Page 23
Model 712 workstation automatically shuts down HP-UX when powered off. System Power LED The Power Light Emitting Diode (LED) is located on the left side of the front panel. It lights when the system unit power is on and flashes until the OS is booted. A flashing pattern may indicate a problem with - HP Model 712/100 | hp 9000 series 700 model 712 service handbook (a2615-90039) - Page 24
LAN-TP Connector SCSI-2 Connector Keyboard PS2 Connector VGA Monitor Connector Audio IN (Microphone Connector) TeleShare Board Slot (optional) Figure 1-2. System Unit Rear Panel Connectors Power Cord Connector Plug the workstation's power cord into the power cord connector to provide ac power to the - HP Model 712/100 | hp 9000 series 700 model 712 service handbook (a2615-90039) - Page 25
Data Transmit Data Data Terminal Ready Ground Data Set Ready Request To Send Clear To Send Ring Indicator Monitor Connector Connect the monitor's video cable to the monitor connector on the workstation. SCSI Connector Use the SCSI connector to connect external SCSI devices such as DDS-format tape - HP Model 712/100 | hp 9000 series 700 model 712 service handbook (a2615-90039) - Page 26
on the audio capability of the workstation see the Audio Users Guide. Optional TeleShare Board Connectors The workstation has a slot for an an expansion board slot for an additional I/O board. HP offers a variety of I/O expansion boards that support graphics, 802.5 IBM token ring, RS-232 SIO - HP Model 712/100 | hp 9000 series 700 model 712 service handbook (a2615-90039) - Page 27
or swiveling the monitor on its base. Refer to the manual that came with the monitor for information on any other controls supported on the Model 712/100. Figure 1-4 shows the 15-inch, 1024x768, color monitor. NOTICE: The 15-inch, 1024x768, color monitor is not supported on the Model 712/100 - HP Model 712/100 | hp 9000 series 700 model 712 service handbook (a2615-90039) - Page 28
1 Power ON/OFF Button 2 Power LED 3 Brightness Toggle Front 1 2 3 Rear Video Cable Power Cable Figure 1-3. 12-Inch Flat Panel 1024x768 Display (Model A2882A) Product Information 1-9 - HP Model 712/100 | hp 9000 series 700 model 712 service handbook (a2615-90039) - Page 29
Front 10 1 2 3 45 6 7 89 1 Degauss 2 Geometry 3 Width 4 Height 5 Horizontal Position 6 Vertical Position 7 Brightness 8 Contrast 9 Power-On LED 10 Power ON/OFF Button Rear Video Cable Power Connector Figure 1-4. 15-Inch Color 1024x768 Monitor (Model D1196A) 1-10 Product Information - HP Model 712/100 | hp 9000 series 700 model 712 service handbook (a2615-90039) - Page 30
1 Brightness 2 Contrast 3 Power ON/OFF Button Front 1 2 3 Rear Video Cable Power Connector Figure 1-5. 17-Inch Color 1024x768 Monitor (Model A2287A, A2287B) Product Information 1-11 - HP Model 712/100 | hp 9000 series 700 model 712 service handbook (a2615-90039) - Page 31
1 V-STAT 2 H-STAT 3 V-CENT 4 Brightness 5 Contrast 6 Power-On LED 7 Power ON/OFF Button Front 12 3 4 5 6 7 Rear RGB Cable Connectors Power Connector Connect video cable to bottom three RGB connectors. Figure 1-6. 19-Inch Color 1280x1024 Monitor (Model A2094A, A2094B) 1-12 Product Information - HP Model 712/100 | hp 9000 series 700 model 712 service handbook (a2615-90039) - Page 32
Keyboard The Model 712 workstation uses a Hewlett-Packard PC keyboard. You may need to know the differences between the PC Keyboard and the Hewlett- Packard ITF Keyboard (HP 46201A/B Keyboard). Aside from the obvious difference in the appearance of these keyboards due to the different arrangement of - HP Model 712/100 | hp 9000 series 700 model 712 service handbook (a2615-90039) - Page 33
Table 1-2. PC Keyboard to ITF Keyboard Equivalent Keys PC Keycap Symbol F9 F10 F11 F12 PrintScreen / SysReq Scroll Lock Pause / Break Page Up Num Lock End Page Down Enter Alt (left) Alt (right) No Equivalent No Equivalent No Equivalent No Equivalent No Equivalent No Equivalent No Equivalent ITF - HP Model 712/100 | hp 9000 series 700 model 712 service handbook (a2615-90039) - Page 34
Table 1-2. PC Keyboard to ITF Keyboard Equivalent Keys (cont.) PC Keycap Symbol Esc Insert Home Delete Caps Lock Esc Shifted Pause / Break Shifted Num Lock Shifted 0 / Ins (number pad) 1 / End (number pad) 2 / B (number pad) 3 / Pg Dn (number pad) 4 / A (number pad) 6 / " (number pad 7 / Home ( - HP Model 712/100 | hp 9000 series 700 model 712 service handbook (a2615-90039) - Page 35
9.03 or later. The Model 712/100 uses HP-UX version 9.05 or later. Instant Ignition systems (systems with preloaded software) have X-windows and a Hewlett-Packard graphical user interface, such as HP VUE or RTW, installed and configured. See the user's guide for more information. 1-16 Product - HP Model 712/100 | hp 9000 series 700 model 712 service handbook (a2615-90039) - Page 36
For:root Printed on:Wed, Sep 4, 1996 13:50:33 From book:sh_a2615_90617 Document:chap_2 Last saved on:Thu, Jun 1, 1995 07:21:06 - HP Model 712/100 | hp 9000 series 700 model 712 service handbook (a2615-90039) - Page 37
workstation. Table 2-1. Environmental Specifications for Model 712 Type Specification Operating Temperature Non-Operating Temperature Humidity Operating Altitude Acoustic Electrical Input +5 to +40° C (+41 to 104° F) -40 to +60° C (-40 to 140° F) 15-85% maximum operating @ 40° C 3050 m 5° C to - HP Model 712/100 | hp 9000 series 700 model 712 service handbook (a2615-90039) - Page 38
22 Class A Installation Refer to the following manuals for system installation information: D Hardware Installation Guide Model 712 (Part Number A2615-90600) D The user's guide that shipped with the workstation Preventive Maintenance The system unit requires no preventive maintenance. Some removable - HP Model 712/100 | hp 9000 series 700 model 712 service handbook (a2615-90039) - Page 39
Environmental/Installation/PM 2-3 - HP Model 712/100 | hp 9000 series 700 model 712 service handbook (a2615-90039) - Page 40
For:root Printed on:Wed, Sep 4, 1996 13:50:48 From book:sh_a2615_90617 Document:chap_3 Last saved on:Thu, Jun 1, 1995 06:47:42 - HP Model 712/100 | hp 9000 series 700 model 712 service handbook (a2615-90039) - Page 41
the HP Apollo 9000 Series 700 Configuration Guide for a complete list of supported accessories, peripherals, and operating systems for the Model 712 workstation. FRU Configurations This section provides information for setting up or changing the configuration of the system Field Replaceable Units - HP Model 712/100 | hp 9000 series 700 model 712 service handbook (a2615-90039) - Page 42
LED Terminator Resistor Modules (Must Be Removed) First Drive SCSI ID 6 A2 A1 A0 Second Drive SCSI SCSI ID 5 ID 4 SCSI ID 3 SCSI ID 2 SCSI ID 1 SCSI ID 0 Figure 3-1. Quantum 120-MB Winchester Drive Jumpers 3-2 Configuration - HP Model 712/100 | hp 9000 series 700 model 712 service handbook (a2615-90039) - Page 43
Resistor Modules (Must Be Removed) NOTICE: Jumpers A0, A1, and A2 are the SCSI ID jumpers. The jumper Product Option should be in place. First Second Drive Drive SCSI SCSI SCSI ID 6 ID 5 ID 4 SCSI ID 3 SCSI ID 2 SCSI ID 1 SCSI ID 0 Product Option A0 A1 A2 Figure 3-2. Quantum 270-MB - HP Model 712/100 | hp 9000 series 700 model 712 service handbook (a2615-90039) - Page 44
jumpers Sync LED Spindle, Term Enable, and WS should be removed, and the jump- er Enable Parity should be in place. First Drive SCSI ID 6 Second Drive SCSI SCSI ID 5 ID 4 SCSI ID 3 SCSI ID 2 SCSI ID 1 SCSI ID 0 Sync Spindle Term Enable Enable Parity Wait Spin A0 A1 A2 Figure - HP Model 712/100 | hp 9000 series 700 model 712 service handbook (a2615-90039) - Page 45
Drive 6 Second Drive 5 4 SCSI ID 1 2 3 4 5 6 7 8 9 10 2 1 0 3 Front NOTICE: The last three jumpers (8, 9, and 10) are the SCSI ID jumpers. Jumpers 1, 2, and 7 should be removed, and jumpers 3, 4, 5, and 6 should be in place. Bottom View Terminator Power Figure 3-4. Hewlett-Packard 1-GB - HP Model 712/100 | hp 9000 series 700 model 712 service handbook (a2615-90039) - Page 46
SCSI ID 6 5 4 3 2 1 0 1 GB is Model HPC3324A 2 GB is Model HPC3325A Figure 3-5. Hewlett-Packard 1-GB and 2-GB Low Profile Drive Jumpers 3-6 Configuration - HP Model 712/100 | hp 9000 series 700 model 712 service handbook (a2615-90039) - Page 47
(Must be removed) Parity Enable Configuration 1 - Reserved 2 - LED 3 - Sync Spindle 4 - A0 5 - A1 6 - A2 SCSI 1 2 3 4 5 6 ID 6 First Drive 5 Second Drive 4 3 2 1 NOTICE: The first three jumpers (1, 2, and 3) should be removed. The SCSI ID 0 jumpers are jumpers 4, 5, and 6. Figure - HP Model 712/100 | hp 9000 series 700 model 712 service handbook (a2615-90039) - Page 48
Terminator Power Parity Enable SCSI ID 6 5 4 3 2 1 0 1 2 3 4 5 6 Figure 3-7. Seagate 1-GB and 2-GB Low Profile Disk Drive Jumpers 3-8 Configuration - HP Model 712/100 | hp 9000 series 700 model 712 service handbook (a2615-90039) - Page 49
SCSI ID 1 2 3 4 5 6 7 8 9 10 6 5 4 3 2 1 0 No Jumper Figure 3-8. Quantum 1-GB and 2-GB Low Profile Disk Drive Jumpers Configuration 3-9 - HP Model 712/100 | hp 9000 series 700 model 712 service handbook (a2615-90039) - Page 50
Terminator Resistor Modules (Must be removed) Factory-Installed Jumpers (Do not remove) First Drive SCSI ID 6 Second Drive SCSI SCSI ID 5 ID 4 SCSI ID 3 SCSI ID 2 SCSI ID 1 SCSI ID 0 ID 0 ID 1 ID 2 PARITY WPROT SPIN 0 SPIN 1 NOTICE: ID 0, ID 1, and ID 2 - HP Model 712/100 | hp 9000 series 700 model 712 service handbook (a2615-90039) - Page 51
SCSI Terminators (must be removed) Target ID 0 1 2 (Default) 3 Jumpers Target ID 4 5 6 Jumpers Figure 3-10. CD-ROM SCSI Address Jumper Settings Configuration 3-11 - HP Model 712/100 | hp 9000 series 700 model 712 service handbook (a2615-90039) - Page 52
SCSI Terminators (must be removed) Target Term ID PWR 0 Jumpers ID2 ID1 ID0 Target Term ID PWR 4 Jumpers ID2 ID1 ID0 1 5 2 6 3 (Default) Figure 3-11. DDS Tape SCSI Address Jumper Settings 3-12 Configuration - HP Model 712/100 | hp 9000 series 700 model 712 service handbook (a2615-90039) - Page 53
NOTICE: The floppy drive is not a SCSI device. The jumper must always be in the position shown. Figure 3-12. Floppy Jumper Configuration 3-13 - HP Model 712/100 | hp 9000 series 700 model 712 service handbook (a2615-90039) - Page 54
and Slot 3 for Pair 1, as shown in Figure 3-13. The model 712/100 has a third pair of connectors labeled Slot 4 and Slot 5, as second pair, which is optional, in the connectors labeled 2 and 3 (Pair 1). In the 712/100 add the third pair in the connectors labeled 4 and 5 (Pair 2). Back of System Unit - HP Model 712/100 | hp 9000 series 700 model 712 service handbook (a2615-90039) - Page 55
System Unit 01 Pair 0 23 45 Pair 1 Pair 2 Figure 3-14. Model 712/100 Memory Connectors See chapter 5 of this manual for details on installing memory modules. High Resolution Graphics The Model 712 workstation requires an optional VRAM board and the Model A2094A/B 19-inch color monitor to support - HP Model 712/100 | hp 9000 series 700 model 712 service handbook (a2615-90039) - Page 56
Setting the Monitor Type from the Boot Administration Mode Use this method to change the workstation's graphics parameters before you replace the monitor. 1. Enter the Boot Administation Mode as described in the section "Entering the Boot Administration Mode" in Chapter 4. 2. Enter the following - HP Model 712/100 | hp 9000 series 700 model 712 service handbook (a2615-90039) - Page 57
when power is first applied, then flash again when the keyboard is initialized. Press the Tab key after the LEDs flash the second time. The system will query you for the new monitor type, similar to the following: Type ---- 2 Resolution ---------- 1024x768 Frequency --------- 70Hz Press - HP Model 712/100 | hp 9000 series 700 model 712 service handbook (a2615-90039) - Page 58
Press to save this monitor type. If you don't select the monitor type that's displayed, the system will cycle through the other monitor types, some of which the monitor won't display. Wait for the workstation to display the correct monitor type again, then select it. NOTICES: Some multisync - HP Model 712/100 | hp 9000 series 700 model 712 service handbook (a2615-90039) - Page 59
For:root Printed on:Wed, Sep 4, 1996 13:51:02 From book:sh_a2615_90617 Document:chap_4 Last saved on:Fri, Jun 2, 1995 08:24:06 - HP Model 712/100 | hp 9000 series 700 model 712 service handbook (a2615-90039) - Page 60
, and the SupportWave online tests, which we describe in this chapter. To troubleshoot the Model 712 workstation, first check that the power LED on the front of the system unit comes on. If the LED doesn't light, follow the instructions in the flowchart in Figure 4-1. If the LED comes on, follow the - HP Model 712/100 | hp 9000 series 700 model 712 service handbook (a2615-90039) - Page 61
System Unit to a Live ac Outlet. No System Unit Plugged In? Yes Check ac Outlet Power: D 90-132 V ac for 100/120 V Environments D 198-264 V ac for 220/240 V Environments Replace: 1. Power Supply Board 2. Fan No Is Fan Running? Yes Replace LED. Figure 4-1. LED Not Lit 4-2 Troubleshooting - HP Model 712/100 | hp 9000 series 700 model 712 service handbook (a2615-90039) - Page 62
? No Yes Problems Accessing Boot Device? No Failing FRU Yes Identified? No Run ODE Diagnostics. See Section "Running ODE-Based Diagnostics." Replace FRU as Described in Chapter 5. Failing FRU Yes Identified? No Call HP Support. Figure 4-2. Troubleshooting the Model 712 Troubleshooting 4-3 - HP Model 712/100 | hp 9000 series 700 model 712 service handbook (a2615-90039) - Page 63
the Precision Architecture RISC HP Apollo 9000 Series 700 Diagnostics Manual. Identifying LED-Indicated Conditions If your monitor remains blank when you power on your workstation, your system unit's power LED may flash to indicate an error condition: D A 3/4-second flash indicates the CPU board - HP Model 712/100 | hp 9000 series 700 model 712 service handbook (a2615-90039) - Page 64
2 While Architected Main Memory space is from 0x00000000 through 0xEFFFFFFF, the Model 712 can only use up to 128 MB (192 MB for the 712/100). With this limitation any memory address from 0x10000000 (0X14000000 for the 712/100) through 0xEFFFFFFF is invalid, and, if given in the System Responder - HP Model 712/100 | hp 9000 series 700 model 712 service handbook (a2615-90039) - Page 65
: D The SIMM pair sizes and their locations (for example, 16 MB SIMMs in Pair 1 and 8 MB SIMMs in Pair 0) D The total memory size in HEX 4-6 Troubleshooting - HP Model 712/100 | hp 9000 series 700 model 712 service handbook (a2615-90039) - Page 66
total for pair = 0x01FFFFFF 8 MB SIMMs = 16 MB total for pair = 0x00FFFFFF The SIMM address ranges are: Pair 1: Pair 0: Addresses 0x00000000 - 0x01FFFFFF Addresses 0x02000000 - 0x02FFFFFF Troubleshooting 4-7 - HP Model 712/100 | hp 9000 series 700 model 712 service handbook (a2615-90039) - Page 67
shown on the monitor. Replace the faulty SIMM. Otherwise, replace the SIMM pair identified in this procedure. Return the system state (e.g., FASTBOOT) to original condition. 4-8 Troubleshooting - HP Model 712/100 | hp 9000 series 700 model 712 service handbook (a2615-90039) - Page 68
Parity Error An HPMC interruption is forced when a data parity error is detected during a Load instruction to the memory address space or during a data cache flush operation. Examine the 12 words listed module detected a (data) cache parity error. Replace the Motherboard. Troubleshooting 4-9 - HP Model 712/100 | hp 9000 series 700 model 712 service handbook (a2615-90039) - Page 69
manually. To boot a device manually, follow these steps: 1. Turn off the power to your workstation for a few seconds. 2. Turn the power back on. The monitor displays the following screen: BootRom Version xxx.x Memory Size: xx MB (c) Copyright 1990-1993, Hewlett-Packard media. 4-10 Troubleshooting - HP Model 712/100 | hp 9000 series 700 model 712 service handbook (a2615-90039) - Page 70
something wrong with the file system or with the hardware. If you suspect a file system failure, see the manual Using HP-UX for help on dealing with file system failures. If you think that something is wrong with the hardware, contact your designated service representative. Troubleshooting 4-11 - HP Model 712/100 | hp 9000 series 700 model 712 service handbook (a2615-90039) - Page 71
failing FRU through the Self Test graphical display. When you power on the Model 712 workstation, the system runs a series of diagnostic tests, called Self Test , the system displays a second screen depicting an overview of the system unit components, similar to the following: 4-12 Troubleshooting - HP Model 712/100 | hp 9000 series 700 model 712 service handbook (a2615-90039) - Page 72
calls out the defective component. Go to Chapter 5 for instructions about replacing the failed FRU. If the self test fails to identify a failed FRU, and you still suspect a problem, run system verification tests, as described in the "Running System Verification Tests" section. Troubleshooting 4-13 - HP Model 712/100 | hp 9000 series 700 model 712 service handbook (a2615-90039) - Page 73
****** Part Number xxxxx-xxxxx ****** ****** ****** ****** (C) Copyright Hewlett Packard Co. xxxx ****** ****** All Rights Reserved ****** ****** ****** Please Wait. System mapping in progress . . . Please type HELP or ? to list available commands. CSTM> 4-14 Troubleshooting - HP Model 712/100 | hp 9000 series 700 model 712 service handbook (a2615-90039) - Page 74
>Verification of (CPU) has completed. 5. Type Enter to return to the CSTM> prompt after all test results are reported. 6. To exit the Support Tools Manager, enter the following: CSTM> exit Enter If any tests failed, run Self Test and ISL diagnostics to isolate the problem. Troubleshooting 4-15 - HP Model 712/100 | hp 9000 series 700 model 712 service handbook (a2615-90039) - Page 75
SCSI interface, LAN interface logic, parallel interface, audio, RS-232, PS/2 keyboard and mouse interface, real time clock, and the PC floppy interface and drive. D ldiag - tests and verifies the basic functionality of the PCX prompt or at the prompt of one of the test modules. 4-16 Troubleshooting - HP Model 712/100 | hp 9000 series 700 model 712 service handbook (a2615-90039) - Page 76
For:root Printed on:Wed, Sep 4, 1996 13:52:01 From book:sh_a2615_90617 Document:chap_5.new Last saved on:Fri, Jun 23, 1995 10:30:27 - HP Model 712/100 | hp 9000 series 700 model 712 service handbook (a2615-90039) - Page 77
This chapter lists the Model 712 Field Replaceable Units (FRUs) and provides procedures for their removal and replacement. Use the following tools for FRU removal and replacement: a replacement FRU. Do not return FRUs with nonexchange part numbers. You may discard them. Field Replaceable Units 5-1 - HP Model 712/100 | hp 9000 series 700 model 712 service handbook (a2615-90039) - Page 78
FRUs Refer to Figure 5-1 for an illustrated parts breakdown of the system unit. Table 5-1 lists the exchange FRU assemblies for the Model 712, Table 5-2 lists the nonexchange FRU assemblies, and Table 5-3 lists the optional I/O expansion boards. The numbered callouts in Figure 5-1 correspond to the - HP Model 712/100 | hp 9000 series 700 model 712 service handbook (a2615-90039) - Page 79
Table 6-1. System Unit Exchange Assemblies Exchange No. Part Number 10 A2263-69510 10 A2263-69511 10 A2263-69515 9 A2577-69001 A2578-69001 A2576-69001 A2575-69001 18 A2615-69001 18 A2084-69001 18 A4022-69009 19 A2084-69002 Description CPU 60 MHz CPU 80 MHz CPU 100 MHz 4-MB Simm 8-MB Simm 16-MB - HP Model 712/100 | hp 9000 series 700 model 712 service handbook (a2615-90039) - Page 80
Table 6-2. System Unit Nonexchange Assemblies No. Part Number Description 17 0950-2377 18 Filler Bezel Floppy Bezel Floppy Cable Floppy EMI Shield Hard Disk 1/2 Hi HP PAC Hard Disk Bracket Hard Disk Full Hi HP PAC HP PAC (Bottom) HP PAC (Floppy) Keyboard LED Cable Assembly Mouse Power Supply (70 - HP Model 712/100 | hp 9000 series 700 model 712 service handbook (a2615-90039) - Page 81
5-4 lists part numbers for the system monitors. Table 5-5 lists model numbers for the keyboards and mouse. Table 6-4. Monitors Part Number Description 19" (Southern Hemisphere) n Table 6-5. Keyboard and Mouse Model Numbers Model Number Description A2840A #xx* Keyboard A2839A Mouse * xx - HP Model 712/100 | hp 9000 series 700 model 712 service handbook (a2615-90039) - Page 82
Unit FRUs This section provides illustrated parts breakdowns and FRU listings for the C2963/64A, C1530B/C2954A and C2943A external storage units. NOTICE.: The A2655A, A2656A, and A2657A have been replaced with the C2963/64A,C1530B/C2954A and C2943A external storage units. 5-6 Field Replaceable Units - HP Model 712/100 | hp 9000 series 700 model 712 service handbook (a2615-90039) - Page 83
Hard Disk Drive (A2963/64A) The numbered callouts in Figure 5-2 correspond to the numbered FRUs in Table 5-6 and Table 5-7. 10 6 5 2 3 7 4 8 9 10 13 12 11 14 Figure 6-2. External Hard Disk Illustrated Parts Breakdown Field Replaceable Units 5-7 - HP Model 712/100 | hp 9000 series 700 model 712 service handbook (a2615-90039) - Page 84
10 A2657-62007 14 20876 13 A2656-40014 12 A2655-40021 * C2908A * C2904A * Not shown Description Power Board DAT/Disk HP PAC Bottom Disk HP PAC Top Rubber Foot Power Button Plunger Fan/LED Cable SCSI Ribbon Cable Chassis Assembly with Top Cover, Disk External Power Module Stand Plastic Foot SCSI - HP Model 712/100 | hp 9000 series 700 model 712 service handbook (a2615-90039) - Page 85
DDS-Format Tape Drive (C1530B/C2954A) The numbered callouts in Figure 5-3 correspond to the numbered FRUs in Table 5-8 and Table 5-9. 10 6 5 2 3 74 8 9 10 11 13 12 14 Figure 6-3. External DDS Tape Illustrated Parts Breakdown Field Replaceable Units 5-9 - HP Model 712/100 | hp 9000 series 700 model 712 service handbook (a2615-90039) - Page 86
10 A2656-62006 14 20876 13 A2656-40014 12 A2655-40021 * C2908A * C2904A * Not shown Description Power Board DAT/Disk HP PAC Bottom DAT HP PAC Top Rubber Foot Power Button Plunger Fan/LED Cable SCSI Ribbon Cable Chassis Assembly DAT with DAT Cover External Power Module Pedestal Plastic Foot SCSI - HP Model 712/100 | hp 9000 series 700 model 712 service handbook (a2615-90039) - Page 87
CD-ROM Drive (C2943A) The numbered callouts in Figure 5-4 correspond to the numbered FRUs in Table 5-11. 2 4 3 11 8 10 5 7 6 9 11 12 14 13 15 Field Replaceable Units 5-11 - HP Model 712/100 | hp 9000 series 700 model 712 service handbook (a2615-90039) - Page 88
C2908A * C2904A Description Power Board CD-ROM HP PAC Bottom Rubber Foot White Power Button Plunger Fan/LED Cable SCSI Ribbon Cable Chassis Assembly CD-ROM with CDROM Cover CD Audio Cable External Power Module Stand Plastic Foot SCSI Cable SCSI Terminator * Not shown 5-12 Field Replaceable Units - HP Model 712/100 | hp 9000 series 700 model 712 service handbook (a2615-90039) - Page 89
Replacement The procedures in this section illustrate how to remove system unit FRUs. Observe any notices and prerequisites for removing a FRU. , the monitor, and any peripheral devices. 12. Unplug the system unit power cord and the power cord of any peripheral devices from ac wall outlets. 13. - HP Model 712/100 | hp 9000 series 700 model 712 service handbook (a2615-90039) - Page 90
Stand Tilt up the front of the system unit and lift it out of the stand, as shown in Figure 5-5. Figure 6-5. Removing the System Unit from the Stand 5-14 Field Replaceable Units - HP Model 712/100 | hp 9000 series 700 model 712 service handbook (a2615-90039) - Page 91
for proper air flow for system cooling. Perform the following steps to open the system unit: 1. Lay the system unit on a flat surface, such as a table top. 2. Attach the static-grounding wrist strap by following the instructions on the package. Attach the the sticky end of the wrist strap to bare - HP Model 712/100 | hp 9000 series 700 model 712 service handbook (a2615-90039) - Page 92
Memory Board Removal Before removing memory boards, perform the following tasks: D Remove the stand. D Open the system unit. In the 712/100 ther are 6 memory slots (3 pairs.) Figure 5-7 shows the memory board locations. Figure 5-8 shows how to remove the memory boards. Perform the following steps to - HP Model 712/100 | hp 9000 series 700 model 712 service handbook (a2615-90039) - Page 93
2. Push the two slot clips out and tilt the top of the memory board toward the back of the system unit, as shown in Figure 5-8. Lift the board from the connector, and place it on a static-free surface. Figure 6-8. Removing Memory Boards 3. Go to the following - HP Model 712/100 | hp 9000 series 700 model 712 service handbook (a2615-90039) - Page 94
Memory Board Installation Before replacing memory boards, perform the following procedures: D Remove the stand. D Open the system unit. In the 712/100 ther are 6 memory slots (3 pairs.) Refer to Chapter 3 for information about memory board configurations. Angle the board with the top edge tilted - HP Model 712/100 | hp 9000 series 700 model 712 service handbook (a2615-90039) - Page 95
VRAM (Video RAM) Before removing the VRAM, perform the following procedures: D Remove the stand. D Open the system unit. Grasp the VRAM board firmly at both ends and pull it straight up, as shown in Figure 5-10. Figure 6-10. Removing the VRAM Board Field Replaceable Units 5-19 - HP Model 712/100 | hp 9000 series 700 model 712 service handbook (a2615-90039) - Page 96
Option Board Before removing the TeleShare board, perform the following procedures: D Remove the stand D Open the system unit Perform the following steps to remove the TeleShare board: 1. Disconnect any cables from the board. 2. Grasp the board firmly at both ends and pull it straight up, as shown - HP Model 712/100 | hp 9000 series 700 model 712 service handbook (a2615-90039) - Page 97
Boards Before removing an optional I/O expansion board, perform the following procedures: D Remove the stand D Open the system unit Perform the following steps to remove the board: 1. Disconnect the cable from the board. 2. Grasp the expansion board firmly at both ends and pull it straight up, as - HP Model 712/100 | hp 9000 series 700 model 712 service handbook (a2615-90039) - Page 98
procedures: D Remove the stand. D Open the system unit. Remove the battery as shown in Figure 5-13. WARNING disassemble them. Replace battery only with Matsushita Electric BR-2325 three-volt lithium battery (HP part number 1420-0314)! Use of any other battery may cause fire or explosion. Fsf - HP Model 712/100 | hp 9000 series 700 model 712 service handbook (a2615-90039) - Page 99
model number to find out the LANIC IDs. D Remove the stand and open the system unit. D Remove the memory boards, and all of the other boards from the CPU board. D Disconnect the cables 0.5 Pozidrive, Pan Head Screw w/Patchlock HP Part # 0515-0408 Figure 6-14. Removing the CPU Board Field Replaceable - HP Model 712/100 | hp 9000 series 700 model 712 service handbook (a2615-90039) - Page 100
that the CPU board solves the problem, reboot the workstation and continue to Substep b. b. Enter the workstation's two LANIC IDs when prompted by the system. The LANIC IDs shown on the PROM label are 5-digit numbers, for example 96354 and 96355. (The second ID is always one number larger than - HP Model 712/100 | hp 9000 series 700 model 712 service handbook (a2615-90039) - Page 101
floppy disk drive, perform the following procedures: D Remove the stand. D Open the system unit. Perform the following steps to remove the floppy disk drive: 1. Disconnect the two cables from the floppy drive. 2. Remove the HP PAC from the top of the floppy drive, as shown in Figure 5-15. 3. Lift - HP Model 712/100 | hp 9000 series 700 model 712 service handbook (a2615-90039) - Page 102
Disk Before removing the hard disk, perform the following procedures: D Remove the stand. D Open the system unit. Perform the following steps to remove the disk drive: 1. Disconnect the SCSI and power cables from the hard disk. 2. Remove the disk retaining bracket by lifting the end closest to the - HP Model 712/100 | hp 9000 series 700 model 712 service handbook (a2615-90039) - Page 103
3. Remove the HP PAC from the top of the disk drive, as shown in Figure 5-17. 4. Lift the drive straight up, as shown in Figure 5-17. Figure 6-17. Removing the Hard Disk 5. Check the SCSI ID and any other jumper settings on the replacement drive, as shown in Chapter 3. Field Replaceable Units 5-27 - HP Model 712/100 | hp 9000 series 700 model 712 service handbook (a2615-90039) - Page 104
Speaker Before removing the speaker, perform the following steps: D Remove the stand. D Open the system unit. Disconnect the speaker cable from the CPU board and lift out the speaker, as shown in Figure 5-18. Figure 6-18. Removing the Speaker 5-28 Field Replaceable Units - HP Model 712/100 | hp 9000 series 700 model 712 service handbook (a2615-90039) - Page 105
Power Supply Cover Before removing the power supply cover, perform the following procedures: D Remove the stand. D Open the system unit. D Remove the speaker. WARNING: Do not turn on the workstation with the power supply cover removed. Perform the following steps to remove the power supply - HP Model 712/100 | hp 9000 series 700 model 712 service handbook (a2615-90039) - Page 106
5-20. Figure 6-20. Removing the Fan from the Power Supply Cover CAUTION: To prevent damage to the ac power cable, make sure the cable is secured between the side of the system unit chassis and the tabs on the bottom of the system unit before you replace the power supply cover. 5-30 Field Replaceable - HP Model 712/100 | hp 9000 series 700 model 712 service handbook (a2615-90039) - Page 107
the following procedures: D Remove the stand. D Open the system unit. D If present, remove the hard disk and floppy drives. D Remove the power supply cover. Lift the HP PAC from the system unit, as shown in Figure 5-21. Note how the fan cable connects to the CPU board, then snakes under four hold - HP Model 712/100 | hp 9000 series 700 model 712 service handbook (a2615-90039) - Page 108
following steps: D Remove the stand D Open the system unit D Remove the power supply cover Perform the following steps to remove the power supply: 1. Disconnect all power supply connectors and cables, as shown in Figure 5-22. ac Power Cable Floppy Connector Hard Disk Connector CPU Board Connector - HP Model 712/100 | hp 9000 series 700 model 712 service handbook (a2615-90039) - Page 109
power supply button to the power switch on the new power supply after you install the power supply into the system unit. CAUTION: To prevent damage to the ac power cable, make sure the cable is secured between the side of the system unit chassis and the tabs on the bottom of the system - HP Model 712/100 | hp 9000 series 700 model 712 service handbook (a2615-90039) - Page 110
Power Supply Button Before removing the power supply button, perform the following steps: D Remove the stand D Open the system unit D Remove the power supply cover D Remove the power supply Pull the power supply button straight out until it disengages from the power switch, as shown - HP Model 712/100 | hp 9000 series 700 model 712 service handbook (a2615-90039) - Page 111
LED Cable Assembly Before removing the cable assembly, perform the following procedures: D Remove the stand. D Open the system unit. D Remove the power supply cover. D Remove the power supply. From the front of the system unit, push in the LED until it disengages from the chassis. Field Replaceable - HP Model 712/100 | hp 9000 series 700 model 712 service handbook (a2615-90039) - Page 112
the following illustrations correspond to step numbers in the associated procedure. Before performing the following procedures, observe the following precautions: D Power off the system, the monitor, and any peripheral devices. D Unplug the system unit power cord and the power cord of all external - HP Model 712/100 | hp 9000 series 700 model 712 service handbook (a2615-90039) - Page 113
Hard Disk (C2963/64A) Refer to Figure 5-24 for an illustration of each FRU. The number identifiers in Figure 5-24 correspond to the step numbers in the following FRU removal procedure. 1 6 5 2 3 7 4 8 9 Figure 6-24. External Disk Drive Field Replaceable Units 5-37 - HP Model 712/100 | hp 9000 series 700 model 712 service handbook (a2615-90039) - Page 114
off (see Figure 5-25). Figure 6-25. Removing the Cover (C2763/64A Disk) 2. Lift out the top HP PAC. 3. Remove the drive. Lift the rear of the drive slightly and disconnect the power and SCSI cables. Lift the drive from the chassis. NOTICE: When replacing the drive, make sure the jumpers are set - HP Model 712/100 | hp 9000 series 700 model 712 service handbook (a2615-90039) - Page 115
cable connector to disconnect it from the power supply. From the front of the unit, push in the LED until it disengages from the chassis. Tilt the top of the fan toward the front of the unit arrow on its side points toward the rear of the unit. Figure 6-26. Removing the Fan/LED Assembly (C2963/64A - HP Model 712/100 | hp 9000 series 700 model 712 service handbook (a2615-90039) - Page 116
until it disengages from the grounding clip. WARNING: Use only power supply Model ETYHP127MM with the A2657A /C2963/64A Hard Disk Drive. 8. Remove the bottom HP PAC. 9. Remove the SCSI ribbon cable. From the back of the unit, use a small flat-blade screwdriver to remove the four screws that hold - HP Model 712/100 | hp 9000 series 700 model 712 service handbook (a2615-90039) - Page 117
DDS-Format Tape (C1530B/C2954A) Refer to Figure 5-27 for an illustration of each FRU. The number identifiers in Figure 5-27 correspond to the step numbers in the following FRU removal procedure. 1 6 5 2 3 7 4 8 9 Figure 6-27. External DDS-Format Tape Drive Field Replaceable Units 5-41 - HP Model 712/100 | hp 9000 series 700 model 712 service handbook (a2615-90039) - Page 118
see Figure 5-28). Figure 6-28. Removing the Cover (C1530B/C2954A Tape Drive) 2. Lift out the top HP PAC. 3. Remove the drive. Lift the rear of the drive slightly and disconnect the power and SCSI cables. Lift the drive from the chassis. NOTICE: When replacing the drive, make sure the jumpers are set - HP Model 712/100 | hp 9000 series 700 model 712 service handbook (a2615-90039) - Page 119
cable connector to disconnect it from the power supply. From the front of the unit, push in the LED until it disengages from the chassis. Tilt the top of the fan toward the front of the unit arrow on its side points toward the rear of the unit. Figure 6-29. Removing the Fan/LED Assembly (C1530B/ - HP Model 712/100 | hp 9000 series 700 model 712 service handbook (a2615-90039) - Page 120
until it disengages from the grounding clip. WARNING: Use only power supply Model ETYHP127MM with the A2656A/C1530B/C2954A DDS Tape Drive. 8. Remove the bottom HP PAC. 9. Remove the SCSI ribbon cable. From the back of the unit, use a small flat-blade screwdriver to remove the four screws that hold - HP Model 712/100 | hp 9000 series 700 model 712 service handbook (a2615-90039) - Page 121
CD-ROM Drive (C2943A) Refer to Figure 5-30 for an illustration of each FRU. The number identifiers in Figure 5-30 correspond to the step numbers in the following FRU removal procedure. 2 4 3 1 8 5 6 9 10 7 Figure 6-30. External CD-ROM Drive Field Replaceable Units 5-45 - HP Model 712/100 | hp 9000 series 700 model 712 service handbook (a2615-90039) - Page 122
off (see Figure 5-31). Figure 6-31. Removing the Cover (C2943A CD-ROM) 2. Lift out the top HP PAC. 3. Remove the drive. Lift the rear of the drive slightly and disconnect the power, SCSI, and audio cables. Lift the drive from the chassis. NOTICE: When replacing the drive, make sure the jumpers are - HP Model 712/100 | hp 9000 series 700 model 712 service handbook (a2615-90039) - Page 123
cable connector to disconnect it from the power supply. From the front of the unit, push in the LED until it disengages from the chassis. Tilt the top of the fan toward the front of the unit arrow on its side points toward the rear of the unit. Figure 6-32. Removing the Fan/LED Assembly (C2943A CD - HP Model 712/100 | hp 9000 series 700 model 712 service handbook (a2615-90039) - Page 124
until it disengages from the grounding clip. WARNING: Use only power supply Model ETYHP127MM with the A2655A/C2943A CD-ROM Drive. 8. Lift out the bottom HP PAC. 9. Remove the SCSI ribbon cable. From the back of the unit, use a small flat-blade screwdriver to remove the four screws that hold the SCSI - HP Model 712/100 | hp 9000 series 700 model 712 service handbook (a2615-90039) - Page 125
For:root Printed on:Wed, Sep 4, 1996 13:52:49 From book:sh_a2615_90617 Document:chap_6 Last saved on:Thu, May 25, 1995 09:40:36 - HP Model 712/100 | hp 9000 series 700 model 712 service handbook (a2615-90039) - Page 126
Diagrams 7 This chapter provides functional information about the system. System Power Figure 7-1 shows the system power distribution. Power Supply +5 V SCSI +12Vdc +5 Vdc Ground +3.3 Vdc External SCSI Port Memory CPU Board TeleShare & I/O Board Slots Fan Hard Disk Floppy Drive Figure - HP Model 712/100 | hp 9000 series 700 model 712 service handbook (a2615-90039) - Page 127
The power supply distributes power through the following connectors: CPU Board Connector (11-pin) Floppy Drive Connector (2-pin) Hard Disk Drive Connector (4-pin) Fan Connector on CPU board (2-pin) Table 7-1 lists the pinouts for the power supply connector to the CPU board: Table 7-1. CPU Board - HP Model 712/100 | hp 9000 series 700 model 712 service handbook (a2615-90039) - Page 128
Table 7-3 lists the pinouts for hard disk drive power: Table 7-3. Hard Disk Drive Power Pinouts Pin Number 1 2 3 4 Description +12V GROUND GROUND +5V Wire Color red black black orange Table 7-4 lists the pinouts for fan power: Table 7-4. Fan Power Pinouts Pin Number 1 2 Description +12V - HP Model 712/100 | hp 9000 series 700 model 712 service handbook (a2615-90039) - Page 129
System Block Diagram Figure 7-2 shows the system unit block diagram. CPU PBUS 32 32 32 Instruction & Data Cache Memory Memory 72 Control I/O Control Token Ring IBM Token Ring GSC System Connection SCSI-2 Bus 8 DDS-Format Tape Drive CD-ROM Drive Winchester - HP Model 712/100 | hp 9000 series 700 model 712 service handbook (a2615-90039) - Page 130
For:root Printed on:Wed, Sep 4, 1996 13:52:51 From book:sh_a2615_90617 Document:chap_7 Last saved on:Wed, May 31, 1995 09:48:34 - HP Model 712/100 | hp 9000 series 700 model 712 service handbook (a2615-90039) - Page 131
Hardware Installation Guide Model 712 Service Manuals 09740-90041 B2355-90040 5960-1511 Precision Architecture RISC: HP Apollo 9000 Series 700 Diagnostic Manual System Administration Tasks Manual HP Apollo 9000 Series 700 Servicing Hewlett-Packard Workstation Monitors Reference Manuals A2615 - HP Model 712/100 | hp 9000 series 700 model 712 service handbook (a2615-90039) - Page 132
For:root Printed on:Wed, Sep 4, 1996 13:52:53 From book:sh_a2615_90617 Document:chap_8 Last saved on:Thu, May 25, 1995 09:40:41 - HP Model 712/100 | hp 9000 series 700 model 712 service handbook (a2615-90039) - Page 133
For:root Printed on:Wed, Sep 4, 1996 13:52:59 From book:sh_a2615_90617 Document:chap_9 Last saved on:Thu, May 25, 1995 09:40:41 - HP Model 712/100 | hp 9000 series 700 model 712 service handbook (a2615-90039) - Page 134
For:root Printed on:Wed, Sep 4, 1996 13:53:01 From book:sh_a2615_90617 Document:index-Real Last saved on:Thu, May 25, 1995 09:40:21 - HP Model 712/100 | hp 9000 series 700 model 712 service handbook (a2615-90039) - Page 135
pim command, 9-2 reset command, 9-3 search command, 9-3 secure command, 9-3 Boot failure, 4-10-4-16 C CD-ROM drive, removal and replacement, external storage unit, 5-45 Configurations FRU, 3-1-3-12 mass storage, 3-1-3-18 memory, 3-14-3-18 workstation, 3-1-3-12 Connectors monitor, 1-8-1-16 system - HP Model 712/100 | hp 9000 series 700 model 712 service handbook (a2615-90039) - Page 136
power distribution, 6-1 system unit functions, 6-4 Documentation installation manual, 7-1 reference manuals, 7-1 service manuals, 7-1 E Environmental specifications, 2-1 Exchange part numbers, 5-1 exit command, SupportWave, 4-15 Expansion board connectors, 1-7 External storage unit FRUs CD-ROM drive - HP Model 712/100 | hp 9000 series 700 model 712 service handbook (a2615-90039) - Page 137
K Keyboard connector, 1-7 Keyboard model numbers, 5-5 Keyboards key equivalents, 1-14-1-15 PC and ITF, 1-13 L LED cable assembly, removal and replacement, system unit, 5-35 LED-indicated conditions, 4-4 LEDs, system unit, 1-3, 1-4 M Manuals installation, 7-1 reference, 7-1 service, 7-1 Mass storage - HP Model 712/100 | hp 9000 series 700 model 712 service handbook (a2615-90039) - Page 138
model manuals, 2-2, 7-1 Regulatory requirements, 2-2 Removal and replacement, ex- ternal storage devices, 5-36 RS-232 connector, 1-6 pinout, 1-6 S SCSI connector, 1-6 SCSI devices default SCSI IDs, 3-1 terminators, 3-1 SCSI IDs, jumpers CD-ROM drive, 3-11 DDS-format tape drive, 3-12 Hewlett-Packard - HP Model 712/100 | hp 9000 series 700 model 712 service handbook (a2615-90039) - Page 139
exit, 4-15 verify, 4-15 T TeleShare board, removal and replacement, system unit, 5-20 TeleShare connectors, 1-7 Terminators, 3-1 Tools required for service, 5-1 Top cover, removal and re- placement, system unit, 5-15 Troubleshooting, 4-1 boot failure, 4-10-4-16 HPMC error, 4-4-4-16 ISL environment
-
 1
1 -
 2
2 -
 3
3 -
 4
4 -
 5
5 -
 6
6 -
 7
7 -
8
-
9
-
10
-
11
-
12
-
13
-
14
-
15
-
16
-
17
-
18
-
19
-
20
-
21
-
22
-
23
-
24
-
25
-
26
-
27
-
28
-
29
-
30
-
31
-
32
-
33
-
34
-
35
-
36
-
37
-
38
-
39
-
40
-
41
-
42
-
43
-
44
-
45
-
46
-
47
-
48
-
49
-
50
-
51
-
52
-
53
-
54
-
55
-
56
-
57
-
58
-
59
-
60
-
61
-
62
-
63
-
64
-
65
-
66
-
67
-
68
-
69
-
70
-
71
-
72
-
73
-
74
-
75
-
76
-
77
-
78
-
79
-
80
-
81
-
82
-
83
-
84
-
85
-
86
-
87
-
88
-
89
-
90
-
91
-
92
-
93
-
94
-
95
-
96
-
97
-
98
-
99
-
100
-
101
-
102
-
103
-
104
-
105
-
106
-
107
-
108
-
109
-
110
-
111
-
112
-
113
-
114
-
115
-
116
-
117
-
118
-
119
-
120
-
121
-
122
-
123
-
124
-
125
-
126
-
127
-
128
-
129
-
130
-
131
-
132
-
133
-
134
-
135
-
136
-
137
-
138
-
139
 |
 |

For:root
Printed on:Wed, Sep 4, 1996 13:50:18
From book:sh_a2615_90617
Document:frtmtr
Last saved on:Tue, Jul 25, 1995 07:29:04