HP Officejet Pro X476 HP Officejet X Series - Software Technical Reference - Page 50
HP EasyColor, Dry Time, Saturation, Black Ink Spread, Ink Settings, Print Color as Gray
 |
View all HP Officejet Pro X476 manuals
Add to My Manuals
Save this manual to your list of manuals |
Page 50 highlights
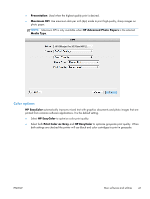
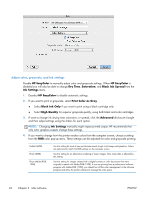
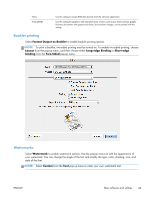
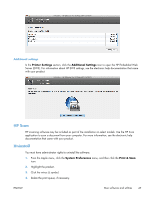
Adjust color, grayscale, and ink settings Disable HP EasyColor to manually adjust color and grayscale settings. When HP EasyColor is disabled you will also be able to change Dry Time, Saturation, and Black Ink Spread from the Ink Settings menu. 1. Deselect HP EasyColor to disable automatic settings. 2. If you want to print in grayscale, select Print Color as Gray. ● Select Black Ink Only if you want to print using a black cartridge only. ● Select High Quality for superior grayscale quality, using both black and color cartridges. 3. If want to change ink drying time, saturation, or spread, click the Advanced disclosure triangle and then adjust settings using the sliders for each option. NOTE: Changing Ink Settings manually might impact printed output. HP recommends that only color graphics experts change these settings. 4. If you want to change how the printer renders colors from the computer screen, choose a setting from the RGB color pop-up menu. These settings can be adjusted for color and grayscale printing. Default (sRGB) Photo (sRGB) Photo (Adobe RGB 1998) Use this setting for most of your printed documents to get vivid images and graphics. Colors are optimized to match the RGB settings on the computer screen. Use this setting for an alternative rendering of raster images. Only raster data is affected by this setting. Use this setting for images created with a digital camera or color documents that were originally created with Adobe RGB (1998). If you are printing from a professional software program with Adobe RGB (1998), you should turn off the color management in the software program and allow the printer software to manage the color space. 42 Chapter 3 Mac software ENWW
-
 1
1 -
2
-
3
-
4
-
5
-
6
-
7
-
8
-
9
-
10
-
11
-
12
-
13
-
14
-
15
-
16
-
17
-
18
-
19
-
20
-
21
-
22
-
23
-
24
-
25
-
26
-
27
-
28
-
29
-
30
-
31
-
32
-
33
-
34
-
35
-
36
-
37
-
38
-
39
-
40
-
41
-
42
-
43
-
44
-
 45
45 -
 46
46 -
 47
47 -
 48
48 -
 49
49 -
 50
50 -
 51
51 -
 52
52 -
 53
53 -
 54
54 -
 55
55 -
56
-
57
-
58
-
59
-
60
-
61
-
62
-
63
-
64
-
65
-
66
-
67
-
68
-
69
-
70
 |
 |
